

If you do not read any further, the most important tip for scroll sawing accurately for Intarsia is CHANGE YOUR BLADES OFTEN.
If the thought crosses your mind "is the blade getting dull, should I change it?" you should change it. Perhaps subconsciously you realize you are pushing too hard. The cost of the blade is not worth the frustration not to mention if you have to scrap some expensive wood.
 Tension: Use this link to hear that high "C" note. Ready to pluck your scroll saw blade? Listen to the sounds of scroll saw blade from too loose, just right, way too tight. It's very helpful to learn the sound of a properly tensioned scroll saw blade. Music for scrollers!
Sawing: Make sure your blade is cutting square. Check the table/blade to make sure it is square. Next make a test cut, cut a curve then check it with a square. The curve makes it easier to see any light between the square and the cut part.
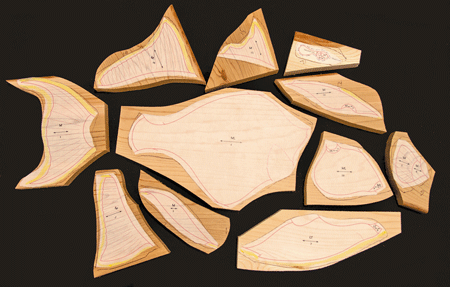
Cut the pieces about the size of your hand, this will make it much easier to handle than one large board. After cutting the hand size pieces be sure to turn them over to remove any tear out with sandpaper. The object is to keep the parts as flat as possible to ensure a square cut.
After all the parts have been laid out it is time to start sawing. If you used the same board (color) to layout many parts, start by rough cutting them into smaller more manageable sections.
Start cutting the easiest parts first, like the outside edges. This lets you get into the swing of things. Cut some of the outside edges; parts that do not have another part next to it. I like to mark all exterior parts with a highlighter. While sawing, stop often after making a cut and remove any tear-out on the bottom side. While you're at it check your cuts with a square.

Plan your cuts: Try to make your cuts so the last cut will “drop” the part off the larger block.
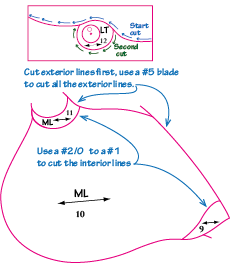
Note the extra part added to the left of the eye. The last cut is a short smooth line. Drill any holes before you start sawing, like the hole for the eye.

Where to Put the Blade?
When cutting a part it is best to put the center of the blade in the center of the layout line, thus removing all of the line. With more experience the goal is to leave half of the pattern line around the parts. If you are using a larger blade you will need to move the blade a little more to the outside of the line.
 Hand Placement: While scrolling, your hands are in control of the part. The blade is in control of the sawing. You will find that by positioning and repositioning your hands as the need arises you will be in control of your wood. Always remember to have at least one hand holding the wood down firmly on the table at all times.
Your hands will be in motion, always setting up for the next curve or turn on your pattern. Think ahead and plan your cuts.
Posture: Sit square in front of the saw making sure you are sitting at an appropriate height, so you can look down at the entire part you are cutting.
If you sit too low and are looking across the part it makes it harder to see what's coming up.
Sometimes you may find you're turning your body to allow movement of the wood, stop and reposition yourself so you are sitting straight in front of the blade.
Breath: Remember to keep breathing (I know that sounds silly). Sometimes when you cut an intricate part you tense up and hold your breath. This can make it even harder to cut smoothly. Make sure you are comfortable and take breaks as needed.
Speed: The speed (strokes per minute) we use varies from time to time depending on the material that is being cut. The main thing to remember is “control”. Intarsia requires accurate cutting, so you might want to experiment with your speed so you can get the best control. We found running the saw about 80% of the speed range on a variable speed saw works great.
Feed Rate: If you push the wood into the blade you will get a rougher cut than if you slow down and let the blade cut the wood. If you push too hard it can make your cause parts to be "out of square".
 Cutting Corners: There are different ways to cut a sharp corner (or point) it will take two cuts. You cannot quickly turn the wood, even with a small blade, to cut a sharp corner. Cut to the corner, then back up the wood, start cutting again leaving a portion of the wood. Once you cut the waste wood away, turn the part around and make the second cut to remove the small portions of waste wood.
 A magnifier really helps to see the lines. A foot switch is a good safety device. If a blade breaks or you need to stop you can easily lift your foot and stop the saw immediately.
Check for Fit: When all the parts have been cut, de-burr the back side of the part and print the number on the bottom (the same number you have on top).
Do not remove the paper from the top-side at this point. After you have numbered the back side of your project, assemble the parts and check to see how it fits. It’s a good idea to leave the paper on to see if a fitting problem could be from cutting outside of the pattern line.
If you can see the pattern lines then you will need to carefully trim the lines with a new #5 scroll saw blade. This takes some practice. If it is a free-form project practice on some of the outside edges.
The kind and size of scroll saw blades can vary from one user to the next. What
works for me here in the studio may not work as well for you on your saw. I have a certain “feel” that I like when sawing and that can be different than what you like. A universal size 5 works for most intarsia projects. If I cut back into the same part to split it up into smaller sections that will go back together I will put in a very small blade size (2/0 or 0). One thing for sure (as far as I am concerned) there is not one blade that is good for everything. The blade that I use for our Intarsia on Western Red Cedar is not the blade that I use on plywood, nor is it what I would use for harder woods. I use different blades for different things. Then there is the “How Thick is the Wood”, is another factor to consider. All in all, there is only one way to figure this out. Get an assortment of blades and a stack of material and start sawing. Experience is the best way to figure this out. Below is a chart with different blades and sizes that are just a starting point. This is the actual blade combinations that we use when sawing, but the ones that you like best might differ from ours. Just remember to experiment to determine the blade that cuts best for you Another question is how long a blade will last? When the blade gets dull it will not cut well and you may find yourself pushing the wood too hard into the blade causing the cuts to be out of square. If the thought crosses your mind “I wonder if the blade is dull” it probably is. After you change the blade you will notice right away how much easier it is to cut your pieces. We can help you get started with blades but in the end you will have to decide for yourself. Below is a list of the blades we use. You can order the “OnLine” and Pegas blades on the Scroll Saw Blades Page, just click on the links.
 Tough Little Blades are a "all around blades for hard & soft woods. Quick cutting blade for all types of wood. Skip tooth; offset teeth for a more problem-free cutting of curves. Very long durability due to special hardening;
  Gold Blades are a quick cutting saw blade - works best with softer woods. Best quality; Skip tooth; very long durability due to special hardening; Reverse teeth will prevent wood splintering on the underside.
  Platinum Blades are a quick cutting blade for all types of wood. Extremely sharp teeth and a strong back for best performance and long life. The Skip tooth design for a rapid discharge of sawdust so that no blue burn marks are left on the wood in tight radius cuts. Reverse teeth prevents wood splintering on the underside.
 TMR Titanium Reverse Skip Tooth quick cutting saw blade, has a positive cutting angle which makes it more aggressive, no drifting of the cut, extremely long life due to special hardening in oil.
  Platinum Plus These blades work well for medium to hard woods. This high-speed skip tooth blade, every 3rd tooth is reversed to prevent wood splintering on the underside. The tooth configuration allows for more control going thru curves.
 Q: My blade is square to the table but when cutting curves my parts get "out of square" usually the parts are larger on the bottom.

 | We are using the “900” Creative Station with repositionable adhesive roll. Start by spraying a very light coat of Repositionable Spray Adhesive to stick the pattern pieces upside down to a piece of paper. The paper is a temporary way to hold the pattern sections together to put glue evenly on the back of the pieces. |
 | Run the pattern parts through the Creative Station machine. This will apply glue to the back of the pattern pieces. (This machine can be found for a pretty good price online. If you purchase this, be sure to get the Repositionable Adhesive Refill to replace the permanent adhesive cartridge) |
 | Peel the paper off carefully, sometimes the pattern pieces stick to the paper. Now you are ready to place them on your wood and begin sawing. |

Saw tight corners with less binding by lightly rounding over the back edges of the blade.

A DIY tutorial to build a scroll saw stand including free plans. How I set up my scroll saw station on a DIY stand including a little dust collection.

If you do not read any further, the most important tip for scroll sawing accurately for Intarsia is CHANGE YOUR BLADES OFTEN.
If the thought crosses your mind "is the blade getting dull, should I change it?" you should change it. Perhaps subconsciously you realize you are pushing too hard. The cost of the blade is not worth the frustration not to mention if you have to scrap some expensive wood.
Tension: Use this link to hear that high "C" note. Ready to pluck your scroll saw blade? Listen to the sounds of scroll saw blade from too loose, just right, way too tight. It's very helpful to learn the sound of a properly tensioned scroll saw blade. Music for scrollers!
Sawing: Make sure your blade is cutting square. Check the table/blade to make sure it is square. Next make a test cut, cut a curve then check it with a square. The curve makes it easier to see any light between the square and the cut part.
Cut the pieces about the size of your hand, this will make it much easier to handle than one large board. After cutting the hand size pieces be sure to turn them over to remove any tear out with sandpaper. The object is to keep the parts as flat as possible to ensure a square cut.
After all the parts have been laid out it is time to start sawing. If you used the same board (color) to layout many parts, start by rough cutting them into smaller more manageable sections.
Start cutting the easiest parts first, like the outside edges. This lets you get into the swing of things. Cut some of the outside edges; parts that do not have another part next to it. I like to mark all exterior parts with a highlighter. While sawing, stop often after making a cut and remove any tear-out on the bottom side. While you're at it check your cuts with a square.
Plan your cuts: Try to make your cuts so the last cut will “drop” the part off the larger block.
Note the extra part added to the left of the eye. The last cut is a short smooth line. Drill any holes before you start sawing, like the hole for the eye.
Where to Put the Blade?
When cutting a part it is best to put the center of the blade in the center of the layout line, thus removing all of the line. With more experience the goal is to leave half of the pattern line around the parts. If you are using a larger blade you will need to move the blade a little more to the outside of the line.
Hand Placement: While scrolling, your hands are in control of the part. The blade is in control of the sawing. You will find that by positioning and repositioning your hands as the need arises you will be in control of your wood. Always remember to have at least one hand holding the wood down firmly on the table at all times.
Your hands will be in motion, always setting up for the next curve or turn on your pattern. Think ahead and plan your cuts.
Posture: Sit square in front of the saw making sure you are sitting at an appropriate height, so you can look down at the entire part you are cutting.
If you sit too low and are looking across the part it makes it harder to see what's coming up.
Sometimes you may find you're turning your body to allow movement of the wood, stop and reposition yourself so you are sitting straight in front of the blade.
Breath: Remember to keep breathing (I know that sounds silly). Sometimes when you cut an intricate part you tense up and hold your breath. This can make it even harder to cut smoothly. Make sure you are comfortable and take breaks as needed.
Speed: The speed (strokes per minute) we use varies from time to time depending on the material that is being cut. The main thing to remember is “control”. Intarsia requires accurate cutting, so you might want to experiment with your speed so you can get the best control. We found running the saw about 80% of the speed range on a variable speed saw works great.
Feed Rate: If you push the wood into the blade you will get a rougher cut than if you slow down and let the blade cut the wood. If you push too hard it can make your cause parts to be "out of square".
Cutting Corners: There are different ways to cut a sharp corner (or point) it will take two cuts. You cannot quickly turn the wood, even with a small blade, to cut a sharp corner. Cut to the corner, then back up the wood, start cutting again leaving a portion of the wood. Once you cut the waste wood away, turn the part around and make the second cut to remove the small portions of waste wood.
A magnifier really helps to see the lines. A foot switch is a good safety device. If a blade breaks or you need to stop you can easily lift your foot and stop the saw immediately.
Check for Fit: When all the parts have been cut, de-burr the back side of the part and print the number on the bottom (the same number you have on top).
Do not remove the paper from the top-side at this point. After you have numbered the back side of your project, assemble the parts and check to see how it fits. It’s a good idea to leave the paper on to see if a fitting problem could be from cutting outside of the pattern line.
If you can see the pattern lines then you will need to carefully trim the lines with a new #5 scroll saw blade. This takes some practice. If it is a free-form project practice on some of the outside edges.
The kind and size of scroll saw blades can vary from one user to the next. What
works for me here in the studio may not work as well for you on your saw. I have a certain “feel” that I like when sawing and that can be different than what you like. A universal size 5 works for most intarsia projects. If I cut back into the same part to split it up into smaller sections that will go back together I will put in a very small blade size (2/0 or 0). One thing for sure (as far as I am concerned) there is not one blade that is good for everything. The blade that I use for our Intarsia on Western Red Cedar is not the blade that I use on plywood, nor is it what I would use for harder woods. I use different blades for different things. Then there is the “How Thick is the Wood”, is another factor to consider. All in all, there is only one way to figure this out. Get an assortment of blades and a stack of material and start sawing. Experience is the best way to figure this out. Below is a chart with different blades and sizes that are just a starting point. This is the actual blade combinations that we use when sawing, but the ones that you like best might differ from ours. Just remember to experiment to determine the blade that cuts best for you Another question is how long a blade will last? When the blade gets dull it will not cut well and you may find yourself pushing the wood too hard into the blade causing the cuts to be out of square. If the thought crosses your mind “I wonder if the blade is dull” it probably is. After you change the blade you will notice right away how much easier it is to cut your pieces. We can help you get started with blades but in the end you will have to decide for yourself. Below is a list of the blades we use. You can order the “OnLine” and Pegas blades on the Scroll Saw Blades Page, just click on the links.
Tough Little Blades are a "all around blades for hard & soft woods. Quick cutting blade for all types of wood. Skip tooth; offset teeth for a more problem-free cutting of curves. Very long durability due to special hardening; Gold Blades are a quick cutting saw blade - works best with softer woods. Best quality; Skip tooth; very long durability due to special hardening; Reverse teeth will prevent wood splintering on the underside. Platinum Blades are a quick cutting blade for all types of wood. Extremely sharp teeth and a strong back for best performance and long life. The Skip tooth design for a rapid discharge of sawdust so that no blue burn marks are left on the wood in tight radius cuts. Reverse teeth prevents wood splintering on the underside.TMR Titanium Reverse Skip Tooth quick cutting saw blade, has a positive cutting angle which makes it more aggressive, no drifting of the cut, extremely long life due to special hardening in oil. Platinum Plus These blades work well for medium to hard woods. This high-speed skip tooth blade, every 3rd tooth is reversed to prevent wood splintering on the underside. The tooth configuration allows for more control going thru curves.Q: My blade is square to the table but when cutting curves my parts get "out of square" usually the parts are larger on the bottom.
| We are using the “900” Creative Station with repositionable adhesive roll. Start by spraying a very light coat of Repositionable Spray Adhesive to stick the pattern pieces upside down to a piece of paper. The paper is a temporary way to hold the pattern sections together to put glue evenly on the back of the pieces. |
| Run the pattern parts through the Creative Station machine. This will apply glue to the back of the pattern pieces. (This machine can be found for a pretty good price online. If you purchase this, be sure to get the Repositionable Adhesive Refill to replace the permanent adhesive cartridge) |
| Peel the paper off carefully, sometimes the pattern pieces stick to the paper. Now you are ready to place them on your wood and begin sawing. |

Mountain wood wall art made with my scroll saw! Check out this custom-made scroll saw art that is perfect for a nusery and uses solid color stain.

If you do not read any further, the most important tip for scroll sawing accurately for Intarsia is CHANGE YOUR BLADES OFTEN.
If the thought crosses your mind "is the blade getting dull, should I change it?" you should change it. Perhaps subconsciously you realize you are pushing too hard. The cost of the blade is not worth the frustration not to mention if you have to scrap some expensive wood.
Tension: Use this link to hear that high "C" note. Ready to pluck your scroll saw blade? Listen to the sounds of scroll saw blade from too loose, just right, way too tight. It's very helpful to learn the sound of a properly tensioned scroll saw blade. Music for scrollers!
Sawing: Make sure your blade is cutting square. Check the table/blade to make sure it is square. Next make a test cut, cut a curve then check it with a square. The curve makes it easier to see any light between the square and the cut part.
Cut the pieces about the size of your hand, this will make it much easier to handle than one large board. After cutting the hand size pieces be sure to turn them over to remove any tear out with sandpaper. The object is to keep the parts as flat as possible to ensure a square cut.
After all the parts have been laid out it is time to start sawing. If you used the same board (color) to layout many parts, start by rough cutting them into smaller more manageable sections.
Start cutting the easiest parts first, like the outside edges. This lets you get into the swing of things. Cut some of the outside edges; parts that do not have another part next to it. I like to mark all exterior parts with a highlighter. While sawing, stop often after making a cut and remove any tear-out on the bottom side. While you're at it check your cuts with a square.
Plan your cuts: Try to make your cuts so the last cut will “drop” the part off the larger block.
Note the extra part added to the left of the eye. The last cut is a short smooth line. Drill any holes before you start sawing, like the hole for the eye.
Where to Put the Blade?
When cutting a part it is best to put the center of the blade in the center of the layout line, thus removing all of the line. With more experience the goal is to leave half of the pattern line around the parts. If you are using a larger blade you will need to move the blade a little more to the outside of the line.
Hand Placement: While scrolling, your hands are in control of the part. The blade is in control of the sawing. You will find that by positioning and repositioning your hands as the need arises you will be in control of your wood. Always remember to have at least one hand holding the wood down firmly on the table at all times.
Your hands will be in motion, always setting up for the next curve or turn on your pattern. Think ahead and plan your cuts.
Posture: Sit square in front of the saw making sure you are sitting at an appropriate height, so you can look down at the entire part you are cutting.
If you sit too low and are looking across the part it makes it harder to see what's coming up.
Sometimes you may find you're turning your body to allow movement of the wood, stop and reposition yourself so you are sitting straight in front of the blade.
Breath: Remember to keep breathing (I know that sounds silly). Sometimes when you cut an intricate part you tense up and hold your breath. This can make it even harder to cut smoothly. Make sure you are comfortable and take breaks as needed.
Speed: The speed (strokes per minute) we use varies from time to time depending on the material that is being cut. The main thing to remember is “control”. Intarsia requires accurate cutting, so you might want to experiment with your speed so you can get the best control. We found running the saw about 80% of the speed range on a variable speed saw works great.
Feed Rate: If you push the wood into the blade you will get a rougher cut than if you slow down and let the blade cut the wood. If you push too hard it can make your cause parts to be "out of square".
Cutting Corners: There are different ways to cut a sharp corner (or point) it will take two cuts. You cannot quickly turn the wood, even with a small blade, to cut a sharp corner. Cut to the corner, then back up the wood, start cutting again leaving a portion of the wood. Once you cut the waste wood away, turn the part around and make the second cut to remove the small portions of waste wood.
A magnifier really helps to see the lines. A foot switch is a good safety device. If a blade breaks or you need to stop you can easily lift your foot and stop the saw immediately.
Check for Fit: When all the parts have been cut, de-burr the back side of the part and print the number on the bottom (the same number you have on top).
Do not remove the paper from the top-side at this point. After you have numbered the back side of your project, assemble the parts and check to see how it fits. It’s a good idea to leave the paper on to see if a fitting problem could be from cutting outside of the pattern line.
If you can see the pattern lines then you will need to carefully trim the lines with a new #5 scroll saw blade. This takes some practice. If it is a free-form project practice on some of the outside edges.
The kind and size of scroll saw blades can vary from one user to the next. What
works for me here in the studio may not work as well for you on your saw. I have a certain “feel” that I like when sawing and that can be different than what you like. A universal size 5 works for most intarsia projects. If I cut back into the same part to split it up into smaller sections that will go back together I will put in a very small blade size (2/0 or 0). One thing for sure (as far as I am concerned) there is not one blade that is good for everything. The blade that I use for our Intarsia on Western Red Cedar is not the blade that I use on plywood, nor is it what I would use for harder woods. I use different blades for different things. Then there is the “How Thick is the Wood”, is another factor to consider. All in all, there is only one way to figure this out. Get an assortment of blades and a stack of material and start sawing. Experience is the best way to figure this out. Below is a chart with different blades and sizes that are just a starting point. This is the actual blade combinations that we use when sawing, but the ones that you like best might differ from ours. Just remember to experiment to determine the blade that cuts best for you Another question is how long a blade will last? When the blade gets dull it will not cut well and you may find yourself pushing the wood too hard into the blade causing the cuts to be out of square. If the thought crosses your mind “I wonder if the blade is dull” it probably is. After you change the blade you will notice right away how much easier it is to cut your pieces. We can help you get started with blades but in the end you will have to decide for yourself. Below is a list of the blades we use. You can order the “OnLine” and Pegas blades on the Scroll Saw Blades Page, just click on the links.
Tough Little Blades are a "all around blades for hard & soft woods. Quick cutting blade for all types of wood. Skip tooth; offset teeth for a more problem-free cutting of curves. Very long durability due to special hardening; Gold Blades are a quick cutting saw blade - works best with softer woods. Best quality; Skip tooth; very long durability due to special hardening; Reverse teeth will prevent wood splintering on the underside. Platinum Blades are a quick cutting blade for all types of wood. Extremely sharp teeth and a strong back for best performance and long life. The Skip tooth design for a rapid discharge of sawdust so that no blue burn marks are left on the wood in tight radius cuts. Reverse teeth prevents wood splintering on the underside.TMR Titanium Reverse Skip Tooth quick cutting saw blade, has a positive cutting angle which makes it more aggressive, no drifting of the cut, extremely long life due to special hardening in oil. Platinum Plus These blades work well for medium to hard woods. This high-speed skip tooth blade, every 3rd tooth is reversed to prevent wood splintering on the underside. The tooth configuration allows for more control going thru curves.Q: My blade is square to the table but when cutting curves my parts get "out of square" usually the parts are larger on the bottom.
| We are using the “900” Creative Station with repositionable adhesive roll. Start by spraying a very light coat of Repositionable Spray Adhesive to stick the pattern pieces upside down to a piece of paper. The paper is a temporary way to hold the pattern sections together to put glue evenly on the back of the pieces. |
| Run the pattern parts through the Creative Station machine. This will apply glue to the back of the pattern pieces. (This machine can be found for a pretty good price online. If you purchase this, be sure to get the Repositionable Adhesive Refill to replace the permanent adhesive cartridge) |
| Peel the paper off carefully, sometimes the pattern pieces stick to the paper. Now you are ready to place them on your wood and begin sawing. |

Affiliate Disclosure: As an Amazon Associate I earn from qualifying purchases. Additionally, I may get commissions for purchases made through other affiliate links in this post.Last year, I shared a tutorial on using your Silhouette or Cricut and a scroll saw to cut out shaped blanks that you could paint or stain. (Missed it? Read ...

Christmas time is coming (squeal!) and for me, that means it’s time to think of what gifts to make for neighbors, kid’s teachers, friends, etc., etc. “Am I right? Or am I right?…

If you do not read any further, the most important tip for scroll sawing accurately for Intarsia is CHANGE YOUR BLADES OFTEN.
If the thought crosses your mind "is the blade getting dull, should I change it?" you should change it. Perhaps subconsciously you realize you are pushing too hard. The cost of the blade is not worth the frustration not to mention if you have to scrap some expensive wood.
Tension: Use this link to hear that high "C" note. Ready to pluck your scroll saw blade? Listen to the sounds of scroll saw blade from too loose, just right, way too tight. It's very helpful to learn the sound of a properly tensioned scroll saw blade. Music for scrollers!
Sawing: Make sure your blade is cutting square. Check the table/blade to make sure it is square. Next make a test cut, cut a curve then check it with a square. The curve makes it easier to see any light between the square and the cut part.
Cut the pieces about the size of your hand, this will make it much easier to handle than one large board. After cutting the hand size pieces be sure to turn them over to remove any tear out with sandpaper. The object is to keep the parts as flat as possible to ensure a square cut.
After all the parts have been laid out it is time to start sawing. If you used the same board (color) to layout many parts, start by rough cutting them into smaller more manageable sections.
Start cutting the easiest parts first, like the outside edges. This lets you get into the swing of things. Cut some of the outside edges; parts that do not have another part next to it. I like to mark all exterior parts with a highlighter. While sawing, stop often after making a cut and remove any tear-out on the bottom side. While you're at it check your cuts with a square.
Plan your cuts: Try to make your cuts so the last cut will “drop” the part off the larger block.
Note the extra part added to the left of the eye. The last cut is a short smooth line. Drill any holes before you start sawing, like the hole for the eye.
Where to Put the Blade?
When cutting a part it is best to put the center of the blade in the center of the layout line, thus removing all of the line. With more experience the goal is to leave half of the pattern line around the parts. If you are using a larger blade you will need to move the blade a little more to the outside of the line.
Hand Placement: While scrolling, your hands are in control of the part. The blade is in control of the sawing. You will find that by positioning and repositioning your hands as the need arises you will be in control of your wood. Always remember to have at least one hand holding the wood down firmly on the table at all times.
Your hands will be in motion, always setting up for the next curve or turn on your pattern. Think ahead and plan your cuts.
Posture: Sit square in front of the saw making sure you are sitting at an appropriate height, so you can look down at the entire part you are cutting.
If you sit too low and are looking across the part it makes it harder to see what's coming up.
Sometimes you may find you're turning your body to allow movement of the wood, stop and reposition yourself so you are sitting straight in front of the blade.
Breath: Remember to keep breathing (I know that sounds silly). Sometimes when you cut an intricate part you tense up and hold your breath. This can make it even harder to cut smoothly. Make sure you are comfortable and take breaks as needed.
Speed: The speed (strokes per minute) we use varies from time to time depending on the material that is being cut. The main thing to remember is “control”. Intarsia requires accurate cutting, so you might want to experiment with your speed so you can get the best control. We found running the saw about 80% of the speed range on a variable speed saw works great.
Feed Rate: If you push the wood into the blade you will get a rougher cut than if you slow down and let the blade cut the wood. If you push too hard it can make your cause parts to be "out of square".
Cutting Corners: There are different ways to cut a sharp corner (or point) it will take two cuts. You cannot quickly turn the wood, even with a small blade, to cut a sharp corner. Cut to the corner, then back up the wood, start cutting again leaving a portion of the wood. Once you cut the waste wood away, turn the part around and make the second cut to remove the small portions of waste wood.
A magnifier really helps to see the lines. A foot switch is a good safety device. If a blade breaks or you need to stop you can easily lift your foot and stop the saw immediately.
Check for Fit: When all the parts have been cut, de-burr the back side of the part and print the number on the bottom (the same number you have on top).
Do not remove the paper from the top-side at this point. After you have numbered the back side of your project, assemble the parts and check to see how it fits. It’s a good idea to leave the paper on to see if a fitting problem could be from cutting outside of the pattern line.
If you can see the pattern lines then you will need to carefully trim the lines with a new #5 scroll saw blade. This takes some practice. If it is a free-form project practice on some of the outside edges.
The kind and size of scroll saw blades can vary from one user to the next. What
works for me here in the studio may not work as well for you on your saw. I have a certain “feel” that I like when sawing and that can be different than what you like. A universal size 5 works for most intarsia projects. If I cut back into the same part to split it up into smaller sections that will go back together I will put in a very small blade size (2/0 or 0). One thing for sure (as far as I am concerned) there is not one blade that is good for everything. The blade that I use for our Intarsia on Western Red Cedar is not the blade that I use on plywood, nor is it what I would use for harder woods. I use different blades for different things. Then there is the “How Thick is the Wood”, is another factor to consider. All in all, there is only one way to figure this out. Get an assortment of blades and a stack of material and start sawing. Experience is the best way to figure this out. Below is a chart with different blades and sizes that are just a starting point. This is the actual blade combinations that we use when sawing, but the ones that you like best might differ from ours. Just remember to experiment to determine the blade that cuts best for you Another question is how long a blade will last? When the blade gets dull it will not cut well and you may find yourself pushing the wood too hard into the blade causing the cuts to be out of square. If the thought crosses your mind “I wonder if the blade is dull” it probably is. After you change the blade you will notice right away how much easier it is to cut your pieces. We can help you get started with blades but in the end you will have to decide for yourself. Below is a list of the blades we use. You can order the “OnLine” and Pegas blades on the Scroll Saw Blades Page, just click on the links.
Tough Little Blades are a "all around blades for hard & soft woods. Quick cutting blade for all types of wood. Skip tooth; offset teeth for a more problem-free cutting of curves. Very long durability due to special hardening; Gold Blades are a quick cutting saw blade - works best with softer woods. Best quality; Skip tooth; very long durability due to special hardening; Reverse teeth will prevent wood splintering on the underside. Platinum Blades are a quick cutting blade for all types of wood. Extremely sharp teeth and a strong back for best performance and long life. The Skip tooth design for a rapid discharge of sawdust so that no blue burn marks are left on the wood in tight radius cuts. Reverse teeth prevents wood splintering on the underside.TMR Titanium Reverse Skip Tooth quick cutting saw blade, has a positive cutting angle which makes it more aggressive, no drifting of the cut, extremely long life due to special hardening in oil. Platinum Plus These blades work well for medium to hard woods. This high-speed skip tooth blade, every 3rd tooth is reversed to prevent wood splintering on the underside. The tooth configuration allows for more control going thru curves.Q: My blade is square to the table but when cutting curves my parts get "out of square" usually the parts are larger on the bottom.
| We are using the “900” Creative Station with repositionable adhesive roll. Start by spraying a very light coat of Repositionable Spray Adhesive to stick the pattern pieces upside down to a piece of paper. The paper is a temporary way to hold the pattern sections together to put glue evenly on the back of the pieces. |
| Run the pattern parts through the Creative Station machine. This will apply glue to the back of the pattern pieces. (This machine can be found for a pretty good price online. If you purchase this, be sure to get the Repositionable Adhesive Refill to replace the permanent adhesive cartridge) |
| Peel the paper off carefully, sometimes the pattern pieces stick to the paper. Now you are ready to place them on your wood and begin sawing. |

Looking for scroll saw inspiration? Here I test mine out and share some ideas to inspire you for a variety of projects for your home.

Here are 150 Free Scroll Saw Patterns for both Beginner and Advanced Woodworkers! You can craft everything from toys, to ornaments, to home decor!

If you love DIY, odds are you have either tried your hand at woodworking by now or daydream of being able to. A bit daunting for the DIY newbie, and even the average person, woodworking projects are some of the best, and when it comes to home improvement and repair, unavoidable. Learn how to be

Create beautiful wooden animal portraits on the scroll saw with Woodworker's Pattern Book. With 78 realistic and ready-to-use scroll saw patterns for fascinating creatures, from exotic predators to familiar backyard friends, the inspiration is endless for scroll sawyers of any level. Each animal can be cut as a single, freestanding piece of wood. The authors include advice for beginners on getting started, with expert scrolling tips and techniques plus advice on wood preparation, blade selection, cutting strategy, finishing, and display options. A full color photo gallery will inspire you with the range of impressive wildlife projects that you can complete with this book. Father and son scroll sawing team Wayne and Jacob Fowler have based every design on their own extensive photographic studies of live animals, taken on location in the wild, in zoos, and in nature preserves.

Free script word art, printable patterns, templates, stencils for the scroll saw, band saw, and other projects including string art.

From Sewing Machine to Scroll Saw, a Christmas Tale: Let's transform an old and unused sewing machine into a scroll saw so we can make some wooden decorations (and a load of other cool jazz). If, like me, you had an old sewing machine (I tend to collect these things when they are getting thrown …

If you do not read any further, the most important tip for scroll sawing accurately for Intarsia is CHANGE YOUR BLADES OFTEN.
If the thought crosses your mind "is the blade getting dull, should I change it?" you should change it. Perhaps subconsciously you realize you are pushing too hard. The cost of the blade is not worth the frustration not to mention if you have to scrap some expensive wood.
Tension: Use this link to hear that high "C" note. Ready to pluck your scroll saw blade? Listen to the sounds of scroll saw blade from too loose, just right, way too tight. It's very helpful to learn the sound of a properly tensioned scroll saw blade. Music for scrollers!
Sawing: Make sure your blade is cutting square. Check the table/blade to make sure it is square. Next make a test cut, cut a curve then check it with a square. The curve makes it easier to see any light between the square and the cut part.
Cut the pieces about the size of your hand, this will make it much easier to handle than one large board. After cutting the hand size pieces be sure to turn them over to remove any tear out with sandpaper. The object is to keep the parts as flat as possible to ensure a square cut.
After all the parts have been laid out it is time to start sawing. If you used the same board (color) to layout many parts, start by rough cutting them into smaller more manageable sections.
Start cutting the easiest parts first, like the outside edges. This lets you get into the swing of things. Cut some of the outside edges; parts that do not have another part next to it. I like to mark all exterior parts with a highlighter. While sawing, stop often after making a cut and remove any tear-out on the bottom side. While you're at it check your cuts with a square.
Plan your cuts: Try to make your cuts so the last cut will “drop” the part off the larger block.
Note the extra part added to the left of the eye. The last cut is a short smooth line. Drill any holes before you start sawing, like the hole for the eye.
Where to Put the Blade?
When cutting a part it is best to put the center of the blade in the center of the layout line, thus removing all of the line. With more experience the goal is to leave half of the pattern line around the parts. If you are using a larger blade you will need to move the blade a little more to the outside of the line.
Hand Placement: While scrolling, your hands are in control of the part. The blade is in control of the sawing. You will find that by positioning and repositioning your hands as the need arises you will be in control of your wood. Always remember to have at least one hand holding the wood down firmly on the table at all times.
Your hands will be in motion, always setting up for the next curve or turn on your pattern. Think ahead and plan your cuts.
Posture: Sit square in front of the saw making sure you are sitting at an appropriate height, so you can look down at the entire part you are cutting.
If you sit too low and are looking across the part it makes it harder to see what's coming up.
Sometimes you may find you're turning your body to allow movement of the wood, stop and reposition yourself so you are sitting straight in front of the blade.
Breath: Remember to keep breathing (I know that sounds silly). Sometimes when you cut an intricate part you tense up and hold your breath. This can make it even harder to cut smoothly. Make sure you are comfortable and take breaks as needed.
Speed: The speed (strokes per minute) we use varies from time to time depending on the material that is being cut. The main thing to remember is “control”. Intarsia requires accurate cutting, so you might want to experiment with your speed so you can get the best control. We found running the saw about 80% of the speed range on a variable speed saw works great.
Feed Rate: If you push the wood into the blade you will get a rougher cut than if you slow down and let the blade cut the wood. If you push too hard it can make your cause parts to be "out of square".
Cutting Corners: There are different ways to cut a sharp corner (or point) it will take two cuts. You cannot quickly turn the wood, even with a small blade, to cut a sharp corner. Cut to the corner, then back up the wood, start cutting again leaving a portion of the wood. Once you cut the waste wood away, turn the part around and make the second cut to remove the small portions of waste wood.
A magnifier really helps to see the lines. A foot switch is a good safety device. If a blade breaks or you need to stop you can easily lift your foot and stop the saw immediately.
Check for Fit: When all the parts have been cut, de-burr the back side of the part and print the number on the bottom (the same number you have on top).
Do not remove the paper from the top-side at this point. After you have numbered the back side of your project, assemble the parts and check to see how it fits. It’s a good idea to leave the paper on to see if a fitting problem could be from cutting outside of the pattern line.
If you can see the pattern lines then you will need to carefully trim the lines with a new #5 scroll saw blade. This takes some practice. If it is a free-form project practice on some of the outside edges.
The kind and size of scroll saw blades can vary from one user to the next. What
works for me here in the studio may not work as well for you on your saw. I have a certain “feel” that I like when sawing and that can be different than what you like. A universal size 5 works for most intarsia projects. If I cut back into the same part to split it up into smaller sections that will go back together I will put in a very small blade size (2/0 or 0). One thing for sure (as far as I am concerned) there is not one blade that is good for everything. The blade that I use for our Intarsia on Western Red Cedar is not the blade that I use on plywood, nor is it what I would use for harder woods. I use different blades for different things. Then there is the “How Thick is the Wood”, is another factor to consider. All in all, there is only one way to figure this out. Get an assortment of blades and a stack of material and start sawing. Experience is the best way to figure this out. Below is a chart with different blades and sizes that are just a starting point. This is the actual blade combinations that we use when sawing, but the ones that you like best might differ from ours. Just remember to experiment to determine the blade that cuts best for you Another question is how long a blade will last? When the blade gets dull it will not cut well and you may find yourself pushing the wood too hard into the blade causing the cuts to be out of square. If the thought crosses your mind “I wonder if the blade is dull” it probably is. After you change the blade you will notice right away how much easier it is to cut your pieces. We can help you get started with blades but in the end you will have to decide for yourself. Below is a list of the blades we use. You can order the “OnLine” and Pegas blades on the Scroll Saw Blades Page, just click on the links.
Tough Little Blades are a "all around blades for hard & soft woods. Quick cutting blade for all types of wood. Skip tooth; offset teeth for a more problem-free cutting of curves. Very long durability due to special hardening; Gold Blades are a quick cutting saw blade - works best with softer woods. Best quality; Skip tooth; very long durability due to special hardening; Reverse teeth will prevent wood splintering on the underside. Platinum Blades are a quick cutting blade for all types of wood. Extremely sharp teeth and a strong back for best performance and long life. The Skip tooth design for a rapid discharge of sawdust so that no blue burn marks are left on the wood in tight radius cuts. Reverse teeth prevents wood splintering on the underside.TMR Titanium Reverse Skip Tooth quick cutting saw blade, has a positive cutting angle which makes it more aggressive, no drifting of the cut, extremely long life due to special hardening in oil. Platinum Plus These blades work well for medium to hard woods. This high-speed skip tooth blade, every 3rd tooth is reversed to prevent wood splintering on the underside. The tooth configuration allows for more control going thru curves.Q: My blade is square to the table but when cutting curves my parts get "out of square" usually the parts are larger on the bottom.
| We are using the “900” Creative Station with repositionable adhesive roll. Start by spraying a very light coat of Repositionable Spray Adhesive to stick the pattern pieces upside down to a piece of paper. The paper is a temporary way to hold the pattern sections together to put glue evenly on the back of the pieces. |
| Run the pattern parts through the Creative Station machine. This will apply glue to the back of the pattern pieces. (This machine can be found for a pretty good price online. If you purchase this, be sure to get the Repositionable Adhesive Refill to replace the permanent adhesive cartridge) |
| Peel the paper off carefully, sometimes the pattern pieces stick to the paper. Now you are ready to place them on your wood and begin sawing. |

Even more shop-tested scrollsaw tips from scrollers around the country.

Carole Rothman introduces a new series with a spotlight on the scroll saw: Here’s what you need to know about buying, using and being safe with this tool.

Learn how to start scroll sawing - 11 step guide and some useful tips I have learned over the years.

Scroll Saw Sanding Belts easily smooth the edges of scroll saw projects in wood, plastic, metal and composites. These durable, fabric back...

Free printable snowflake templates, patterns, stencils, and designs that you can use for Christmas ornaments, decorations, or as coloring pages.

Carole Rothman introduces a new series with a spotlight on the scroll saw: Here’s what you need to know about buying, using and being safe with this tool.

Having a scroll saw is helpful if you’re looking to make some scroll saw patterns. Besides, scroll saw projects are some of the most woodworking projects that you can engage in. And in this post, we’re going to look at some of the best free scroll saw patterns that you could make with your scroll

The scroll saw is an invaluable tool for woodworkers. It makes detailed crafts and crisp fretwork in a way that no other machine can. You might have already learned the basics on how to use a scroll saw such as turning it on, setting it on the bench and how to start cutting. However, there is...

Having a scroll saw is helpful if you’re looking to make some scroll saw patterns. Besides, scroll saw projects are some of the most woodworking projects that you can engage in. And in this post, we’re going to look at some of the best free scroll saw patterns that you could make with your scroll

Create your very own EASY {and pretty} do it yourself word art! You can use whatever word or font you like – or come grab the FREE PRINTABLE TEMPLATE for this sweet “family…
