

Fabric selvages can be saved from the trash to be turned into treasured projects - learn how with these tips, tricks and tutorials for sewing with selvages.

This gorgeous selvage quilt was made by Natalia in Vladivostok. Her blog is: MishiNata. You can translate the blog into English by clicking "Translate" at the top of the page. The photo below is a close up. Most of her selvages don't have writing. Nice work Natalia! It's interesting how each quilter has her/his own style for arranging selvages. Some are mostly white, others are colorful, some have lots of color windows, and so on.
Sewing projects to make with selvedge / selvage fabric ~ Threading My Way

In September I shared this quilt finish. For want of a name, it's my "Selvedges Quilt" that finished at 59" X 72". I designed the block. Several blog-followers let me know they'd like a tutorial to make this quilt, so here you are! Supplies Lots and lots of selvedges! I used approximately 560 selvedge strips - only the parts with color, text, and color windows - to make 80 rectangle units, 5" X 9½" (unfinished). Scrap fabrics, approximately 3½" X 6" for print pinwheels Solid white fabric: 12 - 5" X 5" squares 18 - 5" X 9½" rectangles 60-degree ruler card stock, for a template Assuming you've never cut and saved fabric selvages... Each selvedge strip should be cut 1/2" beyond where the selvedge ends and the print begins. So most of my selvedges are approximately 1"-wide strips. I've saved them for years - more than 15 years - so I had (and still have) lots to work with. Prepare Selvages If needed, press selvedges. Sort by color. Six to 8 selvages are needed for each rectangle-shaped unit, so 24 to 32 selvages for one four-unit pinwheel. Lay the selvedge strip on a cutting mat and select the section with the most color, text, or color windows (those little round circles of color). Cut roughly 10" to 10½" long until you have a total of 24 to 32 selvedges of one color family. This color range runs from pinks to rose. Sew Selvedge Strips With the finished side of a selvage strip on the left, position the finished side of another selvedge strip on top, leaving approximately ¼" print showing on the under strip. Using a straight sewing machine stitch, edgestitch along the left side of the upper strip to join two strips. With the finished side of a selvage strip on the left, position a third selvedge strip on top of the right selvedge strip, again allowing ¼" of print to show. Stitch along the edge of the third selvedge to join. Continue to add strips to create a rectangle of selvedges that's 5" to 5½" wide. Press. Trim the unit to measure 5" X 9½". Note: If necessary, it's perfectly acceptable to piece together two selvedge pieces to come up with a 10" to 10½" length. Make Selvedge-Triangle Unit Position a 60-degree ruler along the bottom edge of the selvedge rectangle. Align the left side of the ruler with the left corner. Note that I chose to arrange all my rectangles "left-readable." It probably doesn't matter which direction you position your selvedges; just be consistent. Cut. The triangle piece that's removed can be your template to cut the print fabric that will become one-fourth of a color-coordinated center pinwheel. Cut print fabric flush with the bottom and right side of the selvedge triangle, but be sure to add 1/4" along the top/long side. After making one like this, I got smart and made a paper template that I taped to the back of my ruler. I used this template to cut the bottom and right sides... ... and made a second paper template, positioning it to a ruler to align the top/long side of the unit with the ruler's edge. This sure made cutting easier. The selvedge-triangle unit is pieced this way. With right sides together, align the raw edges of the cut selvedge piece and print triangle. Allow 1/4" overlap at the top and bottom of the seam. Use a ¼" seam to join. Press seam allowance toward triangle. The selvedge unit should have a ¼" seam allowance at the triangle end. Completed selvedge unit measures 5" x 9½". Choose selvedge colors to continue making four selvedge units using four different prints for triangles. When you have enough units to begin playing on your design wall, you'll quickly see that though this is the layout you want... ... the actual block to be sewn together looks like this. At this point, I auditioned different solid fabrics as center squares: two grays. I settled on white. Piece Blocks With Inset Seam Assemble the block in counter-clockwise order. Refer to diagram below. On the 5" X 5" center square, mark one corner 1/4" from two raw edges. Position selvedge Unit 1 in the "readable" (horizontal) direction, with the triangle at the right end. With right sides together, place the 5" x 5" square along the lower left sides of the non-triangle end of the selvedge unit, aligning the square with the left and bottom of the selvedge unit. With the square on top, stitch from the 1/4" mark to the end of the block. Press seam allowance toward selvedge Unit 1. With right sides together, position Unit 2 along seam 2 of the square, aligning the triangle end of Unit 2 with the edge of Unit 1, and the bottom end of Unit 2 with the bottom of the square. Sew a 1/4" seam along the length of Unit 2. Press seam allowance toward Unit 2. In the same way, add Unit 3 to side 3 of the square. Press seam allowance toward Unit 3. Add Unit 4 to side 4 of the square, being sure to move Unit 1 away from the seam. Do not sew over Unit 1. Press seam allowance toward Unit 4. Sew the short 5th seam to join Unit 4 to Unit 1. Press seam allowance toward Unit 1. From the back, the block looks like this, with seam allowances pressed toward selvedge units. Each block is 13½" X 13½" with a plain square center that finishes at 4½". Plain Rectangles I could have finished the quilt layout with more selvedges, adding 5" by 5" selvedge squares to the outside edges, but instead chose to add plain rectangles so the design seemed more "floaty." In the same manner as piecing blocks, mark ¼" on two ends of a solid 5" X 9½" rectangle. Sew inset seams to join. Join blocks to complete the quilt top. Press seams open. I chose to pin-baste my quilt, using rulers for domestic machine quilting, and embellishing with big stitch hand quilting. I used my favorite binding technique: No Tails Binding: Mitered Corners by Machine - found here, and here, and a PDF here - to complete my quilt. I hope you enjoy this tutorial, and making something fun with your collection of selvedges. Be sure to let me know how it goes! Linda Note: Measurements for the finished block size was updated September 20, 2021.

A peek into my love of fabric, piecing, and quilting!

A selvage is the tightly woven edge of a fabric that keeps it from raveling. It also serves as the manufacturer's label, listing the name of the fabric line, designer, and year of production. I don't know how Barb guessed my favorite, but I’m thrilled with the quilt she sent me. These particular selvages came from reproductions of traditional fabrics spanning 1800-1900, also known as "Civil War Repros." The backing fabric features cartouches of Civil War battle scenes. A big thanks to all who contributed selvages for this project, and of course, to Barb, for her inspired use of them. Thank you for including me in this string of friendship quilts. I adore mine!

Upcycling by sewing with fabric selvages is such a fun way to use up those pretty edges that show the color dots on the edge of the fabric.

Linda Hall of Tampa, Florida is a symphony violinist and a quilter. Her new blog is The Quilting Violinist, "Holding life together with stitches and notes." Isn't her selvage quilt with yo-yo's a beauty? Nice job, Linda! Take a look at all the fabric that Linda and her quilting buddies are using to make charity quilts. Wow!

Well, it's almost the last day of July and instead of a "finish" to show you, I"m reporting on a new start! Oops!! I've been saving selvages in 2 plastic Animal Cracker jars for several years now. The jars are packed full so when I fell hard for this quilt by Jodi on Pleasant Home blog, I knew just what I wanted to make with my precious selvages. (In case you wonder, I try to add at least one inch of "color" when I cut off my selvage from the yardage.Some are less. Some are more.) Because i figure that you might like to make some of these easy-to-do blocks, I thought that I'd show you how I'm making mine. First, dump out all of your selvages into a basket or other large container that you can rummage through. Pick a fabric to use for the center strip on each block. This fabric will create an on-point frame around each diamond shape once the blocks are set together. Cut the fabric into 1.5 inch strips. (A yard should be enough to make a lap size quilt.) I almost chose the red dot, but ended up using the black and white chevron below. This is a foundation pieced block. I am using premium musiin, cut into 6.5 inch squares for the foundation. You could also use paper if you don't mind ripping it off after stitching. Center the one inch strip on the diagonal of a foundation. Cut the strip so that it extends over the end of the foundation square a bit. Pin if necessary. Now for the fun part: Pick out some selvage fabrics with the lots of writing or dots to lay next to the center strip.Cover the center strip on each side with the selvage leaving a half inch of the strip showing. Trim the selvage so that it extends past the muslin on each corner. I usually pin this first strip to keep it straight. Stitch close to the edge of the selvage. (You might want to stitch again on the other side of the writing if the selvage is one with a frayed edge.) Continue to lay selvages on either side of the middle diagonal fabric strip and sewing as described above until the muslin is completely covered. Now,flip the block over and trim it to the muslin size using a rotary cutter and square ruler. (Note:Your foundation might have "shrunk" a bit from the stitching so be sure that you are cutting the block to the desired size. In my case, that is 6.5 inches.It is okay for the selvages to extend beyond the foundation base a little.) Four blocks sewn together will create the X in the middle. Mine will measure 12 inches finished. I plan to make 30 of these to create a quilt, 60" x 72". These things are incredibly addictive to make, I'm just telling you now! Have I tempted you?!

I'm all about saving time and money. When I first heard of chain-piecing, I really latched onto it. I discovered that not only did it prevent the little bird's nest knot on the underside of the fabric when starting and that it saved thread, (Have you ever noticed how much thread is thrown away as you sew? You could stuff a doll with it!), but it also kept a whole line of pieces together so I didn't have to get up and down as much as I was sewing. I could get into my groove and go. I then learned that if you used a little scrap of fabric - about 1-1.5" wide and sewed over that at the end of the chain, you had all the benefits of chain piecing indefinitely. Cool. I was converted to the method. Then as I was reading a quilting book (Cut the Scraps! by Joan Ford, pg. 35), she mentioned how she always had 2 projects going at once. The main one and a secondary one that was done over a long period of time. Here's how it works. You are sewing along and come to a place where you need to remove your sewing from the machine. You reach into your little box of pre-cut pieces and sew a couple together, using these as your holder while you remove your sewing project. When you begin sewing again, remove the secondary project and put it off to the side. This first photo is of two scraps I am sewing together to make longer strips. When I have sewn these together, I can remove the black thing behind it that I was sewing. The second photo is of a little plastic container I use to contain my secondary project. In this case, I began accumulating 1" strips - things that others were throwing away and I thought, "Surely something can be made from these!" I think that it's much easier to do this if the secondary project is purely scrappy in design. You don't want to have to keep two projects in mind and remember which one you are working on. One inch strips may not be your cup of tea, but choose some scrap project - especially if it's a "grab bag" style, and you can put those scraps to good use. What I am doing is sewing 1" x 9" strips together, or if the 1" pieces are smaller than that, I am piecing then together to make longer strips which I then cut down to about 9" strips. I sew them together, little by little. When I have 16 strips sewn together, I iron it (I know, I'm waiting until the end), and then trim the square to 8.5" x 8.5." When I get enough of those squares made, I can make them into a quilt. I've been working on this for the last 2 years and have 15 squares out of the 80-120 I need to make a full or queen, so it will be a while before I have it complete, but, I love that I can be wasting nothing - no fabric, no thread. See finished quilt here.

Have you seen this? Source: flickr.com via Trina on Pinterest I just finished a string quilt and this quilt makes my quilt want to go hide in a closet and cry. If I am very, very brave and manage to collect enough pale neutraly sort of scraps, there may be one of these in my future. The pattern is in the new issue of Fat Quarterly and can be purchased here. Dolores of A Labour of Love is hosting a sew along of the projects from this issue. Details here. So, what's your current obsession?

This string quilt by Southern Belle is so cheerful. It's part of my new treasury of string quilts. Take a look. Warning: It will make you want to drop everything and make a string quilt. Here's another link, String Thing Along, from Brenda at Scraps and Things in Canada.

Here's a quilt I made years ago when I cut my stash into 1" strips. That action inspired lots of good quilts. I love this one! See all the fans in the border? View pattern for making fans. These fabrics are mostly oldish prints. Think: Lucy Ricardo's dresses. I like how the black print looks with all these colors.

Anya of Wellsboro, Pennsylvania just finished this selvage quilt. She used the quilt-as-you-go method, and she doesn't recommend it. "Too many issues" she says. I'll take her word for it. Another interesting fact is that she used the selvages from 72 yards of fabric to make this quilt. I had no idea! (Her friends contributed selvages, of course.) Nice job, Anya. You can read more about this project on her blog: http://www.hillscreekquilter.blogspot.com/ Also see her group blog: www.randomactsofstitching.blogspot.com.

In September I shared this quilt finish. For want of a name, it's my "Selvedges Quilt" that finished at 59" X 72". I designed the block. Several blog-followers let me know they'd like a tutorial to make this quilt, so here you are! Supplies Lots and lots of selvedges! I used approximately 560 selvedge strips - only the parts with color, text, and color windows - to make 80 rectangle units, 5" X 9½" (unfinished). Scrap fabrics, approximately 3½" X 6" for print pinwheels Solid white fabric: 12 - 5" X 5" squares 18 - 5" X 9½" rectangles 60-degree ruler card stock, for a template Assuming you've never cut and saved fabric selvages... Each selvedge strip should be cut 1/2" beyond where the selvedge ends and the print begins. So most of my selvedges are approximately 1"-wide strips. I've saved them for years - more than 15 years - so I had (and still have) lots to work with. Prepare Selvages If needed, press selvedges. Sort by color. Six to 8 selvages are needed for each rectangle-shaped unit, so 24 to 32 selvages for one four-unit pinwheel. Lay the selvedge strip on a cutting mat and select the section with the most color, text, or color windows (those little round circles of color). Cut roughly 10" to 10½" long until you have a total of 24 to 32 selvedges of one color family. This color range runs from pinks to rose. Sew Selvedge Strips With the finished side of a selvage strip on the left, position the finished side of another selvedge strip on top, leaving approximately ¼" print showing on the under strip. Using a straight sewing machine stitch, edgestitch along the left side of the upper strip to join two strips. With the finished side of a selvage strip on the left, position a third selvedge strip on top of the right selvedge strip, again allowing ¼" of print to show. Stitch along the edge of the third selvedge to join. Continue to add strips to create a rectangle of selvedges that's 5" to 5½" wide. Press. Trim the unit to measure 5" X 9½". Note: If necessary, it's perfectly acceptable to piece together two selvedge pieces to come up with a 10" to 10½" length. Make Selvedge-Triangle Unit Position a 60-degree ruler along the bottom edge of the selvedge rectangle. Align the left side of the ruler with the left corner. Note that I chose to arrange all my rectangles "left-readable." It probably doesn't matter which direction you position your selvedges; just be consistent. Cut. The triangle piece that's removed can be your template to cut the print fabric that will become one-fourth of a color-coordinated center pinwheel. Cut print fabric flush with the bottom and right side of the selvedge triangle, but be sure to add 1/4" along the top/long side. After making one like this, I got smart and made a paper template that I taped to the back of my ruler. I used this template to cut the bottom and right sides... ... and made a second paper template, positioning it to a ruler to align the top/long side of the unit with the ruler's edge. This sure made cutting easier. The selvedge-triangle unit is pieced this way. With right sides together, align the raw edges of the cut selvedge piece and print triangle. Allow 1/4" overlap at the top and bottom of the seam. Use a ¼" seam to join. Press seam allowance toward triangle. The selvedge unit should have a ¼" seam allowance at the triangle end. Completed selvedge unit measures 5" x 9½". Choose selvedge colors to continue making four selvedge units using four different prints for triangles. When you have enough units to begin playing on your design wall, you'll quickly see that though this is the layout you want... ... the actual block to be sewn together looks like this. At this point, I auditioned different solid fabrics as center squares: two grays. I settled on white. Piece Blocks With Inset Seam Assemble the block in counter-clockwise order. Refer to diagram below. On the 5" X 5" center square, mark one corner 1/4" from two raw edges. Position selvedge Unit 1 in the "readable" (horizontal) direction, with the triangle at the right end. With right sides together, place the 5" x 5" square along the lower left sides of the non-triangle end of the selvedge unit, aligning the square with the left and bottom of the selvedge unit. With the square on top, stitch from the 1/4" mark to the end of the block. Press seam allowance toward selvedge Unit 1. With right sides together, position Unit 2 along seam 2 of the square, aligning the triangle end of Unit 2 with the edge of Unit 1, and the bottom end of Unit 2 with the bottom of the square. Sew a 1/4" seam along the length of Unit 2. Press seam allowance toward Unit 2. In the same way, add Unit 3 to side 3 of the square. Press seam allowance toward Unit 3. Add Unit 4 to side 4 of the square, being sure to move Unit 1 away from the seam. Do not sew over Unit 1. Press seam allowance toward Unit 4. Sew the short 5th seam to join Unit 4 to Unit 1. Press seam allowance toward Unit 1. From the back, the block looks like this, with seam allowances pressed toward selvedge units. Each block is 13½" X 13½" with a plain square center that finishes at 4½". Plain Rectangles I could have finished the quilt layout with more selvedges, adding 5" by 5" selvedge squares to the outside edges, but instead chose to add plain rectangles so the design seemed more "floaty." In the same manner as piecing blocks, mark ¼" on two ends of a solid 5" X 9½" rectangle. Sew inset seams to join. Join blocks to complete the quilt top. Press seams open. I chose to pin-baste my quilt, using rulers for domestic machine quilting, and embellishing with big stitch hand quilting. I used my favorite binding technique: No Tails Binding: Mitered Corners by Machine - found here, and here, and a PDF here - to complete my quilt. I hope you enjoy this tutorial, and making something fun with your collection of selvedges. Be sure to let me know how it goes! Linda Note: Measurements for the finished block size was updated September 20, 2021.

Debbie in Jerusalem just finished piecing this wonderful selvage hexagon quilt top. I love the rainbow effect. Now she's looking for sugges...

If you've considered making a selvage quilt...or maybe haven't heard of one, you will be greatly swayed by this post. Riel from the Q and t...

What do you do with your selvages? (P.S. According to Wikipedia, it's "selvage" in the U.S. and "selvedge" in Britain - well, what d'ya kno...

I will be playing with selvedges along with Quilty Habit and Quilts of a Feather. To start, they've asked us to show how we store our selvedges. Mine are all in this big lined basket in a jumbled mess. I'm in awe of the quilters who have their selvedges stored by color, folded neatly in ziplock baggies. Earlier this year, I made this selvedge log cabin wall hanging in response to the RIMQG log cabin challenge. I had a few extra blocks which became a giant pillow. My first selvedge project was this spiderweb wall hanging made in 2013. I had so much fun quilting this one! I will be teaching a class called "Salvaging your Selvedges" in September. This table runner is my class sample of a sampler table runner. I'm ready to play! Maybe I'll start by sorting my selvedges by color like the cool kids.

In September I shared this quilt finish. For want of a name, it's my "Selvedges Quilt" that finished at 59" X 72". I designed the block. Sev...

This is a project that I have been planning for months, maybe even years! I have been collecting selvages (or selvedges, whichever you like) over the past few years- in our studio there are separat…

traditional spiderweb blocks in offset setting. blocks are paper pieced using thousands of selvage pieces. juried into the Scrap Art exhibit at the San Jose Museum of Quilts and Textiles in 2011.

I've been wanting to make one of these for a long time!

Author: Rebecca Greco

Explore Karen Griska Quilts' 267 photos on Flickr!

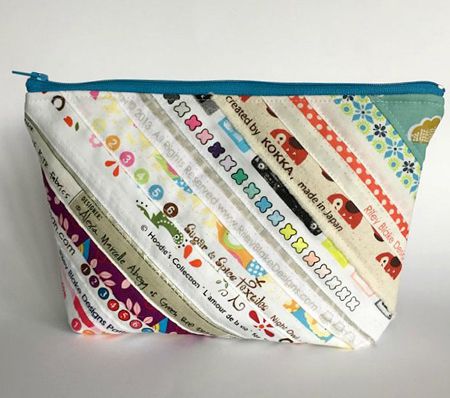
This beautiful selvage pencil case is the creation of my friend Christine in France. Isn't it amazing? You can read more about it on ...

Sewing projects to make with selvedge / selvage fabric ~ Threading My Way

Selvage projects are all the rage, so check out how Christine is using the NQ900 to convert selvages into a fun sewing project.

Katell Renon from Toulouse, France has written about selvage quilts on her blog: La Ruche des Quilteuses. She has lots of great quilt photos. There's a handy translation button in the upper right corner of her blog. My "Tree of Life" quilt (above) is part of her post. To see how to make it, view my book "Quilts from the Selvage Edge." (Sidebar link.) I think it's great that quilters all over the world are enjoying their selvages. Here's a great big cyberspace hug to you from quilters in the USA!

Selvage quilt by Chicken Julie http://chickenjulie.blogspot.com/ Selvages (or selvedges in English English) are the finished edges of the yardage. In screened fabric the selvage usually has information about the print, such as name, company and colors used in the various screens to get the multi-colored print. In the selvage above eight colors are indicated by the dots. Sometimes there is a number too. The dot is the traditional shape for color indication. At Moda we use that familiar strips of dots as a logo. ..... Riel Nason Making Every Scrap Count Riel at The Q and The U blog showed this quilt pieced of just the dots and the numbers cut from selvages. http://quispamsisquilter.blogspot.com/2012/03/making-every-scrap-count-selvage-wall.html riel Spider Webs from Squares and Triangles http://www.squaresandtriangles.com/selvages-spider-webs-and-dresdens-oh-my-100 Selvage quilters make the most of everything. Elena sells selvage quilts on Etsy They become selvage collectors A dress pieced of selvages by Jodi at Ricrac in 2008 http://vintagericrac.blogspot.com/2008/10/big-selvedge-project.html You collectors have probably noticed that Moda has done some innovating in their color indicators. In my Morris Modernized line we used a Voysey bird instead of a dot. We pull out an image from a print in the collection. The more colors, the more birds. Karen Griska at THE Selvage Blog calls the selvage quilt phenomenon "Extreme Scrap Quilting." Karen Griska, Thin Sticks http://selvageblog.blogspot.com

Making more binding from selvedges. My original tutorial is here.

This is another of Edda's selvage quilts that she donated to the Seita Scholars Program at Western Michigan University. So beautiful!

Steffi from Germany is getting her Selvage Stars quilt ready for quilting. Isn't this incredible? You need a lot of selvages to make each star a different color! She must have a huge selvage stash, (or did have, I should say). Fantastic job, Steffi! Visit her blog at: www.steffiscandyquilts.blogspot.com. She writes in both German and English.

How To Make Selvedge Fabric - A Fast & Easy Tute This week I've made a laptop case using selvedges and I thought I'd share with you how I create selvedge fabric. When I buy a piece of fabric I remove the selvedges along both edges by folding the fabric in the correct direction to cut them off as full-length strips. It's up to you how wide you cut them, you may want to cut them wider and see more of the original fabric design. I line the selvedge edge up with a 1" line on the cutting mat and then 1/8" line of my ruler on the next 1" line - lining the ruler over the larger amount of fabric helps hold the fabric in place so it doesn't move while I'm cutting though you do risk making a wrong cut into your selvedge. Update on 11 February 2017 These days I'm cutting my selvedges at 1" instead of 7/8" to allow me to retain more of the print design. The rest of the process of creating the fabric remains exactly the same😊. Update on 11 September 2018 Making fabric from my selvedges has become an important part of my design so these days I have increased the width of the selvedge I cut off a piece of fabric. I'm now cutting at 1-1/8". This gives me more wiggle room for overlapping the fabrics and leaves more of the print section visible on the text selvedge edge. The rest of the process in creating the fabric remains exactly the same😊. To make selvedge fabric first I take a piece of batting or backing fabric - whatever suits the outcome of your project best - and cut it at least an inch wider and longer than the finished size of selvedge fabric that I need. Next, I spray it all over with basting spray such as 505 (temporary/repositionable) fabric spray adhesive - using a repositionable adhesive means you can change the strips around until you're happy with the look. Now comes the fun part - lay your selvedges row by row onto the now sticky backing fabric. Start at the bottom edge of the 'fabric' placing the frayed/finished edge bottom-most. Overlay the next selvedge over the cut raw edge - slightly overlapping it. You may want to vary the amount you overlap the selvedges by so you can see more/less of the colour/design/text. You can use more than one selvedge along a particular row - using up shorter lengths of selvedge - just lay them side by side and leave the side edges raw, any fraying will be minimal and adds to the look of the finished fabric (as in the top row being placed in the photo above) Once the backing batting/fabric is completely covered with selvedges you are ready to sew the selvedges in place. (If you are creating a Quilt As You Go (QAYG) block then at this stage you can spray baste your backing fabric to the made fabric.) The spray basting should hold the selvedge strips firmly in place while you complete this stage. I sew/quilt over the length of the selvedges using my 1/4" foot as a width guide. I choose one very straight edged selvedge as a marker for my first row of stitches and then use this as a loose guide for my next rows 1/8" to 1/4" apart - I'm not looking for a perfectly straight line finish here. Placing the stitch lines so close together firmly fastens down all the selvedge edges and creates the fabric. There're other methods of attaching selvedges that leave the finished edge of each selvedge strip loose from the background fabric but this I like that my method ensures each strip is well attached and often I use a contrasting thread so the stitching becomes part of the finished design also. Here's a finished QAYG selvedge block that I made last year as part of my Something NEW Sampler Quilt. This block contains selvedges from all the fabrics used in making the quilt. This is how the back of the fabric will look - in this case, you're seeing the backing fabric of the QAYG block but if you've just used a backing fabric or batting then you'll see that instead. Once you've finished your 'made' selvedge fabric then you can trim the edges/cut the fabric to size and use in your chosen project. And that's all there is to making selvedge fabric!!! Check out my other Selvedge posts: This time, I used it to make a laptop case Crazy about that Kaffe Fassett blue Millefiore lining I love selvedge fabric - it's so individual and scrappy looking, there's always something to look at and read! I've wondered about crocheting/knitting with my selvedges too - have you tried it? I've crocheted/knitted with lots of materials in the past - one of my favourites is plastic carrier bags - great for making waterproof garden table place/drink mats and chair covers but that's a whole other post! Do you save your selvedges? If you do then share what you've made and if you've used a different method to make selvedge fabric tell us about that too. Updated On 21 April 2014: The laptop case was a present for my daughter's friend Hayley and here's a photo Flicky sent me of Hayley with her case which she tells me she uses every day. The photo is also proof that the sun does shine sometimes in St Andrews, Scotland! Updated at 11 September 2018 I've used a piece of selvedge fabric for a cushion back - I looove how this looks, don't you? See more about this cushion here in this blog post. and another I made last year - read more about it here. How To Make Selvedge Fabric - A Fast & Easy Tute Featured On: Clicking on an image will take you through to the new page of crafty goodness :) Disclaimer: This post is for informational purposes only, no payment or commission is received on click-throughs and opinions are my own.

Ok, don’t tell me. You want to see the flimsies first. I know I would want to if that was what you posted on YOUR blog. So without further ado, here they are. (For the uninitiated, a flimsy is just a quilt top before it is sandwiched with batting, backing and quilted). This is my Rainbow Selvages quilt top. It was originally going to contain just 14 columns, but I added the brown column, extreme left, after adding the planned black and white (polka dot) column on the right. It measures 60x72”. I like this so much more now that the top is complete. The texture is so much fun! I have a couple choices for a backing, but have made no decisions yet on that or the binding. I think a fun scrappy binding might be the ticket if I have enough leftovers. Must go stash-diving! The second flimsy is my autumn farm girl type sampler. Please excuse the distracting blue low-tack tape holding it up (in addition to pins); it is too large for my design board. I probably should have just let it hang, but it makes it look wonky. I am pretty amazed at how this turned out. You see, some of the original blocks were made 3 (or was it 4?) years ago during the Vintage Farm Girl Quilt-Along. I was learning as I went, and the block sizes ranged from 12 1/8" to 12 3/4”. They were supposed to be 12 1/2” unfinished. So first, some blocks had to be added to and of course everything trimmed. There went some points. And the 1” sashing didn’t leave much wiggle room. But it got done, slowly, imperfectly. Not a competition-level quilt by any means, but not bad. Then, since I wanted the leaf fabric of the outer border, of which I only had one yard, to orient with the leaves falling down, the cutting was a challenge. That’s why there are cornerstones - there was not enough fabric without them! And then, when it was all sewn up, I measured the top. And nearly fell over. And measured again. The width at the top and bottom were exactly - EXACTLY - the same. Not an eighth of an inch difference! The length at the two sides had a 1/8" difference, which I don’t even care about. How the heck did THAT happen??? Anyway, if it looks wonky now, get over it. It isn’t! YAY!!! My plans are to get these two tops basted this weekend and maybe even quilt one. They are both on my Finish-Along Quarter 4 list, so they will get done before the end of the year! * * * * * * * * * * * * * * I want to thank you all for your thoughtful comments on my post last week about gathering and saving ideas for quilting projects (for the Rainbow Scrap Challenge and quilting in general). And there were many great ideas and comments about scrap and fabric storage, settings, and organization. Thank you all so much! And be sure to check out the rainbow lineup over at Angela’s So Scrappy blog. It’s Scrappy Saturday, and there are always great ideas and eye candy over there! * * * * * * * * * * * * By early in the week, I was digging into my scraps. Since Dark Neutrals (gray, black, brown) are the color of the month at the Rainbow Scrap Challenge, I sorted all the colors and decided to play with the browns first. First I made twelve 4.5” (unfinished) bow tie blocks. This brings me to 214 made of 304 needed. I’ll probably do a few dark gray and black ones, but these will carry over into next year. And then I whipped out the brown strings and made four 8.5” string blocks and sewed them together. In fact, I sewed all my string blocks together into foursomes (like above) and took an inventory. It appears I have 12 more 8.5” string blocks to make: 2 orange (to finish up an orange foursome), 2 blue (to finish up a blue foursome) , then two more foursomes out of any of either red, green or purple, depending on what the scraps dictate. It would be quick work to finish this by year-end if I didn’t have so much ahead of it in line. But I may get to it by the end of the year. If not, it will finish up in the first quarter of 2018. * * * * * * * * * * * * * * * * * * And how fun is this?? Bruce had the day off Friday and we went grocery shopping together. I spotted these Lehi Roller Mills (a local Utah mill and bakery that makes great breads and mixes, etc) items on an end display at our local (Harmon’s) grocery store. What caught my attention? They are all in sacks of Lori Holt Vintage Christmas fabric! Lori, of course, is a local sew-lebrity fabric designer (for Riley Blake fabrics, also a Utah company). So I guess I shouldn’t be surprised at the collaboration. * * * * * * * * * * * * * * * * Finally, I asked last week if any of you were participating in the Bonnie Hunter annual Mystery Quilt-Along, On Ringo Lake. It appears that several of us are! Here is my fabric pull. I decided to go with grays instead of the browns that Bonnie suggested, mainly because I have grays. I could’ve gone out and bought some chocolate brown, but I’d rather use my stash. The grays look good with the colors, and it will all look better in our newly-remodeled living room. Have a great week, and stay warm!

When I started to quilt I noticed the lovely edges of my fabric. I couldn't just throw them away! So I started to collect them, I get them from my friends too. So my stash is growing! Time to make something for 2 of my friends who celebrated their birthday last week. I started with a big piece of old denim and sewed selvages in diagonal rows (yes, I used my sewing machine for this!). Then I cut them in the size I needed for the bookmarks (5 x 18 cm, about 2 x 7 inch). I used a piece of felt on the back and sewed them together with a looped edging stitch by hand. I attached some beads to the bottom to decorate it. The cute dice-beads where a gift from Lucy.

My sister Eileen Lovett of Rhode Island came to my house yesterday for a reunion, and she brought some selvage quilts to show us. Didn't she do a great job? These three patterns are in my book "Quilts from the Selvage Edge." You can see her peeking over the top of the quilt above. We're still friends with the girls who were our next-door neighbors when we were growing up, so we've known each other from day one. Three girls in our family, three in theirs, and our two moms. We had a great time. Eileen made up a contest called the "Mother Goose Awards" where our two moms awarded ribbons for tons of different categories; the prize was the "Goody Two-Shoes" award (baby-sized clear, sparkly jellies, $5 from Walmart) won by Sandi in the pink top. Lots of laughs. Then we looked at old photos of our birthday parties from the 1960's. Cool dresses. Haha.

This month in the IAQ quilt group we are having a little swap. And of course, since I am the one hosting I get to have a head start and work on something totally fun using the selvage from my own stash. (can't wait for the swap and new ones arrive as well!)

Black I by Kathleen Loomis “I have a fondness for selvages, the tightly woven fabric edges that are usually cut off and thrown away before sewing, probably because so many of them contain words and...

This beautiful selvage quilt is the creation of Kathy Boudreau in Maine. She is a member of the Pine Tree Quilt Guild. You can read more about this quilt on Louisa Enright's Blog. What a creative comb

This big selvage quilt was featured on the KnitOneQuiltToo blog. This blogger was showing some quilts from her recent guild quilt show. She didn't name the maker of this quilt. If you know who made it, please let me know. Note the prairie points around the edge. Nice!

I have a box full of selvages, I love them! This is the first time I have sewn with them. It was so much fun choosing which ones to use :) Making a selvage quilt is on my to do list. I made this block 3 times! The first time, my block wasn't big enough. I didn't print the pattern (actual size), and that ruined the dimensions. The third time was a charm! Here are the rest of my blocks, there will be 9 in all.

2011 Fiber Arts Fiesta, Albuquerque, New Mexico
