

Jelly Weave is a strip quilt that is so quick and easy, but has a woven look that looks complicated (it's not!). Make the Throw size quilt with just one Jelly Roll (40 - 2 1/2" strips), or yardage. The large blocks are set on point, so if you've never tried an on point quilt yet...this quilt is a great place to start

Click the "Buy Now" button to the right to find the book AND the individual patterns. Click HERE to find the Geese Migrations Supplement, which includes line drawings for all 29 samples, finished b...

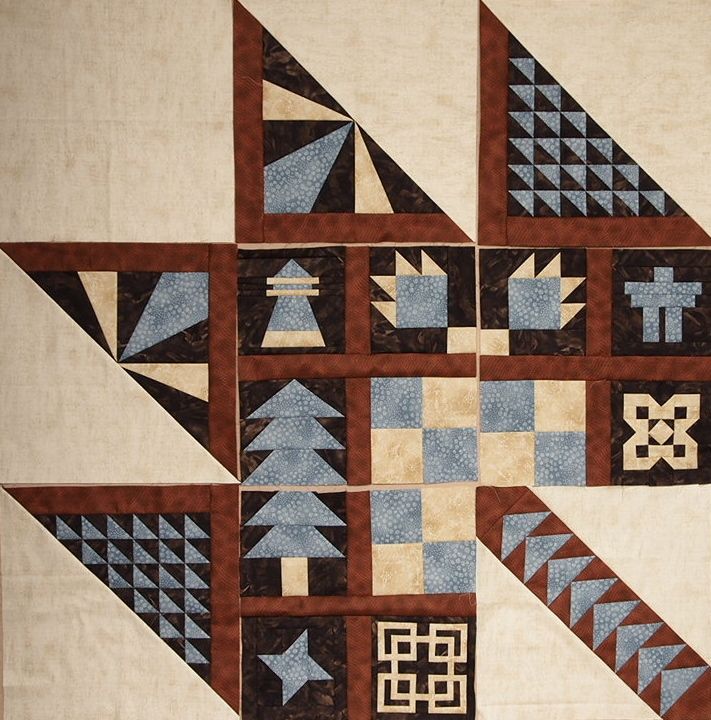
I am leading a Northern Wilderness Block Party (think Block of the Month) at the store this year. We will be using the pattern Northern Wilderness from Northern Threads. If you are local the patt…

Dena has made a traditional block in reds and whites. How perfect for the Christmas season.

Better than an HBC blanket.

I swear on a stack of Anne Rice novels that I did not plan this. But it just so happens I have a Canadian Flag pillow to share with you, just under a week away from Canada Day! You see, a little bit ago I was asked to make a Union Jack Pillow for a friend's daughter. It was a birthday gift. But this friend has another daughter, with another birthday, so a Canadian Pillow was ordered :) I had a great time making this pillow. The quilt block is from Cheryl Arkison's Oh Canada! pattern. I loved learning Cheryl's slab technique. For sure a method I will use again. For quilting, simple straight lines and the maple leaf is machine appliqued. And on the back, some strips from a previous project found a good home. I love this little pillow, I hope it's new owner will like it too. Do you have any Canadian themed projects on the go, or even sewing plans for the Holiday weekend? I am going to the MMQG Sew In, looking forward to a full day of stitching bliss! This project was my June Goal for A Lovely Year of Finishes. So linking up over at Fiber of All Sorts. And, linking up Fabric Tuesday Happy Canada Day! Adrienne

Another beautiful quilt by my customer Jeannette. (Last year I quilted her Texas Quilt) Her piecing is so precise and her applique again was perfect. For the Mounties she used Ultra suede which rea…

Buoy in St. Andrews- By-The-Sea, New Brunswick Welcome to the next TGIFF! party for OctoberQuest! Is the opportunity of winning one of two $50 gift certificates to Mad About Patchwork getting you to pull out that WIP or UFO to finish? We hope so! Also don't forget that you can also get 10% off your purchases throughout the month by using the TGIFF10 code. My finish this week is about six months in the making, but has been on my wish list much longer. The Hudson's Bay Company's point blankets have an interesting and not-always-positive history. I had one as a child and although I loved the colours, I always found the wool too itchy. Why not try the design in a quilt? Quick recap: Front: Back: There were a couple of things that stumped me with this one, the first being that I wanted to match the thread to the colours on the front and was worried about the coloured top threads showing up on the back. Also, I was unsure how to keep the back stripes perpendicular and square to the front ones and how to keep the tight horizontal straight-line quilting from distorting the vertical stripes on the back. I hemmed and hawed, wondering if there were some tricks or techniques I could use, but ultimately I knew that I had to baste very carefully and just do it. And done it is! Woo hoo! Front - Canadiana Back - Canadiana Detail - Straight-line quilting For the straight-line quilting in the off-white areas, I tried using a hera marker to help mark the straight line. Not successful on white or such a wide quilt. I kept losing where the line was. Once again, I forgot to use the little straight-line quilting guide that came with my walking foot. D'oh! Distortion on the back from the quilting Back - Flips on the monkey bars Even though I did stabilize the quilt by quilting every four inches first, there were a few areas of the vertical stripes on the back that did get slightly distorted when I filled it in. Not enough to make me unpick though. It's the back after all and this quilt is going to be used until it's threadbare, stained and holey. Lesson learned: stabilize it every two or even one inch before filling in more densely. For the colour pops of thread on the back that I worried about, I tightened the top tension just a little bit so that the top thread wouldn't show on the back -- it worked very well! Now I have my own soft, cuddly HBC point blanket quilt! And you can too. I posted the instructions for the top back in May and I will post the material requirements and instructions for the back and binding of this quilt soon. Now it's your turn, fine people! Link up those fab finishes, grab a glass of something fine and give thanks for the week that was. A reminder of the rules for OctoberQuest: Your quilty project must be completely finished (As much as we love celebrating quilt tops or completed blocks, they will not be eligible for the prizes). You may enter more than one finish and even more than one finish each week. Just add a link for each finish to one of the linky parties. The linky parties will stay open from their start date until the end of the month. Your post/photo on Flickr/Picasa must have a link back to the TGIFF! site and the particular party you are participating in. Link up your quilty finish in any of the TGIFF! linky parties this month: October 5 - Janice @ Better Off Thread October 12 - M-R @ Quilt Matters October 19 - Jenelle @ Echinops and Aster October 26 - Lynette @ What a Hoot OctoberQuest will be open until October 31st at 11:59 p.m. EST. A winner will be picked via Ms. Random Number Generator on November 1st and notified via email. Please make sure we can contact you via email or we will need to run Ms. Random again. I'm also linking up with Sew Modern Monday at CanoeRidge Creations. Some great modern inspiration over there!

Quilt pattern to make a traditional red and green appliqué quilt designed by award-winning Canadian quilt designer, Rosemary Makhan. This quilt honours her Canadian heritage with its design. Complete instructions are given for an easy freezer paper method of appliqué using an invisible machine stitching technique; other appliqué methods would work equally as well. This print version includes the pattern for the 18.5" x 18.5" block design, border pattern sheets and a feather quilting pattern to trace for completing the quilt. The pattern is for a quilt that finishes to 82" x 102". The block design could be also adapted to make a wallhanging or table topper.
A couple of new versions of my Purely Canadian Quilt - it doesn't just have to be done in red and white.

Each year the Crocus Quilter's Guild here is Dauphin, MB has a challenge. Normally we are given 3 fat quarters and can making anything within the size parameter of 120" in perimeter. Whoever wins the popular vote picks the fabric for the following year. I won in May of 2016, you can read about that here. Since our challenge reveal would be taking place in May of 2017, and our challenges would be on display at our local library over June and July, I thought is was the perfect opportunity to pick some Canadian themed fabric in honour of all the Canada 150 celebrations. I chose three fabrics from Northcott's Stonehenge OH CANADA line. I thought the flag print could be a bit challenging to work with so I added a neutral off white and a tone on tone red. My project did not get completed in time for the reveal date so you won't see it with all of the others here. I am very pleased with how mine finished up so I will show you some of the details. All of the fabrics I added were coordinates from the Stonhenge line. I really love the border fabric, and almost selected it for one of the challenge fabrics. I thought its directional nature would be tricky to work with when you are only given a fat quarter so I opted not to. I bought a big chunk for myself so I could use it for the border and the backing. I decided to add curved lines for the quilting. I was concerned that straight lines might make the text print look crooked if it was even the slightest bit off. I stitched in the ditch around the flag print squares and the narrow sashing and border strips. Pebbles behind the 3-d maple leaves were the finishing touch. I had intended to leave the leaves a little more dimensional but it didn't quite work out that way, but I am still happy. I had a wonderful visit with Kathy back in May, and we found a few moments to take some new head shots for upcoming Highway 10 Designs projects. We don't get to see each other very often so I'm glad we took the time to do this, these are my favorites.


Click the "Buy Now" button to the right to find the book AND the individual patterns. Click HERE to find the Geese Migrations Supplement, which includes line drawings for all 29 samples, finished b...

Finally, all my appliqued circles are finished and assembled into a finished quilt top! I used the pattern Dot Dot Dot by Laundry Basket Quilts (Edyta Sitar) and lots of small pieces from my stash to make this quilt. Every "dot" is a different printed fabric and the background squares are a scrappy selection of off-white to ecru neutrals from my stash. The original pattern is for a full size quilt but I "downsized" it with fewer dots to make a quilt that will fit my wall hanging space. This project has been in the works a long time. I turned the edges under on my circles, though raw edge applique and fusible web is a very reasonable alternative, then machine appliqued the circles to the background squares. When I finished the applique, I began assembling the quilt on my design panels, which I had to do in two parts because the panels are not big enough to hold the whole quilt (40" by 58" finished, with border). There was a lot of moving pieces around and obsessing during this process to get the rainbow effect with the best balance of colors. I wanted the greens on the outer edges because I planned to use a green border. This will hang in my kitchen wall hanging spot and the kitchen is green and white. Eventually I was pleased with the placement and the actual sewing together went fast. Now to get this quilted. Fabric starching is underway for my next project!

I am very excited to share with you a project I'm participating in with 19 other Canadian designers -- The Canadian Sampler. Sew Sisters Quilt Shop asked us each to design a block to celebrate Canada's sesquicentennial as part of a Block of the Month (BOM) Club for 2017. It didn't even take me two seconds so say, "Hell ya!" Here is the finished quilt. Didn't they do a great job laying out all the different blocks? You don't have to lay yours out this way, of course -- you can lay it out any way you want! Designers worked with Northcott ColorWorks Premium Solid 9000-241 Cardinal and 9000-10 Snow to design and create a block that expressed their appreciation for this country. I think there's such a great variety of blocks in this quilt that can appeal to all types of quilters. I especially love that "Eh!" block! Eh? (sorry, couldn't resist) My block is the Canada By Code block (the lower right one below). That's Canada written in Morse code. I'll tell you more about it in February, when my block is up. The BOM kicks off this month and I can't wait to get started. If you'd like to participate, check out the Sew Sisters Quilt Shop website. Instructions for two blocks are sent out each month, with the instructions for the layout and sashing coming in the 11th month. Could be done for Christmas...just sayin'... What a great way to celebrate 150 years, eh?

Spending time with guilds is a great source of inspiration especially when I get to teach them a workshop as well as do a trunk show.

Canadiana is a traveling exhibit by members of the Fibre Art Network. The show opened in January 2015 at the New Zealand Quilt Symposium in Palmerston North, New Zealand. It continued on tour until May 2017. Participants were asked to explore, in fibre, their sense of place in Canada, considering its history, environment, the people,

Here it is! My Canada 150th quilt design is now a top! Dancing a happy jig over here! Canada 150 quilt top - 58.5" x 69.5" There's a pattern too! "150" by Canuck Quilter Designs pattern cover I'm sure you noticed there isn't a finished quilt on the cover. Generally speaking, I don't like EQ drawings as pattern covers. I like to see a finished quilt that proves it's doable and looks decent in actual fabric. However, I know some folks want to get started on this to have a quilt to show off on Canada Day in July, so I focused on the pattern writing before the quilting. I figure those folks can see the flimsy here for proof that it's doable! As soon as I have the top quilted, I'll have a photo shoot for the pattern cover quilt and fix that cover. You see that thin little maple leaf border? I bought a ridiculous amount of border print to get that stripe of maple leaves. I needed a length of fabric equal to the length of the quilt, so I bought 1 3/4 yards. That thin little border isn't very wide. After cutting four strips of maple leaves and discarding the print in between the strips that I didn't need for this, I still have 36" of width left! Still, I love the look. The splurge was totally worth it! I'll find some other celebratory project to use up the rest. Still, if that splurge is not in your budget, you can substitute another fabric, such as polka dots, small stripes or a solid, and get by with 1/8 yard (1/4 yard as stated in the pattern if you prefer wiggle room in your cutting). Or, you can find quilty friends who might want to split that border strip yardage lengthwise with you! You can get 5 quilts' worth of that thin border from the 1 3/4 yards. Here's a list of the Northcott Sesquicentennial Collection fabric I used for my quilt: Newsprint print (21359-11) Red texture (21341-24) Off-white (21341-11) White-on-red leaf print (21361-24) Border print (21362-11) Backing will be the Canadian trivia print: 21360-11) In a previous post I offered to suggest a sewing schedule, so here it is. It really doesn't take long to put this quilt together, but I'm spreading this schedule out over 8 weeks to help folks fit it into small chunks of time here and there and still get a finish by Canada Day. Week 1 - Cut fabric Week 2 - Assemble large leaf Week 3 - Construct short leaf tip units for small leaf blocks Week 4 - Piece long leaf tip units for small leaf blocks (super simple unit to paper piece, just 3 pieces - I'll post a tutorial if you ask for one) Week 5 - Piece the small leaf blocks' stem units Week 6 - Assemble small leaf blocks from units made in weeks 3-5 Week 7 - Assemble all parts into quilt center Week 8 - Add borders If you start this week, you can be done by the first week in June and have 4 weeks lft for the quilting and binding. Easy peasy! In celebration of Canada's 150th birthday this year, I'm offering the pattern free for a limited time in my Payhip shop. Get yours now and get started! I'll have a linky party on July 1st to share finished quilts, flimsies, or any progress at all on this quilt or any Canada related sewing. Linking up with Celebrate - Fêtons 150 at Quilting and Learning Midweek Makers at Quilt Fabrication Let's Bee Social at Sew Fresh Quilts

Happy Friday, everyone! No idea where this week went, but here we are. I'm a little punchy this morning because I stayed up ridiculously late last night to finish this top. And son #3 is fighting a stomach bug this morning so we are cuddling on the couch watching his favourite show "Super Why" in between bouts of vomiting. Poor bug! As riveting as Super Why is and as much as I enjoy the cuddling time, I know that if I don't do something right now, I'll fall asleep so here's my homage to the Hudson's Bay Company point blanket. For those who've been following along for some time, I posted this EQ design a couple of months ago. I was pleasantly surprised at the response; clearly I'm not the only one with a love for those blankets! Yesterday, the design went from this: To this: To this: As a number of you mentioned that you'd like to do one of these too sometime, I thought I'd share my measurements to save you some time. This quilt will be 90" square (I like my queen-sized bed quilts big). Fabric for the top (NB: These are generous fabric requirements. I did not want a seam in the stripes and I knew I'd be using the colour stripes on the back too so I bought the stripe fabric for the width of the quilt): 2 - 2.5 meters (3 yards) of off-white cotton making 5 meters (6 yards total) 2.5 meters (3 yards) indigo cotton 2.5 meters (3 yards) yellow cotton 2.5 meters (3 yards) red cotton 2.5 meters (3 yards) green cotton Cutting Directions: 1. Fold all of your fabric so you will be cutting along the length of the fabric instead of the width. 2. From the off-white fabric, cut: 22.5" wide by 92" 2 - 6.5" wide by 92" 6 - 4.5" wide by 92" 3. From each of the indigo, yellow, green and red, cut: 2 - 4.5" wide by 92" Layout Directions: 1. Layout your stripes according to the design above, with your 6.5" off-white strips on the ends and the 22.5" piece as your centre, and sew them together. 2. You can square it up to 90" square now or wait until you've quilted it (I'd wait until you quilt it). And voilà, you have your own HBC top. If you do make one, I'd love to see it and know if these directions are clear and easy to follow. Being the rebel that I am, I'll be doing this "Party in the back" design for my backing. I'll share the measurements when I finish it. If you wanted to make this look like a true HBC blanket, you could make this top again for the back. I'm linking up with Allison and the other TGIFF! participants at Dreaming in Patchwork. She's got a fun Dorothy picnic quilt to share today. That's where I'm headed next! Hope you have a great weekend!

Yes, this beautiful spot is the Rideau River in Ottawa Happy 146th birthday, Canada! If you are visiting with the Stamp On It blog hop with Sew We Quilt, welcome! Special thanks to Madame Samm and Thearica for organizing such a fun hop. There is just something so interesting and beautiful about art than can fit on a piece of paper that is usually less than 1.5" square, don't you think? I also find it amazing that you can send a letter across Canada, to the States or internationally for less than a dollar (well, just over a dollar for outside of Canada). Happy Canada Day, Eh! I used to collect stamps as a kid and I still have my collection...somewhere. I was a philatelist. I was that cool. I know you are jealous. I still can't pronounce philately, but at least I can spell it. Quilting Detail Since this challenge required us to have our country, currency and date on our stamp, I decided to take this opportunity to also do something from my bucket list, #10 in particular. Yep, I now have a wallhanging to celebrate Canada Day. I wanted something very modern. My inspiration came from these stamps, but a maple leaf had to be my theme. Even though the current cost of a regular domestic P (permanent) stamp is currently 63 cents, I chose $1 because Canada is known for its loonie and 1 is my favourite number. And yes, I now remember that the dollar sign should be placed before the 1. Um, design element, yeah, that's it. ;) Quilting Detail Simple quilting to emphasize the design elements. The wavy quilting on the background is for our water. It measures 20" x 35". Happy Canada Day, Eh! Meets the Rideau River So here is my Happy Canada Day, Eh! stamp quilt. And just in time for Canada Day! Some notes about its construction: The low volume background are 2" pieced equilateral triangles. Used the HexNMore ruler - love! The maple leaves, letters, numbers, cancellation mark and stamp edge are machine appliquéd. Quilting is mostly with Aurifil thread (#1103, 2260, 2612, and 2630). The cream on the stamp edge is Coats and Clark because that's what I had on hand and I was running out of time. My machine threw a hissy fit when I free motion quilted with it on the stamp edge and I was very close to making an emergency drive to Kanata for the matching Aurifil. Reason prevailed thankfully because I do not live close to Kanata. I did a major clean of my machine, changed the needle, rethreaded everything and managed to finish that section without too many more hiccups. Totally fabricated conspiracy theory: You know how people say that McDonalds puts something in their fries so people become addicted? I think Aurifil does something like that with their thread so our machines don't want other threads. Just putting that out there. ;) The quilt has a non-mitred facing to finish it off. Oh, the back? I found this stamp fabric in my stash. Couldn't resist. :) Happy Canada Day, Eh! - Back I can't wait to see what my fellow Stamp On It blog hoppers come up with this week: July 1 Sew Many Yarns Scrapbook-ChickADoodle Patchouli Moon The Slow Quilter A Loose Thread Janes Fabrics and Quilts Selina Quilts Debby Kratovil Quilts Dancing Thru Threads July 2 Sew and Sow Farm fishkopp Scraps of Life Meadowbrook Katie and Kwilts Em's Scrap Bag GrammieQ's How ART you? BumbleberryStitches A Stitch in Time July 3 More Stars in Comanche Dachsies With Moxie NotionNannyHeikesquilt’ Traveling Quilter Jackie’s Art Quilts What About Rheema? From This to That Sew We Quilt 13 Woodhouse Road If you've made it this far, kudos! Because it's Canada Day and I'm doing a happy dance right now, I'm going to share my favourite Canadian dance moves video with you to get you going too: Thanks for stopping by. I always appreciate the company! Hope your day is fun, full of great stamp eye candy, and fireworks!

Deb Tucker’s Northern Neighbors pattern features intricate maple leaves and flying geese. The pattern makes two sizes: Twin (70″ x 95″) & King (104″ x 104″). I b…

This is Eileen’s Quarter Sections quilt and she used the Stonehenge Oh Canada fabric collection. This is one of my favorite versions of this pattern and I made one without borders which I shared he
