

How to Find Best Silhouette CAMEO 4 Cut Settings for Any Material! Stop wasting sheets of material on bad Silhouette cuts. Use this proven process!

How to Find Best Silhouette CAMEO 4 Cut Settings for Any Material! Stop wasting sheets of material on bad Silhouette cuts. Use this proven process!

These are the Silhouette Cameo cut settings I always use for cutting and scoring my papers on my Silhouette Cameo 3 machine based on the gsm of paper.

I know everyone is always looking for the “perfect cut settings”.Well, let’s just start with That is a myth! What you will see is many “suggested settings”.Even in the Silhouette software, there are “preset settings“.These are just a starting point. Why? Well, the first reason is Not all materials are created the same.You may have… Continue reading Perfect Cut Settings in Silhouette

If you have trouble cutting paper with your Silhouette - fear not! This Silhouette tutorial will tell you the perfect cut settings for all kinds of paper

How to cut and weed distressed designs and fonts with Silhouette Cameo.

Is Oracal 751 dishwasher safe? How does Oracal 751c compare to 651? Should crafters being using 751? All your burning questions answered.

Use your Silhouette cutting machine to make custom sticker sets. This step by step Silhouette Studio tutorial will walk you through all of the steps from start to finish.

Tutorial on how to cut felt with Silhouette.

Finding the right cut settings for your Silhouette Cameo can be difficult. That's why we put together this handy chart with all of our products. We have the right cut setting for Oracal 651, Oracal 631, Iron-On, Cardstock, and more below.

If you've been trying to figure out how to use your Foil Quill with Silhouette CAMEO 4 you're in luck. In this Silhouette tutorial I'll show you exactly how to get your Foil Quill tips working in the CAMEO 4 - even with the re designed CAMEO 4 tool carriages. Are you ready to make some stunning foiled stickers?! The key to making the Foil Quill play nice with the CAMEO 4 is to use the D adapter that comes with the Foil Quill tools. Best Foil Quill Adapter in Silhouette CAMEO 4 This is labeled for Sizzix and is shaped differently than the A adapter which is the adapter needed to use the Foil Quill in the other Silhouette machines. If you got rid of the extra adapters thinking you'd only need the A adapter to use the quill in your Silhouette machines, you can buy a replacement set of Foil Quill adapters OR you can get a full set with the purchase of any of the quill tips including the new Quill Bevel and Etching tips. Once you have the D adapter, thread it onto the Foil Quill and place it into the left tool carriage - Carriage 1. The adapter does not have teeth, but you can still press in the lock to keep the Foil Quill securely in place. Plug it into a USB adapter or use the WRMK Foil Quill power brick to warm up your Foil Quill tip while you prepare your design. Remember to use the metal plate to prevent the heated tip from damaging the cutting machine while heating OR have it heat up before you place it in the carriage. Foil Quill Cut Settings in Silhouette CAMEO 4 If you are used to using your Foil Quill in your CAMEO 3 or other Silhouette machines, the same settings won't work. They produce too much pressure so you'll need to adjust them. Head over to Silhouette Studio and start in the Send panel. Pick the CAMEO 4 from the machine list and then select the Action as "Sketch". Change the Tool to Sketch Pen. The best cut settings for using the Foil Quill in Silhouette CAMEO 4 are a Force of 4 and a speed of 7 with a single pass. By the way, I found no matter what settings I used with the fine tip Foil Quill it was still too much force and the foil ripped so I would only recommend the standard and bold FQ tips for use in the CAMEO 4. Preparing Your Silhouette Design to Foil Prepare your design in the Design area of the work space. Single line designs and fonts are ideal for sketching and foiling. I'm using the entire set of 16 Foil Quill Christmas Stamps and foiling onto clear (printable) sticker paper from Online Labels. I prefer to place my design slightly down on the cutting mat. I do this as a habit when foiling so IF I decide to foil and cut, like I did here, I can remove the foil before cutting and it's not stuck under the rollers. OPTIONAL STEP: To cut out the stickers, I selected the outer circle and created a small offset. This line will NOT be foiled, only cut. Now you're ready to foil. Place your sticker paper or paper on your cutting mat and your foil on top of that held down with tape or with the edges stuck to the cutting mat and pulled taunt across the paper. If you do this be aware you will get foil bits on your cutting mat. Due to the big metal bar on the CAMEO 4, it's challenging to use the Foil Quill Magnetic Mat in the CAMEO 4 because the magnets want to stick to the bar. Load your cutting mat into the CAMEO 4. If you haven't yet loaded the Foil Quill into Carriage 1 do so now - just make sure it's been warming up for at least about five minutes. Move back to the Send panel. If you created an offset to be used for a cut line, turn that cut line off by selecting it (only) and clicking "No Sketch". When you're ready, click "Send" to begin the foiling. When the foiling is done you can remove the cutting mat if you are completely done. If you created the offset line to cut around your stickers, DO NOT REMOVE YOUR MAT! If you need to cut something out, like I did with the stickers, remove the foil from the mat (leaving the paper or sticker sheet on the mat) and take the Foil Quill out of the carriage. Pop the Autoblade in Carriage 1. Return to the Send panel in Silhouette Studio, this time turn OFF the cut lines for the areas that have already sketched. Turn the cut lines on for the outer offset circle. The AutoBlade and Auto Cut action should automatically be detected. For the Online Labels Clear Sticker Paper, I use the default cut settings in Silhouette Studio for Sticker Paper, Clear. Click Send again to begin the cutting. Once the cutting is done you can unload everything. You should easily be able to remove the negative space of the clear sticker sheet. I just LOVE these clear stickers with the gold foil. They are so classy and look gorgeous! I mean really, how cute are these?! And how happy am I that I can still use my Foil Quill in CAMEO 4. Note: This post may contain affiliate links. By clicking on them and purchasing products through my links, I receive a small commission. That's what helps fund Silhouette School so I can keep buying new Silhouette-related products to show you how to get the most out of your machine! Get Silhouette School lessons delivered to your email inbox! Select Once Daily or Weekly. Subscribe Here!

7 tricks for successfully cutting tiny vinyl designs with Silhouette Cameo - even the more delicate thin and swirly script fonts!

The best paper to cut with Silhouette CAMEO and the best Silhouette cut settings for card stock.

The perfect Silhouette cut settings and heat press temperature for Siser Metal Gold and Silver Heat Transfer Vinyl

One of the big brags of the Silhouette CAMEO 4 is the power of the high pressure right side tool carriage which is reserved for just three tools: the Rotary Blade, the Punch tool and the 3mm Kraft Blade. The 3mm Silhouette Kraft Blade, which can ONLY be used in the CAMEO 4, is a very powerful tool which not only can cut through thick materials, but can also take advantage of the increased force of Carriage 2. However, it requires a whole different type of cutting - and thinking and planning. I would suggest you read this blog post first before you get started as I've intended it to be an overview with some best practices for using the Silhouette 3mm Kraft Blade. Unlike the AutoBlade or even the CAMEO 4 Rotary blade, you can not just pop the 3mm Kraft Blade in the Silhouette machine and expect to have a successful cut. You need to plan. And you need to be patient. This is NOT a fast process - in either the design or cutting process. If you rush, if you pick the wrong design, and if you try to cut corners you will end up wasting a lot of material and potentially damaging your machine and certainly your materials. THIS is what happens when you put the 3mm Kraft blade in and try to cut with NO knowledge or planning of how to use this very powerful tool. I have spent days upon days and a whole lot of money in testing materials and bad cuts to finally crack the code on the best practices for using the 3mm Kraft Blade. This blade is so new there is NO information out there from Silhouette and there's hardly any default cut settings for materials the manufacture claims to cut. For that reason, I am giving you MY best tips. This is what's worked for me...based on the EXACT materials I'm using. There are a lot of variations of leather and balsa wood and mat board... What Materials Can the 3mm Kraft Blade Cut: The 3mm Kraft Blade should be considered for thick, dense materials. I have successfully cut - multiple times - this genuine Cricut leather, this 2mm balsa wood, and I am currently testing to find the right combination of materials and cut settings for mat board and basswood sheets. Preparing Your Material and Cutting Mat A high tack cutting mat is suggested for a lot of the materials that can be cut with the 3mm Kraft Blade. The mat will keep the material in place - and help prevent slipping - during the necessary multiple passes. You'll also want to tape your material onto the mat to ensure it doesn't move. I used washi tape on all four sides of my material to secure it to the mat. If possible try to put your material towards the center of the mat as opposed to right near the edge of the grid - or at least position your design there. I used both the Silhouette Strong Grip mat and the Cricut Strong Grip Mat. The Silhouette mat is thinner and more pliable. While I successfully cut balsa wood on it, I found the mat bubbled a bit - side to side - while cutting. I think this was due to taping the material to it and then it slowly moving out from under the roller. The bubbling caused the multiple passes to be slightly off which resulted in some bad cuts. There are also no mat supports on the CAMEO 4 so you need a mat sturdy enough to support itself and the material on it. The Cricut mats are thicker and more sturdy. I did not experience any bubbling or mat movement with them. However be aware the thickness of your mat CAN change your cuts because a thicker mat may result in more pressure during cutting. Finally, I found it best to cut from the back side of the material (so the design is cut in reverse). This keeps your mat cleaner (especially on materials like this leather), your cuts cleaner, and if you get a bad cut on the first pass you likely won't even see it on the front side. ;) Picking the Right Design for the 3mm Kraft Blade The 3mm Kraft Blade - and 2mm Kraft Blade for that matter - are NOT for small intricate cuts. I repeat, the Silhouette Kraft Blades are NOT for small intricate cuts. This is a big broad blade. It can not make small intricate cuts. A few other things to keep in mind when picking designs for your Silhouette Kraft Blade. It does better on curves than it does on sharp corners. Designs should be at least a third of an inch wide at their narrowest point. Designs should also be positioned so they are NOT too close to the edge of the material to avoid splintering and to avoid the blade going off the edge of the material. If you have a design - like this three piece bow - I would highly suggest you cut each separately and not all in a single pass. The reason is, if the blade gets caught up at any point, the multiple cut lines can end up off. It's better to have one piece off than three. Trust me...I did a lot of testing. Multiple Passes with Varying Force and Blade Depth Remember that video I shared with you up there? There are two big reasons it did all that grinding. The first is I tried cutting with the loops or smart cuts on. Those are the small cuts in the negative space that the software automatically adds for rotating the blade, when you use the Action "Kraft Cut". The problem is the blade often got stuck in them and then it messed up the entire cut. Turning those off helped significantly. Secondly, I tried to just cut the material at full force at full blade depth from the start. That's NOT how the 3mm Kraft Blade works....if you want to get good cuts. Believe me. I know. Basically you need to first puncture and then score the material with the initial pass. Then you need to add a few more passes increasing the force SLIGHTLY with each pass then finish it with a deeper cut but lesser force. What this does is after you have cut through the material about 95% of the way, the deeper blade depth then does the last pass with just the tip of the blade slicing through the very last layer of the material. By backing off the pressure on this last pass you are preventing the blade from digging in and grinding into your cutting mat. Setting Up Your Design for the 3mm Kraft Blade Since the Silhouette software can't automatically apply varying force with each pass - you'll need to force it to do it. You do that in both the Design area and the Send panel by setting up a stacked set of copies of your design and then utilizing the Cut By Fill Color option. Each of these layers will then be assigned a different cut setting - each with a different force. Cutting by Color with Multiple Passes and Varying Settings In the Send Panel, it will look something like this. You'll notice each color layer has a different Material. All of those custom material settings I had to add manually - and each has a slightly different force as we talked about earlier with the scoring then adding increasing force with each pass. This is something you'll have to do one time for each material you try to cut. Once you add the material set you don't need to do it every time you cut that material again. So the next time I cut a piece of genuine Cricut leather, the settings will already be in there for me. If I cut a different type of leather I will need to add settings for that leather since there are likely variations on thickness!! I will, of course, have a Silhouette tutorial soon on how to add these special types of custom material settings. For today, however, I don't want you to get overwhelmed with information. I just want you to be aware of this different type of cutting when using the 3mm Silhouette Kraft Blade. The final step is to hold on tight. Say a prayer. Sip your wine and press Send. DO NOT WALK AWAY FROM YOUR MACHINE WHILE IT'S CUTTING. I would actually suggest you keep a light hand on the edge of your mat. This first pass is basically a score. You're making a track of the blade to follow for the rest of the passes. If the blade stutters at all - just kind of help it out of the rut by pushing or pulling lightly so it keeps moving. Don't worry if the second pass is slightly off from the first. As long as passes 2-5 are in the same spot you should be okay! The machine will slightly lift the blade between each pass as it adjusts the pressure/force you set up before completing passes 2-4. You'll adjust the actual blade depth after the 4th pass for that final pass. Before you unload the mat and material, check that you can pop your cut out. It should be a clean cut. Once you've confirmed it's a clean cut you can unload the cutting mat and your material. Now you're ready to either cut your next piece or start assembling your project!! Note: This post may contain affiliate links. By clicking on them and purchasing products through my links, I receive a small commission. That's what helps fund Silhouette School so I can keep buying new Silhouette-related products to show you how to get the most out of your machine! Get Silhouette School lessons delivered to your email inbox! Select Once Daily or Weekly. Subscribe Here!

The best thin, soft and stretchy heat transfer vinyl to use with Silhouette CAME - plus the perfect cut settings to prevent curling while weeding.

How to print on clear sticker paper with Silhouette CAMEO Print and Cut and avoid registration mark errors!

Tips for how to use stencil film with a cutting machine! Get perfect lines on your next painting project! Great with Silhouette and Cricut!

How to print on clear sticker paper with Silhouette CAMEO Print and Cut and avoid registration mark errors!

How to set up your Silhouette CAMEO and Silhouette Studio to cut vinyl and heat transfer vinyl without a cutting mat

Big monochrome set of different animals Download SVG, PNG, EPS, dxf, jpg digital download Using with a cutter? For Cricut, SVG will work best, for Silhouette Cameo, you must have the Designer Edition upgrade to use the SVG Digital download. Files will be delivered electronically. An automated instant download email will be sent to your Etsy email address, which will contain your download links. The digital files can be used with numerous cutting and printing software and machines (Silhouette, Cricut etc.) ***This is a DIGITAL PRODUCT – INSTANT DOWNLOAD ONLY*** *** NO PHYSICAL PRODUCT WILL BE SENT***

It's now easier than ever to cut felt with Silhouette CAMEO. The trick is to use the CAMEO 4 rotary blade - and you can skip the stabilizer. The rotary blade rolls across the felt rather than dragging the blade through it, which allows both acrylic craft felt and wool felt to cut very easily. Preparing Felt to Cut on Silhouette Start by placing a sheet of felt on your Silhouette cutting mat. That's it - you do not need a stabilizer, just put your sheet of felt right on your mat. If you want to make sure you don't leave felt fibers behind, use this contact paper trick to keep your mat clean and sticky! Next you want to roll a brayer over the felt. I suggest you do not skip this step. It will allow you to get the best possible stick and remove any wrinkles in your felt. Setting Up Your Silhouette CAMEO 4 and Software to Cut Felt Load the cutting mat into the Silhouette CAMEO 4. Ensure the cap on the rotary blade is twisted all the way up so the rotary wheel is exposed. Place the Silhouette Rotary Blade in the right tool carriage of the CAMEO 4. This is the high pressure, specialty tool carriage - Carriage 2. Power on and connect the CAMEO 4 to your computer by USB or Bluetooth. Move into Silhouette Studio. From the Send panel select an available machine from the machine list. Expand the Carriage/Tool 2 settings. Change the material to Felt, Acrylic. The software should recognize you have a rotary blade in the carriage and auto detect it. The tool should change to "Auto (Rotary)" and the action to "Auto (Rotary Cut)". Designing for the Rotary Blade Move to the Design area and open the Page Setup Panel. Select the machine, Mat size, and Material all as Auto. Open your design in the work area. I am using this 3D bow design to make felt bows. The design comes in grouped together so I ungrouped it and deleted the parts I did not want to use. Keep in mind, the rotary blade will work better on some designs than others. It works best on curves rather than corners. It will still work on corners, but with every corner you will produce another loop which is how the wheel turns. The rotary blade can 'drive' on curves so you get fewer loops. Designs with a lot of loops put more stress on your material on the mat and more wear on your rotary blade. Once your design is all sized and ready to go, move back to the Send panel. Cutting Felt with the Silhouette Rotary Blade The Design should have blue cut lines around it and you'll notice some extra lines in the negative space. These are the loops. Again, the loops are how the Silhouette rotary blade turns and changes direction. I have found the best cut settings for felt are the default cut settings for Felt, Acrylic in Silhouette Studio. I have used these cut settings for multiple types of felt and they work very well. When you're ready click "Send" to begin cutting. When the cutting is finished unload your cutting mat and simply peel up the felt pieces. It's amazing how well felt cuts - both acrylic and wool! If you notice you are getting some pulls increase the force slightly the next time or if it's been awhile your rotary wheel may be getting dull so you may need to replace it. Now you just need to assemble your felt bows! And that's it! Attach them to a clip or a headband to make a cute piece for a little girl's hair! Wondering what else the Silhouette rotary blade can cut? Check out this list of materials you can cut with the CAMEO 4 Rotary Blade. Note: This post may contain affiliate links. By clicking on them and purchasing products through my links, I receive a small commission. That's what helps fund Silhouette School so I can keep buying new Silhouette-related products to show you how to get the most out of your machine! Get Silhouette School lessons delivered to your email inbox! Select Once Daily or Weekly. Subscribe Here!

The key to cutting with the Silhouette 3mm Kraft Blade is cutting in multiple passes with varying levels of force and blade depth. Because Silhouette Studio is not able to do this automatically, you need to set up a series of custom material cut settings for every material you cut with 3mm Kraft Blade. If you haven't read over my Tips and Best Practices for the 3mm Kraft Blade yet, do that first. There is a lot of very important information there to help increase the chances of a successful, clean cut and reduce the risk of damaging your machine, blade, and material. Remember, the 3mm Kraft Blade is not a tool you put into the Silhouette CAMEO 4 high pressure tool carriage and just start using to cut. There is a lot of prep work that needs to happen first so don't try to do his when you're rushed - especially the first time. In general, the most successful cuts I've had with the 3mm Kraft Blade are when turning OFF the smart tool cuts (aka those extra loops used to help the Kraft Blade turn in combination with using a series of 5 passes of varying forces. Why a Series of Passes? Gradually cutting through your material rather than trying to puncture and cut it clear through is a much better strategy which is why a series of passes works best. The goal of the first pass is NOT to cut the material. It's to create a track or score so the blade has something to following during the remaining passes. The goal of the next three passes (passes #2-4) are to cut deeper and deeper into the material. And the last pass (pass #5) is to slice away the shape from the material with just the very tip of the blade. During all of this the goal is to avoid the blade digging into the mat which can mess up the entire cut. Unfortunately there are hardly any recommended default cut settings in Silhouette Studio for materials for the 3mm Kraft Blade. That means you need to add your own. But where do you even start? Start with the Blade depth. Deciding What Blade Depth to Start With To find the blade depth, take your 3mm Kraft Blade and twist the cap fully closed. You should see a slight black rim. Then, twist in the other direction to line up the red line with the 1 so you have a starting point. Now, hold your material in one hand and twist the cap of the blade so it is the same depth as your material. Literally line up the blade against the edge...but not hanging below. You should NOT be able to feel the tip of the blade if you rub your finger under the material. For the Genuine Cricut Leather I am using in this example, the blade was on a 16 which makes sense because the material is about 1.6mm thick. This is the blade depth you are going to use for Pass #5 - the final pass. Write that blade number down. The first four passes of the material you're going to use a SLIGHTLY lower blade depth. This way the blade does NOT drag into the mat. For this leather I went with a blade depth of 14 on passes 1-4. Now you have your blade depth(s) and you know you need to add increasing force for passes #1-4 starting with a relatively low force. I usually start with a force of 4 and add 3 with each pass. Then on the final pass, when I change/increase the blade depth, I use the original force. So for this leather it would look like this: Pass 1: Blade Depth: 14, Force 4 Pass 2: Blade Depth: 14, Force 7 Pass 3: Blade Depth: 14, Force 10 Pass 4: Blade Depth: 14, Force 13 Pass 5: Blade Depth: 16, Force 4 Speed is ALWAYS slow. Always. Like a speed of 1 or 2 on every pass. Keep in mind none of this is an exact science. We're crafting here...but using this strategy will give you a good chance of success when you're basically 'guessing'. Now you have your five cut settings for your single material, how do you add them to the software? Adding Custom Cut Settings for 3mm Kraft Blade Each of the above passes needs to be added to your material list as a custom material setting. Get in the habit of naming them something like "Cricut Leather 1", "Cricut Leather 2" and so on. The number indicates the pass number so Cricut Leather 1 is the first pass and the settings would match Pass 1 above. As we add these, through the "More" option on the Send panel, we are also going to turn off the smart cut loops by choosing the action as "Cut" rather than "Kraft Cut". Okay let's start with the first one. Open the Send panel. Expand the Tool 2 options and select the material Craft Foam. It's the ONLY one right now that has the 3mm Kraft Blade as a tool option Change the Action from "(Auto) Kraft Blade" to "Cut". This will remove the loops in your work area Click More From the Advanced Material Setting panel you an add custom cut settings. Select the Craft Foam setting > Right click and click "Duplicate 'Craft Foam'". It will show up as "Craft Foam (2)" at the bottom of your list. Right click and select "Rename". Then type in the new name. I changed it to Cricut Genuine Leather 1 for this example. Make sure CAMEO 4 Tool 2 and "Cut" are still selected Using the blade depth and force settings you wrote down for pass 1 change the Blade Depth and Force settings. Click "Save." Now right click Genuine Cricut Leather 1 and select "Duplicate Cricut Genuine Leather 1". You'll now have "Cricut Genuine Leather 1 (2)". I'd suggest you change the name to "Cricut Genuine Leather 2". The blade depth is the same as the first pass so you don't need to change that or the speed, but update the force. Click Save. Repeat for passes 3-5 ensuring that on Cricut Leather 5 you change both the force AND the blade depth. Click the large X to go back to the Send panel. You can test that your custom cut settings saved correctly by clicking the Material List drop down and finding your set of settings at the bottom. Click on one to ensure it saved correctly. If not update it and click "Save." You'll use each of these settings when you cut your design which you'll set up with a stack of - you guessed it 5 - copies of your design. Filling them with color will let you cut by color. Then your Color Send panel will look like this with each colored layering being assigned a different custom cut setting - in succession. A pause between pass 4 and 5 will force the machine to pause giving you enough time to manually adjust the blade depth from 14 to 16 for this leather. I'll have more in depth tutorials on this part of the process in the near future, but I don't want to overwhelm you with information since this a totally new process for almost everyone. Again remember, this is not a fast process. But if you take the time to set it up correctly, you will have much better results when cutting. Note: This post may contain affiliate links. By clicking on them and purchasing products through my links, I receive a small commission. That's what helps fund Silhouette School so I can keep buying new Silhouette-related products to show you how to get the most out of your machine! Get Silhouette School lessons delivered to your email inbox! Select Once Daily or Weekly. Subscribe Here!

You've probably heard the term "kiss cut" when it comes to making print and cut stickers on your Silhouette CAMEO or Portrait. This is a sponsored post, but all opinions are my own. If you're not sure what that means or how to get a kiss cut - I've got the answer for you today! A kiss cut is a cut made on a lined material such as sticker paper. A line material has two layers: the material and the liner. A kiss cut is achieved when the cut only goes through the material later leaving the liner uncut. A full cut - to make a sticker sheet, for example, would go through both the sticker material and the liner. The trick to perfectly kiss cut stickers or vinyl decals is making sure you have the right Silhouette cut settings - specifically blade depth and force. As you know there are lots of options for materials, but there are hardly any standards for material thickness. For that reason, if you one brand of sticker paper one time and another brand of sticker paper on your next project you may not always be able to get a kiss cut on your first try without testing a whole bunch of cut settings. That's why I always stick with Online Labels sticker sheets. There are, of course, lots of different types of Online Labels materials, but once I find the perfect cut settings I create a custom material setting in Silhouette Studio and never think about cut settings again. Here are the best Silhouette Cut Settings to get perfect kiss cut stickers on five of my favorite Online Labels materials. Printable White, Matte Blade 2, Force 14, Speed 8, 1 Pass Printable White, Glossy Blade 3, Force 20, Speed 4, 1 Pass Printable White Weatherproof Blade 2, Force 14, Speed 4, 1 Pass Clear Printable Blade 3, Force 20, Speed 4, 1 Pass Brown Kraft Sticker Sheets Blade 3, Force 30, Speed 3, 1 Pass Note: This post may contain affiliate links. By clicking on them and purchasing products through my links, I receive a small commission. That's what helps fund Silhouette School so I can keep buying new Silhouette-related products to show you how to get the most out of your machine! Get Silhouette School lessons delivered to your email inbox! Select Once Daily or Weekly. Subscribe Here!

Check out the perfect Silhouette CAMEO cut settings for cutting Shrinky Dink sheets with your cutting machine.

How to Cut Laminated Shapes and Print and Cuts with Silhouette. Silhouette laminator sleeve cut settings.

Finding the right cut settings for your Silhouette Cameo can be difficult. That's why we put together this handy chart with all of our products. We have the right cut setting for Oracal 651, Oracal 631, Iron-On, Cardstock, and more below.

Old people SVG silhouette set png eps jpeg Cricut scrapbooking gold glitter silhouette cameo father day invitation man woman black paper craft free png files. Set of 15 people silhouettes each format and bonus PNG gold glitter silhouettes. You can use for your craft projects, invitation, congratulation cards, special albums, cut on the plotter machines, edited in graphic programs for all of your some DIY project. • 15 SVG editable silhouettes • 15 EPS editable silhouettes for use with vector editing software like Adobe Illustrator or Corel • 15 PNG Transparent background files (High quality / 300 dpi) • 15 JPG files (High quality / 300 dpi) + 15 PNG gold glitter silhouettes free Enlarge to any size (SVG and EPS). Print quality files. For cutting machines and plotters PC/Mac compatible. PNG and JPEG files you can use for sublimation printing. If you need a DWG format, write to me and I will send it to you in addition. Other collection of silhouettes and items for craft project https://www.etsy.com/shop/ScrapArtStudioEU?ref=hdr_shop_menu§ion_id=21067641 We invite you to visit our shop and contemporary wall art. https://www.etsy.com/shop/GecleeArtStudio?ref=hdr_shop_menu Thank for a visiting to my store!

A selection of free silhouettes in vector and PSD formats - businessmen and women silhouettes, sportsmen and dancers silhouettes, animals, trees, and more.

How to cut a score line with Silhouette CAMEO or Portrait.

How to cleanly cut cardstock and paper with Silhouette using the Line Segment Overcut feature.
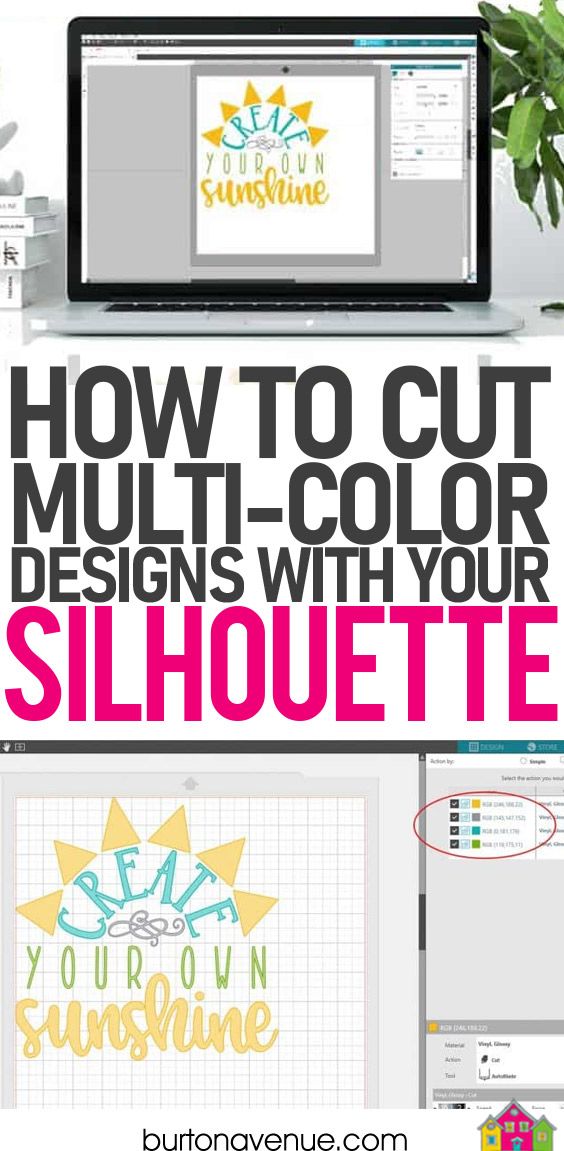
Are you a Silhouette owner that wants to cut multi-color designs, but aren’t really sure exactly how to do it? Well. you’ve come to the right place! Multi-color designs are super cute and lots of fun to make. Today, I’m going to walk you step by step through the process of setting up your multi-color … Read more...

2 pc seaweed cutout set. 60cm tall each. cut to shape and free standing. Printed on 3.5mm correx board

How to make kiss cut stickers on mini sticker sheets with Silhouette CAMEO

How to design and cut a reusable repeating wall stencil with Silhouette CAMEO

Vorige week heb ik een bestaand plaatje laten zien die verdeeld werd in kleuren om daar een sticker van te maken. Maar dat kun je natuurlijk met elke afbeelding doen, kleurplaten lenen zich daar uitstekend voor. De lijnen zijn al mooi aangegeven, je mag zelf de kleurtjes bedenken. Hier thuis zijn ze aardig ' Banana' ofwel…

How to manually set your Silhouette CAMEO Autoblade if it's not cutting or adjusting the blade depth correctly.

Tips for how to cut small vinyl text with Silhouette CAMEO.

One of the most powerful and versatile tools you will use with your Silhouette Cameo die cutting machine is the blade. There are several different varieties of blades available, let’s check them all out and see how they can be used. 1. Self Adjusting Blade The new Self Adjusting Blade is the “new blade on the block!”
