

The 2012-2013 school year was our first year homeschooling. I had a 5 1/2 year old and a just turned 4 year old and we were doing My Father's World Kindergarten curriculum. I loved the Biblical integration along with the phonics and science instruction, and the gentle introduction of math concepts through daily activities. There was only one thing I didn't love - the handwriting instruction, or, in my opinion, the lack thereof. While it included practice pages for each letter, along with instructions for how to form each letter, these were grossly inadequate for my child, who rarely picked up a crayon to color, and who's writing and drawing ability included drawing a line and a circle. He had never been to preschool. He was such a busy child who learned plenty through playing. He knew his letters and sounds before he was two years old. But he was never interested in coloring or drawing, and I never pushed it. I knew he'd learn to write in Kindergarten, and I was fine with waiting until then. However, once we started Kindergarten, I knew he needed more instruction. The curriculum, which began with practicing writing the letter S in the first week was NOT the recipe for his writing success. Immediately, I knew he needed an introduction to writing on three lines, and he needed to start by writing horizontal, vertical, and diagonal lines on those three lines. As a third grade teacher I had used Zaner-Bloser handwriting curriculum, so I went to their website and ordered samples of their Kindergarten and First Grade books. Upon receiving them, I was happy to see that they began with learning to write horizontal, vertical and diagonal lines. From there it progressed to the letters L, I, T, etc. I could see right away that this was much more developmentally appropriate. However, the directions for teaching were still boring. It used the terms "horizontal, vertical, and diagonal" - new terms for my children who were also learning a new fine motor skill. I was looking for cute, kid-friendly descriptions...maybe even pictures of letter and numbers turned into characters to help children remember their formation. I remembered learning that kind of thing as a child who was learning to write. I searched the internet but didn't find what I was looking for....until I found Handwriting Without Tears. It had hands-on teaching materials that taught the components of writing, with child-friendly vocabulary (Big Line, Little Line, Big curve, little curve). For lower case letters, fun descriptions included phrases like "dive down," "magic c," "Slide down," and "Up like a helicopter." It also gave instructions which would help eliminate reversals, which is something my four year old was doing. However, by the time I was convinced it was what I needed, we were done with Kindergarten, and my child had already learned to write, for the most part. However, I like the HWT approach as it transitions into cursive writing, so I decided it was worthwhile to go back and teach HWT handwriting from here on out. However, I didn't want to purchase all their materials, so I found some ways to do it myself at home, with homemade materials and free printable from the internet. I want to use this blog to share what I have done. Here is a downloadable sample of Handwriting Without Tears alphabet poster. However, this sample can be printed on regular copy paper and laminated - a perfect size for homeschooling or one-on-one tutoring! Using materials I already had, (construction paper, magnet tape, a compass, a ruler, scissors and a laminator) I created magnetic pieces that would fit on our small magnetic white boards. This mimics HWT's Wood Pieces for Capital letters, their magnetic pieces, and magnetic board. These materials, along with their other hands-on products can be seen here. Homemade laminated letter pieces on our white board. Magnet tape on the back of the letter pieces. In place of HWT's chalkboards, I also created small white boards for teaching and practicing capitals and lower case. I used a 3 1/2 x 5 photo frame for the capitals, and a 5x7 photo frame for the lower case. These handwriting without tears products can be found here for capital letter board and here for lower case lettter board. Then, I found free printables to help with the teaching terms here. I put them, along with free printable practice pages I found online such as this one in plastic sleeves and bound them together with rings. I have also found the videos on HWT's website and on you tube to be very helpful in explaining their teaching methods. We enjoyed doing the Mat Man activity with my homemade pieces. (See this video). This also helped my oldest who couldn't seem to get beyond drawing people with arms and legs coming out of their heads! Mat Man pieces store in a plastic sleeve Our "Mat Man" I plan to purchase the workbooks and teacher's books on grade level, but for now I can get started with these items! (Update: I still haven't purchased the books, but am using these homemade materials with success!).

Shannon, one of our fantastically talented teachers, created this amazing 6-foot by 6-foot periodic table-inspired bulletin board for our school hallway at the beginning of the 2012-2013 school year. The first element refers to our school teams and students, as we are known as the Blues.

One of my big goals for the 2012-2013 school year is to have better behavior management. I know it'll be better because I'll be at a differe...

Part of the lesson on camouflage is for students to "hide" their creature. I let them choose from butterflies to zebras. I use scrapbook paper or sometimes old wallpaper books. We staple them on our classroom walls for a few weeks, then place them in our science journals. These are 2 examples.

Written by contributor Kris Bales of Weird, Unsocialized Homeschoolers. History is boring! Okay, not really, but that’s definitely how I felt when I was in school. Now, history is my favorite subject to learn alongside my kids and one of their favorite subjects, as well. What’s made the difference? In large part, it’s due to …

Are you getting ready for the 2012-2013 school year? This year, I am embarking on the journey of trying to implement a social studies workshop into my classroom instruction. This summer, I spent a few days in a workshop provided by my district. One of the big ideas was looking at the workshop model across the curriculum and to consider how this might help us meet our common core standards during other parts of the day while also (quite possibly) deepening our instruction in those content areas. How do you define a workshop model? In its simplest form, a workshop model includes a minilesson (where the "expert" is offering some advice or tip), work time (where students are working independently, in partners, and often times with the teacher), and a debriefing (where you discuss what was learned--whole group or with a partner, questions that still remain, or you highlight the work that was done during work time that might benefit other students). At our school, most of us teach social studies for 1/2 of the nine weeks and science for the other 1/2. We also integrate social studies and science topics into our reading and writing instruction throughout the year. As I thought about implementing a social studies workshop, I had a few aha! moments and rationales I had to formulate. 1. A workshop model fits perfectly with the other routines/ideas I worked on for social studies this summer--Student Timeline Notebooks and the Social Studies Big Idea Bulletin Board. I can use timeline activities to introduce the time period, as one of my stations, and as something students work on if they finish their "work time" station. The Bulletin Board (and student summary sheet) can be one of the ways I debrief and help students tie everything together. 2. A workshop model can be thought about vertically and horizontally as I plan (vertically meaning the 45 minutes I have for social studies that day--minilesson, worktime, debrief). Horizontally, I can move my social studies workshop week through "introduction (Mon), working in stations (Tues-Thurs), and reflection (Fri)"--doesn't this sound a lot like "minilesson, work time, debrief"? 3. Workshop Model does not have to mean stations AND using stations does not mean I have to do so every day. One thing that might hold a teacher back from using the workshop model is not wanting to give up whole group instruction time completely or that there are many things we can do in social studies in whole group and with partners that take more than the 5-10 minutes you have for minilesson. It might help explain what I'm thinking by looking at the planning template I designed for our social studies workshop: Although I did not list a debrief on Tues, Wed, and Thurs, I will have a debrief on each of those days. It might simply be "Who's a new person you learned about today?" "What's a new event you learned about today and why was it important?" I plan for my minilessons to take 5-7 min, work time to be 30 min, and the debrief to be 5 min. 4. HOLD UP! Why am I going to put myself through doing all of this work? This was one of the questions I had to find a good answer to before I was completely sold on a Social Studies Workshop. Why should I would put the energy into setting up this structure, teaching students the routines, and breaking social studies down to the point where I might actually be planning more for it? With this question, what you really have to consider is the role of the teacher. What will you (I) be doing while students are in "work time?" How will my expertise as the teacher be utilized? Well, this is an opportunity for me to provide more small group instruction. Consider this an extra literacy block. We might be studying fiction during reading, but in social studies workshop small group time, I can teach students how to read nonfiction, find the main idea, use text features, consider the author's perspective, read historical fiction, analyze primary documents, read for fluency, break words apart, determine the meaning of unknown vocabulary, etc. If I am using some form of stations, my big question is WHY? Why do I want to have students doing different things if they are all going to end up doing the same things in the end? I as the teacher have to have a purpose for why I am doing this. I think being able to increase my small group literacy instruction is the PERFECT reason for structuring a social studies workshop. 5. Another way I answered the "why" question was to think about how whole group instruction in social studies typically goes. Let's say we are going to read and discuss a section of the social studies book (I don't do this a lot, but sometimes it makes perfect sense). Okay, 8-12 of my readers are ready to discuss at the same time, 3-4 of my readers won't be ready until the end of our social studies block leaving no time to discuss, and a few of my students may not really be able to understand the text. What are the students who are finished doing? "Just hold tight...soon everyone will be finished and we'll talk about it. You can look at other parts of the lesson or read farther if you want." They may wait to the point where we have to discuss what we read the following day. Hmmm. not what I planned and one of the reasons why we won't get through all of my plans. (I just want to add a side-note here that of course I am scaffolding my readers and trying to help them with the text during this time). So, here's the conviction that I came to. I have students who CAN LEARN MORE. I have students who need things BROKEN DOWN MORE. Given 12 events related to the Revolutionary War, I will have students who can learn about 20, I have students who can successfully learn about the 12, and I have some who may only be able to complete 3. It's not fair to hold the students who can learn more back for the sake of moving everyone along at the same pace through my whole group instruction. This is what we do when we consider ourselves the main source of information (I'm guilty of this for sure). A workshop model with independent work time where students can work at their own pace is a perfect solution to this---differentiation at its best. And, since everyone is doing "different things," I can really modify that task for my kids who need it and no one will notice. Lastly, how do we fill in the holes for students who are moving at a slower pace? Mini-lesson and debrief times are opportunities to pull everything together. Students will hear about different events from one another and will still meet the overall goal of having a working understanding of the time period. The small group/guided reading time for these students will also pull the time period together and allow me to build more background knowledge for them. When reading, they will be able to connect to what they have learned in the stations, minilesosns, and debriefs to the text. Friday, share day, will also provide them the opportunity to learn from what other students have learned. I hope I have your social studies wheels spinning. What do you think about the workshop model in social studies? (Maybe it sounds so simple, but it was definitely a structural shift in thinking for me). Most importantly, I don't think it is going to ADD to my planning too much at all. I actually think it is going to simplify my planning, especially with the gorgeous planning template I made that helps me remember the components I need to plan for. In my next post, I'll walk you through my planning process.

Earlier this week, I got together with my Kindergarten co-workers and we were able to finish our pacing guide for the year. The best part was, we got to meet our co-workers new baby boy! Can you believe we actually got anything done when there was a sweet baby around? We no longer follow a basal/textbook, so planning is completely up to us. We are about to enter our second year of Missouri Reading Initiative (MRI) Training, which is all about writing. So, don't be concerned that you don't see writing on our pacing guide. We are waiting until we meet with our new trainer and then we'll decide what direction our writing will be taking. I didn't want anyone to be concerned that we weren't doing any writing. :) (Click on the picture to see a copy of our pacing guide.) We know that our pacing guide will change as snow days occur, lessons go over the intended time frame or unexpected events take place. However, we're all about being flexible, right? Several people have mentioned wanting to know what the first two weeks of school look like in Kindergarten. I promise to come back once I've met with my co-workers again and I will let you in on our planning. This is our first year in awhile to have everyone doing the same thing at the same time, so we're working on coordinating our plans. So, what other fun themes do you teach that we might want to add?

Updated for the 2016-2017 school year

BYOD (Bring Your Own Device) demonstrated by teachers and students in Rockingham County Public Schools, Virginia.

We love using Apologia for our elementary science curriculum (you will read that a lot in the posts below)! I love the immersion approach and I love that it is God-centered! Plus,

The 2012-2013 Annual Report is filled with notable accomplishments of faculty, staff, and students from the 2012-2013 academic year.

Getting to know your group, oh there so many ways to do that and here's another one: I got ice-breaker questions (examples: What do you do...

I stumbled upon the most awesome pacing guide over at Made for 1st Grade, those ladies really have it together and decided I needed that I should get going an make one for myself in order to gather my thoughts for what I want/need/have to teach this year. This will be my first year of Common Core and it's going to be a crazy one with so many changes! So, I took all of the 1393472 resources my county has given us to help prepare for next year and turned them into a very simple pacing guide. I'm sure this guide will change (especially since there was NOTHING listed on our website for science during the 3rd nine weeks, maybe I don't have to teach science then???) and I definitely teach past May 24th but for some reason my weeks ran out even without Thanksgiving and Spring Break included. I'm also sure that the county will come out with some sort of guide similar to this and I will have to make some adjustments but if you are in 2nd grade next year and wanted to take a peek at what my plan is, I hope this will give you a good idea. I also have to throw in that I'm not crazy about the sequence of our objectives since they changed a lot from last year, but unfortunately that is the sequence the county has given us so I have to follow it. I also wanted to say WOW and THANK YOU to all of who have entered the giveaway!! I'm excited to give away some great resources! You still have until Friday to enter if you haven't already! Click HERE to enter!

Hello, everyone! This week I am going to tell you what my lesson plans were for the first week of Kindergarten. Each week, my lesson plan...

Architectural Design: BKA-BahadırKul ArchitectsClient: Greater Municipality of Kayseri Location: Kayseri/ TURKEYProject Year : 2009Construction Period: 2012/2013Site Area: 10.000 m2Total Floor Area: 2.600 m2Photography: Ket Kolektif / BKA-Bahadır Kul...

Here's the first of several posts as I outline our whole life education plan for 2012-2013. I love the term whole life education, because this is what we aim to do. To build up our children in a variety of ways, not simply academically. While it's important they deepen knowledge and skills, life

I wish I would have taken pictures before the start of the school year when everything was nice and clean! I've made a few changes this year - all pinterest inspired!! This is our morning meeting area, calendar area, classroom library - the hub-bub of the room. I love love my new carpet! This is our calendar area. And the yellow and blue strips in the pocket chart is our daily schedule that we read every morning during our morning meeting. My benches hold part of our classroom library. You can see the headphones behind the bench - this doubles as our listening center area. The CD/tape player is sitting on the floor to the left of the benches. The blue pocket chart is a regular sized one that I folded to make shorter. I use this every day to sort pictures into beginning sound categories, build sentences with our star words, etc. You can also see my reading strategies by the tree. Here is my word wall - pinterest inspired! I use velcro to attach my words so that I am not messing up the paper - I am hoping the paper will last a long time - this took forever to put up and I don't want to do it again for a long time! My number cards that I made - pinterest inspired as well. You can also see my vowel cards that I made and my "sound-spelling" cards that I made that go around that small blue pocket chart. We refer to them when we do our interactive writing. Our "star words" This is our pocket chart center. I have been creating a pocket chart story that goes with each theme we are working on - it has done wonders for my kinders in regards to reading those color words. I also make a book for their browsing boxes that matches the pocket chart story. You can see the zip-loc bag hanging by the pocket chart- that holds the words to the sentence strips. They are to match the words to the words on the strip! My shelf that holds our Star word books, ABC book (abc pages to work on each letter) and on the bottom are our "Activity Workbooks" that go with our reading series This is the wall to the right when you walk in. It has my Literacy and Math workstation rotation boards. Lucky Ducks and my morning work. Students check here every morning to see what their morning work is for the day. Math calendar books. You can also see my write the room cards for math and literacy - it was "M" week and our theme was Monsters! The blue and red tubs are for literacy workstations The green and yellow tubs are for math workstations This is how I organize my workstations. The top paper shows my literacy rotations (they last for 2 weeks) the bottom is math workstation rotations. The center paper tells what is in each tub - this is all beneficial if I have a sub Our classroom bucket - we are filling it very quickly this year!! This is my voice meter that I made - it works very well!! Our writer's workshop check list - Are you sure your story is finished? This was pinterest inspired - this took 4 mini-lessons. I did one page a day (large size) and then I made copies of the pages (shrunk them) and made the starts and it is a perfect anchor chart for Writer's workshop. We also did the Rate your writing one day for a mini lesson. You can hear my students all the time saying "wow that is star work" or "That is not very good star work" they are harder on each other than I am! These are my baskets that sit on the window ledge behind my small group reading table. There is one for each group. I put our supplies in them for each reading group for the week - keeps me organized! This is the shelf below my group baskets. Sorry - the bottom shelf is a mess!!!!. The baskets on the shelf above hold leveled books that we pick out to put in our browsing boxes. This is our retelling station housekeeping My mailbox that I made a few years ago! These are hanging right next to the door - stores all of the important information that I need at my finger tips Our focus for the week needs to be posted for visitors Pete the Cat - not sure what wonderful blog I got this from :( My new chairs. Students who are at the listening center can choose to listen to books on CD's after they finish their listening center story and response sheet. Or they can choose to read books in the library or do retell - which you can see the legs of the retell easel in the background My new organization tubs that I got this year - love them - they are from Lakesore

Quickly~ I came across this yesterday and wanted to share it with you~ It is a beautiful, FREE, Catholic -home/school/liturgical year- planner download- This Catholic mother offers her beautiful pl…

We’re heading into a new school year, and I’m trying out a new format for the best teacher freebies post series. This time, the collection IS a link up: you can add your favorite resources below. Here’s the criteria: 1) Your item must be something you will ALWAYS give away for free; 2) Your item MAY be related to the … Continued

Share & Help Me GrowDon’t miss your chance to save HUGE on elementary homeschool curriculum with the Build Your Bundle sale. >>Shop the sale now<< I love this time of year! I have prayed over our curriculum choices, made it past the purchases, and the boxes have arrived! I can hardly wait to dive into […]

Here is a quickie activity for the first week of school! Name Glyph Go grab it for FREE on TpT and enjoy it with your kiddos!
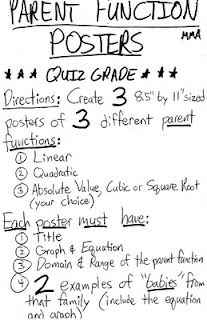
Last week we were reviewing parent functions in my math models class. After introducing and taking notes on different families of functions...

I was supposed to be back in business last week, but my computer was broken and my ten-year-old’s laptop refused to cooperate, so I’m a week late and a dollar short. Actually, after paying to repair the computer and the Suburban, and knowing I have to buy tires for said Suburban next week, I think I’m more like a thousand dollars short, but who’s counting? I certainly don’t intend to count that high. Ahem.Below are my Circle Time plans for this term, Continue Reading...
