

Loose, moody landscapes in watercolor was the perfect outlet! Lots of color play and simple composition is perfect for my tired little soul. In today's tutorial, I'm going to share with you my super easy watercolor landscape techniques. Perfect for beginner watercolor artists!

In this tutorial video, I teach you my FAVORITE technique in watercolor—the wet-on-wet technique. It's great for loose-style painting.

If you're new to watercolor, you may find it helpful to follow these step-by-step easy watercolor tutorials for beginners.
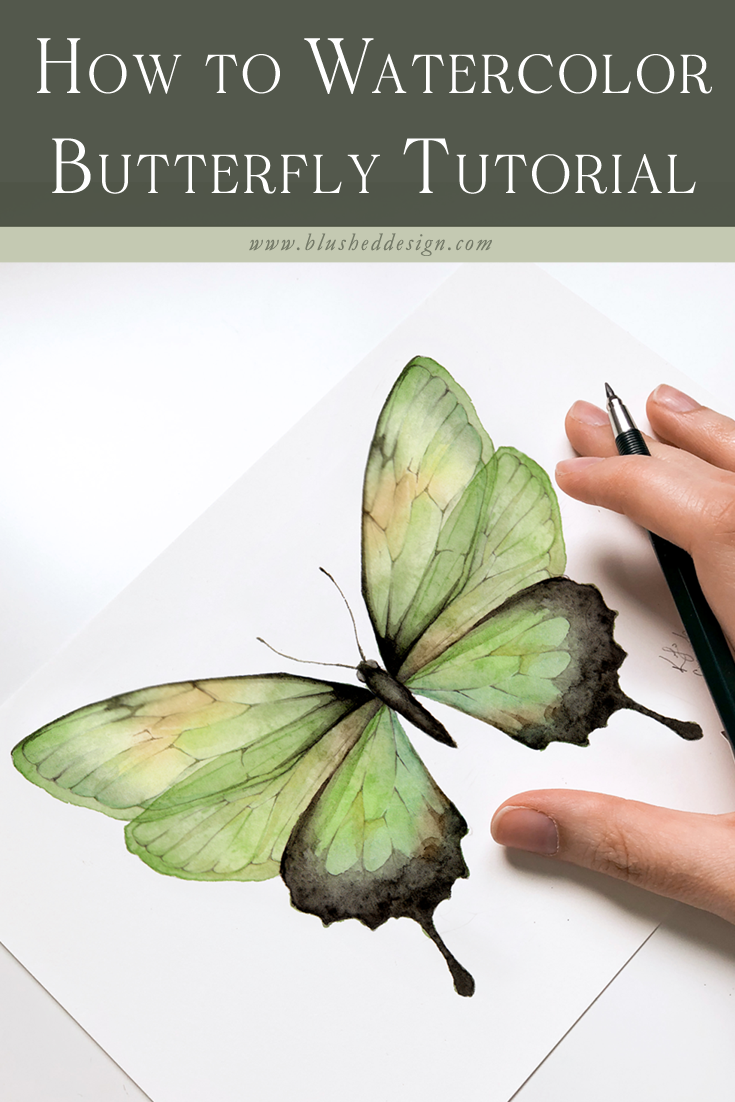
Remember that butterfly we drew together a few weeks ago? I’ve decided to share the watercolor process with you as well! I love the transparency in this butterfly—similar to the blue one that we did a few months ago—but one of my favorite aspects is the three-part wings! So so fun and pretty!

Learn how to paint with watercolors, make art even if you don't consider yoursefl an artist. Tutorials for beginners & techniques for learning painting.

Looking for step by step tutorials to guide you through watercolour techniques? This post will give you ideas, a video and a free worksheet.

Learn how to use watercolor pencils. These easy techniques are perfect for beginners who are new to using watercolor pencils.

What is the negative painting technique in watercolor painting? Let's learn tips to use the watercolor negative painting technique today!

Learning how to layer watercolors is a crucial technique that every beginner must learn to improve their painting skills.

You are in the right place where we have easy step-by-step watercolor tutorials are crafted precisely for beginners like you.

Watercolor pouring is an amazing technique. In this week's Fluid Art podcast you are going to meet Leslie Lambert and her amazing work using watercolor.

These are the top 10 watercolour techniques that you should know as an artist or beginner watercolour enthusiast! Discover them here.

Are you an art enthusiast looking to hone your skills in creating realistic textures using pen and ink? If so, you've come to the right place. This blog post introduces a pen and ink texture worksheet designed specifically for individuals eager to explore the various techniques and intricacies involved in replicating textures with precision.

Techniques and Tips for Watercolors When it comes to watercolor painting, these are the tricks that draw the ooh's and aah's every time. Watercolor as a medium seems like such a challenge because it seems unpredictable at first glance. It's so important to learn what to expect from the pigment when it meets water. When learning watercolor basics, these will help form a better foundation in painting with more enjoyment. The frustration is lessened because you have a better idea of how the pigment is going to respond to what you do. There are many helpful videos on YouTube that are great resources shared by other artists. Do a quick search on YouTube and you'll have a great time watching artists demonstrate these techniques. When teaching these techniques in a workshop, I bring out these posters and copies of the instructions as handouts for students. I'm sharing those handouts with all of you, here and now! This post has been a long time in the planning stages and I'm so thrilled to have it finally ready to share with other watercolor enthusiasts. So, I have a bit of confessing to do first. Have you seen my pins on Pinterest for these techniques? Years ago, when I was new to Pinterest, I created pins for the images of these posters. At the time, I didn't realize how popular these posters would become with time. Now, these pins are my most commonly saved pins! Unfortunately, they lack any explanation. The pins lead nowhere but to the images. Lesson learned, believe me! I can't tell you how much I regret that mistake! It's taken me a while but now I'm glad to share the posters and the tips that help explain each one. If there's a technique you'd like me to elaborate on more, please let me know in the comments. I'd be more than happy to help you with that! When it comes to watercolor painting, these are the tricks that draw the ooh's and aah's every time. Watercolor Techniques Pages 1 and 2 Created by Christy Sheeler. For personal use only. Request permission to reproduce. Created by Christy Sheeler. For personal use only. Request permission to reproduce. Tips & Explanations for Watercolor Techniques I know the text on the tips sheets may be hard to read so here's a link to the printable PDF file: Watercolor Techniques Page 1 and 2 I hope you are able to try these techniques on your own! These make up a watercolor artist's tool box for creating unusual effects. There are several I use often. There are 4 or 5 I rarely use but at times, these techniques are useful. It all depends on the style and subject matter. It's a good idea to become familiar with them, try them out with a bit of practice before applying them to an artwork you are working on. Leave me a note in the comments! Let me know if you've got questions and I'd be very happy to explain any of these further. Thank you for stopping by and sharing a few minutes here today! ADDED NOTE: So many have commented and requested to use this as a resource for instructional material. Thank you for the compliment! I am glad you have found this to be helpful in teaching in your own settings. Use permission is granted with the agreement that source credit is given to Christy Sheeler Artist and She Must Make Art, the art blog. Permission is not given to altar these in any way or form. I know the images above do stipulate for personal use only. I do appreciate you commenting below your own purpose for using because it's so nice to read your stories. I love knowing how these are spreading to touch others' enjoyment of watercolor painting. -CS 2023 Thank you to those of you who have requested my permission in the comments. I am too often late in replying so thus the reason for adding this note. May your instruction go well and these resources be a blessing! Christy -She must make art.

Simple, fun and creative ideas for your next watercolor painting. Perfect for artists of all levels looking for awesome inspiration.

How to trace or transfer images on to watercolor paper. Four fast and easy ways!

How do you mix green? Everyone knows the obvious answer that blue and yellow makes green. Yes that's true of course but there are a range of yellows and

Negative Painting means that you paint around the areas you want to preserve; Think of it like carving stone, chipping away until only ...

Watercolor isn't usually known for its textural elements. Artist Angus McEwan shows how to skillfully use composition and texture to draw in viewers.

Everyone's familiar with watercolor paintings, but did you know you can create similar art with pencils? In this guide to watercolor pencils, I'll give you an overview of this medium and show you how to get started. What are Watercolor Pencils? Watercolor pencils look just like regular colored pencils.

Discover how easy it can be to paint with watercolor with these tutorials for 5 easy watercolor paintings for art journaling beginners.

Painting Pumpkins. Lest you think I just skipped over Autumn and Pumpkin time to Christmas from my last post, know I have pumpkin on the brain! Last weekend, when I found some time to spend in my a…

If you want to learn how to watercolor paint for beginners its time to get started with watercolor by dearannart.

One persons attempt to become a good artist painting in watercolour, experiences along the way and discussion of all things connected with it.

Visit the post for more.

Looking for the best watercolor pencils to create sublime paintings? Take a look at these watercolor pencil sets...

You are in the right place where we have easy step-by-step watercolor tutorials are crafted precisely for beginners like you.

A blog focusing on watercolor media, that offers tutorials, tips and watercolor-related work in progress from artist and art-instructor Jenny Kroik.

Need some fun Fall art project ideas that are beautiful and keep the kids busy? Our creative collection of amazing leaf art projects for kids is for all ages and makes a beautiful gift or keepsake.

Negative painting is one of the most exciting approaches to watercolor I know! The technique is a unique approach of painting around an object to define it in a composition. When working in watercolor we have the challenge that other mediums do not. It is what we don’t paint that becomes the most important element. Think of yourself as a stone carver, chipping away, until only the most precious lights remains. There are many techniques to saving the “lights” of the paper. I have experimented with masking fluids, tapes to save the “lights” but found the end result was either harsh or cutout looking. I preserve the “lights” of the paper from the very beginning by painting around them. Opaque and Transparent Opaque Paints (top row): Cadmium Yellow, Cadmium Red Light, and Horizon Blue. Transparent paints (bottom row): Quinophthalone Yellow, Scarlet Lake, and Cerulean Blue. It is best to avoid opaque paints (such as cadmiums) for negative painting. Opaque are fine for accent marks at the end but not for glazing. The technique requires numerous glazes which will become muddy with opaque paints. To determine if your paints are opaque or transparent do a simple test. With a permanent marker draw a bold line across a piece of watercolor paper. With paint the consistency of cream paints over the line. If the line is obscured at all it is opaque. Learn more about paint characteristics by reading my post on the topic. 3 Colors for under-painting Underpainting: To determine which 3 colors I will use for the under-painting I make numerous color swatches. The swatches will contain a red, blue, and yellow. The colors do not need to be true primaries. When I mix the colors it is important to have the paint be the same consistence to encourage good mixing on the paper. I am looking for colors that have the underlying feeling of the subject matter. The 3 colors I selected are Carmine (C), Cobalt Teal Blue (CTB), and Raw Sienna (RS). Step #1, Line Drawing: When I draw for a negative painting I am especially mindful of the space and shapes between the leaves and pomegranate (negative space). I want to have shape and size variety. I draw enough to get the general shapes. It is important not to over draw. Allow opportunities for additional shapes to be developed in the painting process. Step #2: I wet the entire paper with clean water and introduce the 3 paint colors separately (Raw Sienna, Cobalt Teal Blue, and Carmine). I paint at an angle to encourage mixing as the paint runs down the paper. I don’t over work the surface with a paint brush but encourage the paint to mix on the paper. While the paper was still damp I lifted a little color off one pomegranate with a damp brush. Let thoroughly dry. Step #3: Start glazing. I will add additional paint colors but I will use the 3 original colors through out the painting process. I consider these my “mother colors”. I paint hard edges against the pomegranate and some of the leaves, and soften edges with water as I move out from the subject. This is what I call the “adolescence of a painting”, because it looks and feels awkward. Let thoroughly dry. Step #4: With each glaze I create new negative shapes and darker values. I sometimes soften edges with a light spray of water while the paint is wet. This technique is most evident on the bottom pomegranate where I used a brush saturated with Carmine to paint the lower section and quickly used a spray bottle to help move the paint down the paper. Let thoroughly dry. Step #5: In the final stage I paint the darkest darks and smallest shapes. I use a rich deep green made with Marine Blue and Burnt sienna. While paint is still wet I drop a small amount of Scarlet Lake to the green mixture to liven it up. I am selective to place my darkest darks near my lights to intensify the focal area. I finish with cast shadows and a few details. Happy Painting! Brenda Step #5 Final step

I would like to start this post by thanking Carmen for suggesting I try out the Easy Watercolor Portrait tutorial at the Grow Creative...

These easy watercolor techniques for kids are perfect for all ages and offer endless possibilities for creativity and fun.

Have you ever seen a beautiful piece of watercolor art and thought “I want to paint like that”? Many budding artists hold back because they just don’t know how to start painting in watercolors. I think that’s too bad. Because I believe the joy of creating with watercolors is within anybody’s reach. Some people simply

Learn how to use watercolor pencils for complete beginners that you can learn how to do step by step. Learn best techniques.

I am bringing home this tutorial for "How to Watercolor Paint on Fabric", which was originally shared on Ella Claire, here. If you are looking for a tutorial to turn your watercolor fabric (or
