

A blog about crafty things, the embroideries I'm working at the moment, snail mail, travel and the wonderful random occurrences in my life.

A blog about crafty things, the embroideries I'm working at the moment, snail mail, travel and the wonderful random occurrences in my life.

A blog about Crazy Quilting and Embroidery. Home of Crazy Quilt Quarterly Magazine.
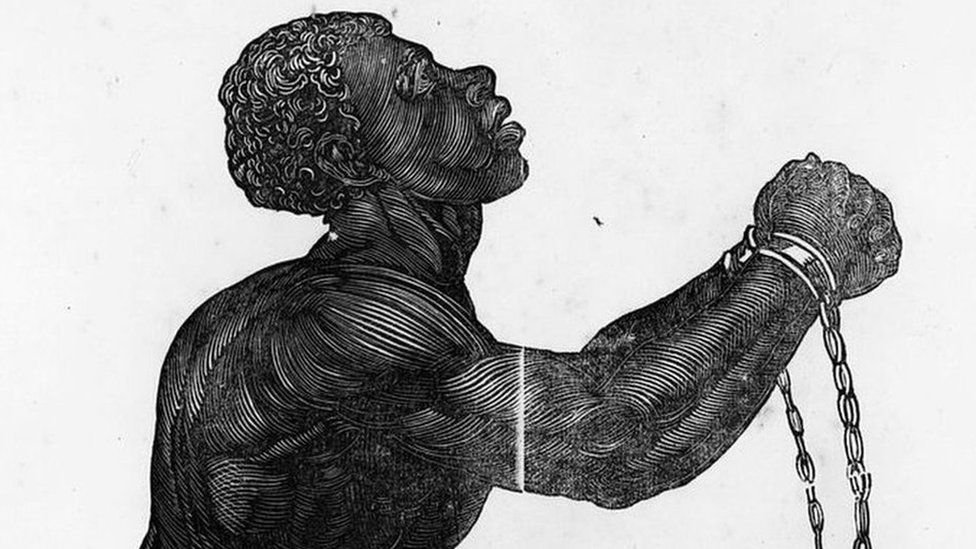
The legacies of colonial slave-traders are being reassessed, but what about the Africans who profited?

I'm starting to not really care for winter too much. The snow, you know? It gets in the way of doing things sometimes. Sometimes it's kind o...

I've been wanting to do this wee Sparrow for over a year now. I guess, that I needed to wait until just the right time. While shopping a couple of weeks ago, I came across the fabric for her dress. It needed to be inspired from the woods in my back yard. When I came across this piece, I knew that it was time to make her. I was watching Jane Austen's Persuasion last weekend and I knew just who my little Sparrow would be,. Dear Anne was sweet, beautiful and bright....yes, my sketch would take form in fabric, it was time and I was ready. As three snowstorms hit our area this week, I was dreaming of the earthy smell of a Spring forest and the song of the birds way before the sun peeks over the mountains. I always love bringing the stuft muslin to life and each step she stole my heart. I never thought that I would capture a sparrow's looks as well as I did. She took many hours as layer, by layer her markings brought her to life. I am so very please with her and I know that she will fly away to a new home and be loved. Like any Mother though... it won't be without a tear shed. Anne, along with her friends are on Simply Primitives as it opens tonight. Enjoy my treasures along with those of my fellows artists.

A blog about crafty things, the embroideries I'm working at the moment, snail mail, travel and the wonderful random occurrences in my life.

A blog about crafty things, the embroideries I'm working at the moment, snail mail, travel and the wonderful random occurrences in my life.

One of my ideas for the Mouthy Stitches pouch swap was a twisted panel, so I made a practice one..... I posted it in the Flickr group - and was promptly asked to write a tutorial for it.......of course I had no photos, so I made another one, slightly smaller and took photos as I went along. This tute shows you how to make one side of a pouch (or a bag, cushion, etc - whatever - the theory can be applied to any project you want to make, you just have to recalculate the sizes) and my side panel is 7" x 12" with a twisted panel, incorporating 5 twists, that finishes around 3.5" square. Please note this is my first tutorial - so go easy on me!! This is the same methodology as Quilt-as-you-go and if any of it doesn't make sense, drop me a line and I'll help in any way I can! What you will need: heavy duty interfacing ruler pencil main fabric (mine is Kona Everglade) scraps of fabric at least 1.5" wide and 5" long (these are for the twists) note - use starch on your fabric - it helps when cutting and piecing What to cut: heavy duty interfacing, 1 piece, 7" x 12" twist scraps, 5 pieces, 1.5" x 5" main fabric 5 pieces, 1.5" x 5" 4 pieces, 1.25" x 5" (we'll call these the spacers) 1 piece, 5" x 3.5" (this will be trimmed later) 1 piece 5" x 6.5" (this will be trimmed later) 2 pieces, 2.5" x 12" (these will be trimmed later) What to do: 1. Mark up the interfacing with your pencil and ruler: measure in 1.5" from each long side and draw a line measure in 3" from one short side and draw a line from the 3" line, measure and mark a further 4 lines, 3/4" apart set aside 'til later I got a bit excited and drew one more line than I needed - you only need an extra 4 to the right of the 3" line 2. Sew your twists: Using all the fabric pieces sized 1.5" x 5", sew each of the scrap pieces to a main fabric piece down one long side and with a 1/4" seam I chain pieced these Press open the seams (this makes it easier to get a good edge), then finger press the twists closed along the seam line, wrong sides together and press again Trim the twists so they are 1" wide and 5" long Here are the 5 twists ready to go 3. Piece the panel: Lay the 5" x 3.5" on top of the interfacing, right side uppermost and centred between the top and bottom lines, carefully matching the 3" line and edge stitch to hold Lay your first twist along this line, carefully matching the long raw edges and edge stitch to hold The twist hasn't been edge stitched in this photo as yet Now it has... Lay 1 1.25" x 5" spacer on top of the twist, matching raw edges and sew through all thicknesses with a 1/4" seam where you just edge stitched Turn main fabric over to the right and press (the long edge of the folded out spacer should be aligned with the next 3/4" line drawn on the interfacing) Oops - forgot to take a photo after the first one, but it's just the same all along - here's the 1.25" x 5" spacer folded out after the 2nd twist and ready to be edge stitched Edge stitch the raw edge Continue adding the twists in this manner until you have stitched down the last one. You will not have any spacers left, but that's ok, because now you'll use the 5" x 6.5" piece to complete the width of the panel 4. Create the Twist: from the back of the piece, sew along one of the 1.5" lines to hold your twists in place I've turned it over so you can see what it should look like fold the other end of each twist to the opposite side and pin to hold Stay stitch along the 1.5" line at the bottom to hold the panel is looking a bit wonky now, but don't fret - it sorts itself out eventually! 5. Complete the panel: Sew the remaining main fabric pieces (12" x 2.5") to the top and bottom of the panel and press open Trim the panel and use as you like.... Let me know if you have a go....and I'm linking up to Tutorial Tuesday over at Lawson and Lotti's

I love visiting Vintage Textile, one of the best, most descriptive vintage fashion sites on the Internet. The Regency era fashions are superb. Take this embroidered child’s dress, which was o…

Does paisley remind you of the 60's and the "Summer of Love?" It certainly was when the paisley pattern was revived. Remember the Beatles ...

Looking for the perfect Hanoi souvenirs? These meaningful souvenirs are the best things to buy in Hanoi. Includes a FREE Hanoi shopping map!

Close up abstract image of the flower of parrot tulip 'blumex' www.clivenichols.co.uk

Ackermann's Repository was a popular British publication of the Regency period and its monthly issues were in distribution from January 1809 till its final issue on December 1828. Fortunately for us, Ackermann's Repository was published by a printing house that specialized in producing bound volumes intended for reference and private libraries. Had this just been a fashion magazine, I believe many of the amazing plates would have vanished over time; however since this publication was a literary, economic, political, architectural,as well as a fashion publication; the pages of Ackermann's was treated as a reference item and several full collections of these bound volumes still exist today. (In 1829 Ackermann's had a fashion only publication - "Ackermann's Repository of Fashion".) Ackermann's was know in its day as one of the premier print shops and produced many illustrated book series and lithographs during it's time. From the beginning "The Repository of Arts, Literature, Commerce, Manufactures, Fashions, and Politics" as it was formally called was intended to be bound into books even though it was available as a monthly magazine as well. This is why you see the odd numbering system on the illustrated plates. At the end of each year, that years issues were available as a 2 volume set and could be purchased in a variety of binding options directly from Ackermann's or from several of the other binding houses or book sellers in London. A subscriber also had the option of having their individual issues custom bound to order. It's just so interesting how things were done 200 years ago. 1823 was the start of Series 3 When these were later bound into their 2 volume sets. Jan - Jun 1823 were part of Series 3 Volume 1 July - Dec 1823 were part of Series 3 Volume 2 1823 would have volumes 3&4 1824 would have volumes 5&6 and so on and so forth till the series was completed At the end of the 20 years of Ackermann's Repository there were 40 bound book volumes. According to the information I've found up to 1,000 bound volumes of Ackermann's Repository were sold per year. I've yet to find a number of how many issues of each magazine were sold per month; however it must have been a lucrative venture for it to have been published in both formats for a twenty year period of time. My pick of the 1823 Ackermann's Repository Fashions I have been posting all the lovely fashion plates from the pages of Ackermann's and continue now with Series 3 which ran from January 1823 - December 1828. These fashion would be considered late Regency and can be most easily identified by the more form fitting bodices, dropping waistlines and fuller skirt bottoms. Today I will be posting the fashions for 1823 and I hope you enjoy seeing them. This is what the cover page for Series 3 Vol 1 (Jan - June) 1823 looked like in the bound book form Ackermann's Repository 1823 Fashion Plates 1823 - Ackermann's Repository Series 3 Vol 1 - January Issue 1823 - Ackermann's Repository Series 3 Vol 1 - January Issue 1823 - Ackermann's Repository Series 3 Vol 1 - February Issue 1823 - Ackermann's Repository Series 3 Vol 1 - February Issue 1823 - Ackermann's Repository Series 3 Vol 1 - March Issue 1823 - Ackermann's Repository Series 3 Vol 1 - March Issue 1823 - Ackermann's Repository Series 3 Vol 1 - April Issue 1823 - Ackermann's Repository Series 3 Vol 1 - April Issue 1823 - Ackermann's Repository Series 3 Vol 1 - May Issue 1823 - Ackermann's Repository Series 3 Vol 1 - May Issue 1823 - Ackermann's Repository Series 3 Vol 1 - June Issue 1823 - Ackermann's Repository Series 3 Vol 1 - June Issue This is what the cover page for Series 3 Vol 2 (July - Dec) 1823 looked like in the bound book form 1823 - Ackermann's Repository Series 3 Vol 2 - July Issue 1823 - Ackermann's Repository Series 3 Vol 2 - July Issue 1823 - Ackermann's Repository Series 3 Vol 2 - August Issue 1823 - Ackermann's Repository Series 3 Vol 2 - August Issue 1823 - Ackermann's Repository Series 3 Vol 2 - September Issue 1823 - Ackermann's Repository Series 3 Vol 2 - September Issue 1823 - Ackermann's Repository Series 3 Vol 2 - October Issue 1823 - Ackermann's Repository Series 3 Vol 2 - October Issue 1823 - Ackermann's Repository Series 3 Vol 2 - November Issue 1823 - Ackermann's Repository Series 3 Vol 2 - November Issue 1823 - Ackermann's Repository Series 3 Vol 2 - December Issue 1823 - Ackermann's Repository Series 3 Vol 2 - December Issue ************* For those of you who want a bit more than to see the pretty fashions; here are the fashion descriptions from the November 1823 issue. I though I'd show this one since it included descriptions of the fashion plate showing hats. You will notice I left the pages intact and did not crop out the extra bits from the previous article that precedes the fashion articles; nor did I remove the beginning of the article that followed the fashions. This is so you can see how the articles ran one into the other and how they can jump from one topic to the next without the two being related. Here we have on page 305 the ending of a technology article followed by fashion then one about a new illustrated literary book soon to be available for sale by Ackermann's. Here at the bottom of the November fashions article we see an subtle advertisement for the new release of Ackermann's annual "The Forget Me Not". "The Forget Me Not" was another well known publication by Ackermann's. This "Literary Annual" was published around November of every year (just in time for the Christmas gift giving season) from 1822-1847 and targeted mainly the female marked. This new style of "annual" contained 12 engravings to represent each of the months and stories or poems to accompany each. It also contained a review of the previous year, the recent census, a family tree of the monarchy of Britain and a list of sovereign families and ambassadors for other kingdoms. This would have been a very safe gift for a gentleman to present a lady and in some years it sold up to 20,000 copies. It is believed that the bound version of Ackermann's only sold upwards to 1,000 copies per year; so this shows how popular "The Forget Me Not" was. ************* I hope you have enjoyed another trip through the Regency Fashions of Ackermann's Repository and that you join me again when I post the fashions for 1824. For your convenience here are some quick links to the earlier Regency fashions I've posted on my blog. Ackermann's ran series 1 from 1809 - 1815 Series 1 - Vol 1 & 2 - 1809 Series 1 - Vol 3 & 4 - 1810 Series 1 - Vol 5 & 6 - 1811 Series 1 - Vol 7 & 8 - 1812 Series 1 - Vol 9 & 10 - 1813 Series 1 - Vol 11 & 12 - 1814 Series 1 - Vol 13 & 14 - 1815 The Ladies of Ackermann's Regency Fashion (this is a fun digital art piece I did using many of the above ladies) Ackermann's ran series 2 from 1816 - 1822 Series 2 - Vol 1 & 2 - 1816 Series 2 - Vol 3 & 4 - 1817 Series 2 - Vol 5 & 6 - 1818 Series 2 - Vol 7 & 8 - 1819 Series 2 - Vol 9 & 10 - 1820 Series 2 - Vol 11 & 12 - 1821 Series 2 - Vol 13 & 14 - 1822 Regency Garden Party with a Roaring Rogue (this is a fun digital art piece I did using several Ackermann's Repository images from series 2 and one fun lion man from J.J. Grandville, who was another Regency period illustrator.) Ackermann's ran series 3 from 1823 - 1828 Series 3 - Vol 1 & 2 - 1823 Series 3 (1824-1828) still to be posted Till our next Regency adventure Thanks for visiting me here at EKDuncan.blogspot.com If you have enjoyed seeing these images from Ackermann's Repository and would like the opportunity to see and read an original for yourself they are are available on line at www.archive.org Click HERE then choose the volume you are interested in. You can then see and read them online or download them to your computer for future reference. Enjoy!

French artist Michel Blazy filled a 13th century Parisian monastery with showers of soapy foam.

Explore Action Weaver's 4235 photos on Flickr!

Jude Hill is an embroidery artist synonymous with a simplicity of style and a respect for the inherent beauty of old cloth. She is expressive with original approaches to handling her materials, never stridently forcing them into concept or statement, though they are persuasive stories in themselves.
