

The 'Heroes of Faith' Teaching Series or Free VBS is a fantastic childrens series that your children will absolutely love!

Superhero Craft Ideas Hero Central VBS Theme

Make super hero cuffs from an empty paper roll

I know this doesn't have anything to do with Barbie or recipes, but I thought that since it involved crafting, I would put it here. I spent many hours searching the Internet for some super hero capes for a dress-up birthday party. The least expensive I could find were $6.00 each. I also stumbled across for "mini super hero capes craft kit at S&S Worldwide at twelve for $32.99. I have no idea from what these are made, but I'm guessing paper. I decided to troll through Dollar Tree to see what they had. I found these plastic tablecloths with a thin fabric web backing. I purchased 6 cloths for a total of $6.00...the joy of the dollar store. I was hoping the backing would be substantial enough to use just one layer of tablecloth, but it wasn't. I cut out a simple pattern and placed the webbing sides together and stitched around the outside edge. You could use a spray adhesive to join if you fear the sewing machine. Then I attached a hook and loop tape fastener to each cape front. The entire sewing and trimming process took less than 15 minutes per cape. I found these in green, red and blue in the housewares area. Do NOT use the thin un-backed plastic cloths on the party supply aisle. Open the table cloth so the length is folded over upon itself, making it half the size. Then fold this in half, from left to right. Then fold it in half, again. Now you have 8 layers of cloth. Make sure that the cloth is fairly smooth and the folds along the left edge are lined up. You can find a free pattern on the Internet, or make your own. Mine started at 7-inches at the neck edge and slowly increased to 10-inches at the bottom. the overall length from the center back of the neck was 25-inches. These measurements should fit 4-7 year-olds. Since you are putting this pattern on a fold, the finished bottom edge will measure 20-inches. Simply sew (or spray adhesive) two capes with the WRONG sides together. I stitched about 1/4-inch from the edge and then trimmed to 1/8 -inch. The "fabric" is thin enough for you to see if you are catching both sides of the cape in the stitching. This is not a precision project. If you have to increase the width of your seam to "catch" the underside fabric, it won't make any difference and the excess will be removed when you trim. Just be careful with the scissors...this stuff is thin and cuts just like paper. Also, you cannot rip out stitches without tearing this stuff. Make sure your machine is working on a bit of leftover tablecloth before you try it on the cape. I just used a regular needle, thread and stitch length and tension. It sews easily. I added colored hook and loop tape on the underside of the top flap and the upper side of the bottom flap. I found colored "Velcro" at Hobby Lobby made by Sew Ology. Attach this well, it will get tugged on a lot! These capes fold into nothing and can be easily store or transported. Kids can decorate the capes with markers and glue things on them, like stickers, but YOU CANNOT IRON THIS MATERIAL. I think these are pretty sturdy, but certainly not on the par with real fabric capes. If you need a ton of cheap super hero capes, this is the way to go. If you are feeling creative, you can trim the seams with pinking shears or use decorative-edged scissors.

The 'Heroes of Faith' Teaching Series or Free VBS is a fantastic childrens series that your children will absolutely love!

Explore ArtistXero's 93 photos on Flickr!

Inside: Got a superhero fan? This free printable Superhero Bingo Game is perfect for birthday parties, school, library programs, or simply as

My son celebrated his 7th birthday last month, but because of our trip to Disney, we just had his birthday party this weekend. He really loves Science, so he requested a Science party this year. This was also the first year he had a party with just friends from school, so he was extra excited. I was lucky enough to find this free printable science invitation over at Living Locurto - thanks Amy! After mailing the invitations I started work right away on the cake, decorations, and party details. For the cake, I ended up doing a two tier cake, covered in fondant and with lots of science details. The colors were vibrant and the details turned out well. Best of all, my son loved it! For the decorations, we used a lot of my son's science things. We filled some flasks with radioactive rods (aka glow sticks) and candy to match our cake colors (green, orange and blue). We also filled his plastic test tubes with candy Nerds - they looked like some mysterious potions bubbling up. We added his shark in a jar, shark teeth, and some of his favorite rocks from his rock collection to our display as well. And, we made this banner reading, "Kaden's Lab," with paper plates linked together with pipe cleaners. Each kid scientist who attended would receive their own clipboard with investigation sheets, a pair of goggles and a scientist badge. I purchased the mini clipboards from Target for $1 each in the Dollar Bins and the plastic badge covers (10 pack) at the Dollar Store for $1. As the kid scientists arrived, they used the hand scan to obtain access to the laboratory. I saw this idea over at The Celebration Shoppe's blog. We started our science party with a free exploration using magnets. I filled a large container with some sand from our sand box and filled it with different metal items. The kid scientists used magnets to find the hidden items and drew pictures of them on their investigation sheets. Our second investigation was called Drops on a Penny. The kid scientists made predictions about how many drops of water would fit on a penny, nickel, dime and quarter, then used pipettes to test their predictions and record their results on their investigation sheets. Sink and Float was our third investigation. Each kid scientist had a turn to pass an object around the table, then test it in the water to see if it would sink or float. They recorded their predictions and results on their investigation sheets. Our fourth investigation was Color Lab. The kid scientists practiced mixing colors on their investigation sheets using colored water and pipettes. \ The fifth investigation was creating constellations, using dark colored paper and star stickers. We talked about what a constellation was and the kid scientists used their star stickers to create their own picture in the sky and used a piece of chalk to connect-the-stars to show their design. I didn't catch a picture of this one. The Milk Lab was our last investigation. In a shallow dish, I poured some whole milk, then put drops of food coloring in a circle in the center of the dish. I dipped a toothpick in some dish soap (we used Dawn) and placed it in the milk in the center of that circle of food coloring. The reaction is really cool! I purposely did not take a picture of the reaction, so you could be just as surprised when you try it yourself. The kid scientists drew pictures on their investigation sheet to show what happened. We had some basic snacks, drinks and food for the party. We covered these mini water bottles with H2O labels that my husband made up. We also had rainbow spectrum fruit strips (aka fruit roll ups), marshmallow molecules, cheddar explosion goldfish, and pretzel pinwheel atoms. And of course there was every scientist's favorite fuel food - pizza! All in all, I think the party turned out great! The kid scientists seemed to have a lot of fun; even my son's teacher said that some of the kids wrote about the party in their journals Monday morning. As a former teacher, I had fun too, getting back into teacher mode for a bit. Many of our other Science items were purchased from American Science and Surplus. If you haven't checked them out, you must! I don't believe I can share a link for my documents, but if you are interested in having a copy of any of the science investigation sheets or the kid scientist badges, just shoot me an email at [email protected] and I will email you the files. Sharing this party on the following blogs: Fireflies and Jellybeans A Vision to Remember Paisley Passions Craft Envy Yesterday on Tuesday Funky Junk Interiors What Allie's Making Now Along for the Ride Suzy's Artsy Craftsy Sitcom Tatertots and Jello Momnivore's Dilemma While He Was Napping 733 A Creative Blog Be Different Act Normal Home Sweet Farm Naturally Me Creations Momma's Kinda Crafty It's a Crafty Life Fingerprints on the Fridge Fun to Craft Home is Where My Story Begins A Little Knick Knack Finding Fabulous Lit and Laundry Chic on a Shoestring Decorating 504 Main The Shabby Nest It's a Hodgepodge Life Kojo Designs A Few of My Favorite Things Punkin Seed Productions Antique Texan Truly Lovely

Super Hero Youth Leadership Training. LDS Youth activity, Young Women, Everything you need to teach youth to be leaders. Printable's, ideas,follow thru

Printable Bible Hero Stations- Great for Youth Ministries, Sunday School, Outreach, and Home! Teach Kids About Bible Heroes in a Fun Way!

Super Powers Craftivity – Learning Goals I have always made goals with my students and love the empowerment it gives them as learners. I wanted to make a resource that will help children identify their strengths and challenges (I refer to them as challenges rather than weaknesses). I use my assessments to inform my program […]

Kids love pretending to be super heroes. Today for Fun Friday we're making SLIME. As a super hero, you never know when you...

Looking for a solid, fun, easy-to-use children’s outreach resource? Look no further. The Captain Sun VBS Primer Pack is a resource designed to be an ‘event blueprint’ for churches and ministries ea…

Superhero Craft Ideas Hero Central VBS Theme
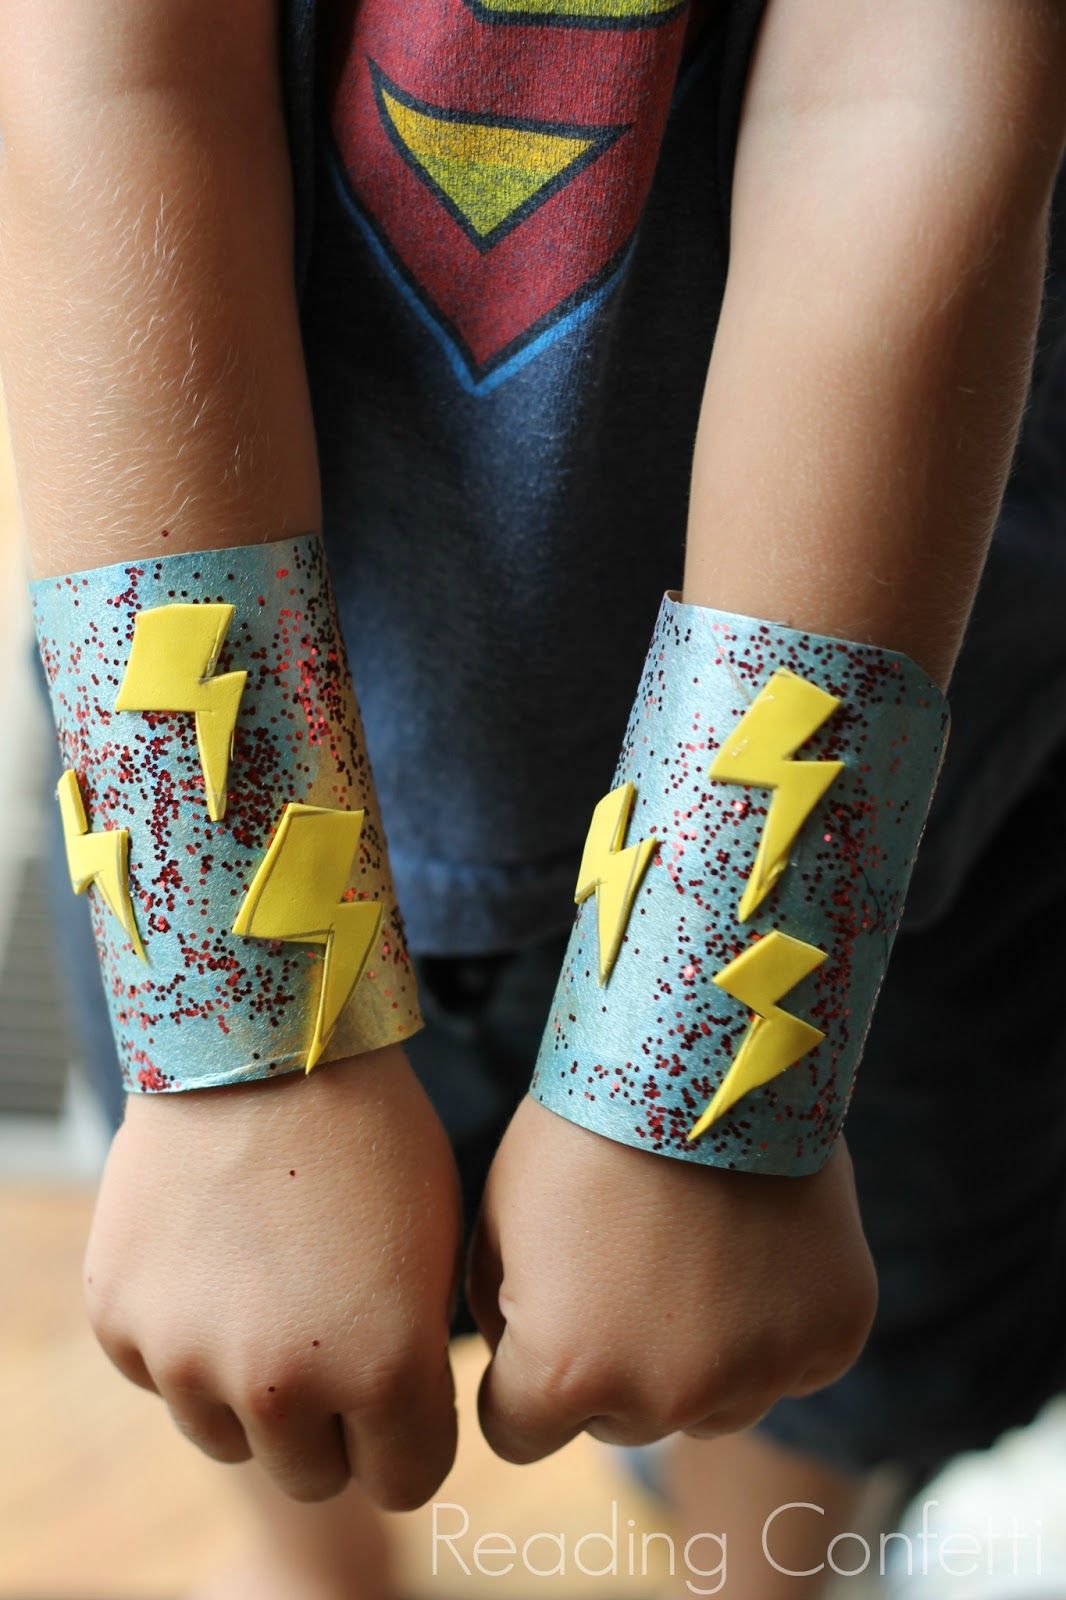
Make super hero cuffs from an empty paper roll

Delight your Kindergarten and 1st grade students with this superhero-themed writing craft! Students make superhero headbands and write goals or accomplishments on the lightning bolts. With 6 different writing templates in 3 line styles, students can highlight an ability or accomplishment they are proud of, set learning goals, and reflect on accomplishments inside the shield booklet. A fun addition to a Superhero themed classroom or event, your students will love wearing their masks and shields! Please see the preview for more details. Happy teaching! Linda Kamp Around the Kampfire You may also enjoy these Superhero themed items: Superhero K-1 Memory Book Superhero Kindness Mailbox & Notes Student Awards Staff Awards

Superhero theme matching printable for toddlers and preschoolers! Fun, free busy bag activity for your superhero fan!

A fun and easy Captain America paper plate shield craft that uses tissue paper to create the superhero's shield. Kids will love it!

Great ideas for those summer time blues! Super Heroes Boredom Busters!!

The boys and I decided to do a project using the Bible as our inspiration. Big Guy chose the story of Queen Esther. Queen Esther was a Jewish Queen who saved God's people by exposing the high official Haman to her husband, King Xerxes of Persia, by asking him to save her life and the lives of her people. She risked her own life to save thousands of others. The essence of the story is that Queen Esther was brave and that God protects those who are brave in His name. So we decided to make Super Hero Queen Esther capes. You could make a cape for any "Brave Person" in the Bible. It doesn't have to be Queen Esther. The boys LOVED LOVED LOVED this project! (and so did I) I used this project again. This time we made Super Samaritan Capes. The pre-schoolers LOVED this project. Its high impact for very little preparation! This is what we did: Cut a brown paper bag down the sides so that it opens the full length. Trim off the sides (and extra length if it too long for the child). Use a paper punch to make two holes. Use ribbon to make a neck hole. Slide the ribbon into each hole punch and tape it down. Make sure that it is large enough to fit over the child's head. I wouldn't use string. I think it would cut the child's neck when he/she ran with it on. Decorate. Be creative! Big Guy drew pictures of all the BRAVE people he could think of (Real - his karate instructor and Imaginary - Rudolph) Little Guy put faith stickers on his cape and colored it. Mom wrote her name and used Bible verses. We decorated our capes for at least a 1/2 hour or more. When we were finished we ran around the house trying to make our capes fly. It was so fun to talk with the boys about bravery as we made the capes.
