

So many great Silhouette project ideas for teachers! Put your Portrait or Cameo to work in your classroom for all kinds of organization projects and decor.

New Silhouette CAMEO 5 Everything to know including CAMEO 5 Price CAMEO 5 release date, cameo 5 features and more!

So many great Silhouette project ideas for teachers! Put your Portrait or Cameo to work in your classroom for all kinds of organization projects and decor.

I also wanted to share some of my favorite Silhouette Cameo Projects I've put together.
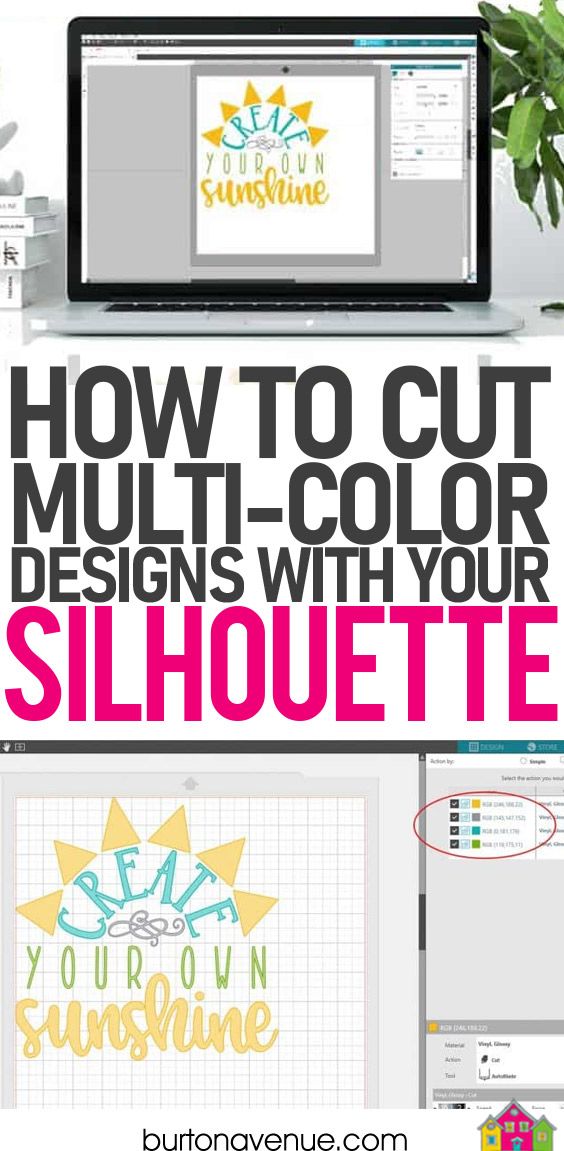
Are you a Silhouette owner that wants to cut multi-color designs, but aren’t really sure exactly how to do it? Well. you’ve come to the right place! Multi-color designs are super cute and lots of fun to make. Today, I’m going to walk you step by step through the process of setting up your multi-color … Read more...

Silhouette Cameo E-Books, Guides, Manuals, How To's and more. Want more free project walkthroughs, guides, product recommendations, and more? Visit Silhouette School. How to apply vinyl, heat transfer, silhouette studio guide, print & cut.

Want to know how to use fancy characters and swirly fonts in Silhouette Studio? This tutorial will teach you how to use glyphs like a pro!

Makers Gonna Learn

If you're the proud new owner of a Silhouette CAMEO 4 and you want to decorate it, I have a free Silhouette cut file for you. The free CAMEO 4 skin template is perfect for the left sliding front panel...and it's a great first Silhouette CAMEO 4 project! All you need to do is head over to So Fontsy and download the free Silhouette CAMEO 4 design to your computer. This makes a great Silhouette CAMEO 4 vinyl project since it's just a single solid cut. Start by opening Silhouette Studio. Remember you must use Silhouette Studio V4.3.240 or higher to run your CAMEO 4. Go to File > Open and find the .studio file (or SVG which is included in the free download) you downloaded on your computer. Click it to open in Silhouette Studio. It will open in the Design area. Do not resize the cut file at all. It's perfectly sized to fit the CAMEO 4 front left panel which slides out to the left for tool storage. Design Panel: Preparing a Design to Cut in Silhouette Studio Click the Page Set Up tool on the right sidebar. Check that the following settings are selected: Machine: Auto (CAMEO) Cutting Mat: CAMEO 12 x 12 Media Size: Auto (12 x 12) To limit waste, move the design to one of the corners of your virtual cutting mat. Most people place it in the upper left corner of the cutting mat. Finally from the Page Set Up panel move the Reveal bar all the way to the right, if it's not already. This will turn on the grid lines. Notice the blocks that are your design is covering. These are the same squares on the actual Silhouette cutting mat where your material needs to be placed. (We'll get to that part in a moment). Preparing Your Silhouette Mat and Blade to Cut Before moving to the Send panel, make sure your CAMEO 4 is powered on and connected to your computer. Also be sure your CAMEO 4 AutoBlade is inserted and locked into the left tool carriage (Carriage 1). Take your material (I'm using vinyl) and place it on the sticky, gridded area of the Silhouette cutting mat (be sure to remove the blue cover to expose the sticky area). If you are not using a full sheet of material make sure the scrap piece is covering those same boxes on the mat where your design is covering in Silhouette Studio. Place the cutting mat so the top edge is gently resting up against the rollers and the left edge is aligned with the gray lines and arrows on the left side of the CAMEO 4. Hold it there gently while you click the up arrow on the touch panel. The mat will be pulled under the rollers. Send Panel: Selecting Your Cut Settings and Material Back in Studio open the Send panel. Because of the auto tool detection feature, the software is able to detect the blade you have in the carriage and update the recommend cut settings. However, you will still need to select your material. I would suggest you cut the skin out of vinyl, printable vinyl, or printable waterproof sticker paper. Change the material type from the Material list and then the cut settings will update for the selected material. The design should have a bold red line around it. These are the cut lines. If your design does NOT have bold red lines, select the design and click "Cut" as the Action. First Silhouette CAMEO 4 Cut At the bottom of the Send Panel click "Send". The AutoBlade will first begin tapping to adjust to the recommended blade setting then the cutting will begin. When the cutting is complete click the down arrow on the touch panel to remove the mat from the machine. Now you'll need to remove the excess vinyl around your design. This process is called weeding. You can trim around your design with scissors before using a hook tool to remove the extra vinyl around the design. For vinyl you need a transfer material - I prefer transfer tape - to move the vinyl decal from the backing to the surface. Cut a piece of clear transfer tape, remove it off the backing, and then carefully lay it over your CAMEO 4 vinyl skin. Use a scraper to burnish the tape onto the vinyl and then peel up the tape from the corner so the vinyl comes with it...and exposes the adhesive on the back of the vinyl. Carefully position the CAMEO 4 skin over the left panel lining up the top edge. Press down from there. When the entire vinyl skin has been applied, again burnish it. This time peel the transfer tape up from the corner leaving the vinyl behind on the CAMEO 4. I love the little pop of color covering the tool carriage storage slot is..and it's so easy and quick with this free CAMEO 4 vinyl skin template!! Finally, if you think you're gonna be tricky and reverse the image to cut a second skin for the right panel ... STOP RIGHT THERE! That is the touch panel and you definitely don't want to cover that with anything. Don't forget! You can get commercial use freebies every week at So Fontsy - just keep an eye on the Freebies section as they swap out every Friday! Here's a peek at this week's new freebies! Note: This post may contain affiliate links. By clicking on them and purchasing products through my links, I receive a small commission. That's what helps fund Silhouette School so I can keep buying new Silhouette-related products to show you how to get the most out of your machine! Get Silhouette School lessons delivered to your email inbox! Select Once Daily or Weekly. Subscribe Here!

Last Updated: August 6th, 2014 The subtitle to this should be: A Cautionary Tale! How I Broke My Cameo, But Then Fixed It. You see, I have lots of Print-and-Cut projects that I want to do, but I …

Makers Gonna Learn

Do you have a Silhouette machine and want to know how to use the silhouette pen holder? Today I'm showing you how to use a sharpie to draw.

It's no surprise that I love my Silhouette Cameo cutter. I keep finding new ways to use it! The latest discovery is that I can cut fabri...

If you want to get more stickers out of each sticker sheet, you can print and cut stickers with Silhouette CAMEO without registration marks. This is a sponsored post but all opinions are my own Registration marks take up space on the printed sheet and limit the max size of the area printed with stickers. But the Silhouette Pixscan mat actually lets you use the entire sticker sheet for stickers! This Silhouette print and cut tutorial assumes you know the basics of print and cut. If you are a beginner or need a print and cut refresher head over here for this beginner Silhouette print and cut tutorial. Set up your stickers in Silhouette Studio. From the Page Setup Panel make sure you have the print border on. You can get even more out of your sticker sheets (I am using Online Labels sticker sheets, as always) if your printer allows you to borderless print. Do not add registration marks before sending the sticker designs to print. Sidenote: Look how many stickers I'd have to get rid of on the page if I have to account for registration marks - even registration marks moved as far out as possible. I printed this workout sticker set (get it free here with code WORKOUT) on Online Labels printable clear sticker paper, but you can use of their awesome types of sticker paper for this tutorial - glossy, removable, matte, kraft paper, silver or gold, etc. When the printing is done, take the sticker sheet and place it on your Silhouette Pixscan mat. Make sure the entire sheet is within the black border. If you need to, trim the edge down just slightly. Take a straight on picture - in good lighting - without any shadows or glare of the entire Silhouette Pixscan mat. I usually place my Pixscan mat on the floor and stand over to take the picture. *From here on out, do not move or remove the sticker sheet from the Pixscan mat. It must stay in the exact same position. Send the picture to your computer. Then using the Pixscan tool on the right tool bar of Silhouette Studio, load the image into the software. It may take a few minutes for the image to load depending on the size. When it does, it should look like this. If the sticker designs you have came with a separate SVG or DXF cut line, like the free set included above, grab that. If you need to create cut lines, you can select all of the stickers and make a duplicate set, then give them a transparent fill and a colored cut line. Copy the cut lines to your clipboard and move into the work area tab with the Pixscan image. Paste the cut lines there. If you need to rotate the cut lines, use the Rotate 90 option in the Transform panel from the right sidebar. Line the cut lines up over the Pixscan image of the stickers. Now load your Silhouette Pixscan mat, with the sticker sheet on it into the Silhouette CAMEO. Adjust the blade depth if necessary for the best Silhouette cut settings on the type of Online Labels sticker material you are cutting. From the Send panel in Silhouette Studio click Send. The machine will first look for the registration marks on the mat then begin cutting. When the cutting is finished you can unload the Pixscan mat. You can see how the machine cuts right around the stickers! It's able to do this because the Pixscan mat has its own set of registration marks so they're not necessary on the printed sticker sheet itself. Note: This post may contain affiliate links. By clicking on them and purchasing products through my links, I receive a small commission. That's what helps fund Silhouette School so I can keep buying new Silhouette-related products to show you how to get the most out of your machine! Get Silhouette School lessons delivered to your email inbox! Select Once Daily or Weekly. Subscribe Here!

Text to path *created in version 4.2 of the Silhouette software Let’s explore how to take ordinary text and make it more interesting by adding it onto a path. The most common way I see this used is when you want the text to form to a circle or oval shape. But why stop there?… Continue reading Let’s Explore v4 – Text to path

Have you ever wanted to create something of your own in Silhouette Studio®? Maybe you want to curve text, or draw your own design? Maybe you want to tweak something from the Silhouette Design Store? T

This step-by-step, simple tutorial will teach you how to cut an extra large vinyl with your Silhouette.

Have you ever wanted to convert an image to SVG and not lose any of the layers? It can be frustrating trying to do that in Design Space but I found the

Want to use your photo with your Cricut Machine? Learn the 3 easiest ways to convert your png or jpg to SVG and cut file for use with your Cricut!

We got an email from the PTA last Thursday reminded us that teacher appreciation week was THIS WEEK! WHAT! I had like 4 fun post I still wanted to make! I started with the

How to use Silhouette CAMEO 4 sketch pens to sketch on wood

Silhouette Cameo E-Books, Guides, Manuals, How To's and more. Want more free project walkthroughs, guides, product recommendations, and more? Visit Silhouette School. How to apply vinyl, heat transfer, silhouette studio guide, print & cut.

The Ultimate Silhouette Guide book series teaches how to use the CAMEO cutting machine! Looking for a Silhouette CAMEO book for dummies? It's here

Makers Gonna Learn

Hi Guys I posted this thread a week ago trying to gauge what kind of cut files people want to see, and I got a variety of very specific responses. People like dog cut files! I have a cat though…

Wanting to know how the new Cricut Maker 3 and Explore 3 compare to the Silhouette Cameo 4? This post is for you!

Here is how to open those SVG files for free with the basic edition silhouette software. Sure it's a workaround, but once you get the hang of it, it's pretty fast and easy.There are a few easy and free ways to convert SVG files to another format that works with the basic version of the silhouette software.

Have you been wanting to learn how to make stickers for your own planner? Do you often get frustrated when trying to cut an image you found on the internet? It always cuts the white background with it! So all you're left with is just a square instead of the actual shape around the whole image. The reason you got a Silhouette machine was to be able to get stickers that were cut around the image perfectly. Not ones that look like you just used scissors to cut out!

How to make your own vintage-style fonts and images in Silhouette Studio. Once you make your own distressed fonts and designs you can cut them on your Silhouette CAMEO or Portrait to give your creations a cool, custom and worn look!

Want to know how to use fancy characters and swirly fonts in Silhouette Studio? This tutorial will teach you how to use glyphs like a pro!

Makers Gonna Learn

Learn to use the Silhouette Studio Magnet Trace tool to remove the background from an image for photo.

Want to use your photo with your Cricut Machine? Learn the 3 easiest ways to convert your png or jpg to SVG and cut file for use with your Cricut!

How To Use Silhouette Sketch Pens: Want to learn how to use your Silhouette Cameo or Portrait to draw?! It's easy; this tutorial will show you how!

Want to create larger than life projects with your Silhouette Cameo? This step-by-step tutorial will show you how to cut oversized designs, no matter what size mat you have! Open Silhouette Studio and the design you want to cut. Size it your particular project. I'm cutting out a large megaphone design to create a fun football cheerleading sign. You can find the designs used to make this sign in the Sports SVG and Font Bundle. Draw a rectangle an inch smaller than your cutting mat. I'm using a 12 x 24 inch cutting mat so the rectangle I drew measures 11 x 23. Duplicate enough of those rectangles to completely cover the design you wish to cut. Align the rectangles to sit right next to one another, no gaps between them. Duplicate everything for as many rectangles as you drew. I drew four rectangles, so I need a total of four. Then, open the Modify Panel. Select the megaphone design and 1 of the rectangles. Click crop. This newly cropped piece of the design can now fit on your cutting mat. Delete the remaining rectangles around this cropped piece. Repeat this with all the copies you made, using a different rectangle for each copy. You should now have the design cropped into multiple sections, each of which is small enough to fit on your cutting mat! Cut out each piece.... Assemble the pieces together with a piece of tape between the pieces on the backs. We also used designs and fonts from the Sports SVG and Font Bundle to create this awesome oversized spirit sign! These make great decoration for team parties! Check out these other blog posts: How to Cut Larger Than the Mat with Cricut How to Cut Larger Than the Mat with ScanNCut Watch the project video below for more tips about how to create this sign: PIN it for later:

Free Silhouette CAMEO tutorials and videos! Largest resource for help with Silhouette CAMEO, software, Silhouette Studio, reviews & more for beginners

You can print from Silhouette Studio to any printer that's connected to your computer by USB or on the same network. There are various reason why you might want to print from Silhouette Studio and they may not all include printing and cutting. For example, you can print to your sublimation printer directly from Silhouette Studio and never use your CAMEO at all for the project. Read on for how to print from Silhouette Studio.Make sure you have your printer connected to your computer to start. From Silhouette Studio go to the File menu and click Print Page Setup. Select your printer and the printer page size you are going to print on. Return to Silhouette Studio's Design area. Open the Page Setup panel. Change the "Media Size" to "Printer." Add your design or image and make any changes such as sizing. Now you're ready to add your design to the work area. Make any changes to the design you want including size. Remember lines that are part of images or texts that do not have a line weight or aren't filled in with a solid color will not print. When you're ready to print go to File > Print. If you are printing to a sublimation printer you will want to make sure you are printing through the print manager. You can find more information through the links below that are specific to your sublimation printer. How to Use Sawgrass Sublimation Printer with Silhouette Studio Using Silhouette Studio with Epson Sublimation Printer To learn more about all of the printers I have, it's best to start here Note: This post may contain affiliate links. By clicking on them and purchasing products through my links, I receive a small commission. That's what helps fund Silhouette School so I can keep buying new Silhouette-related products to show you how to get the most out of your machine! Get Silhouette School lessons delivered to your email inbox! Select Once Daily or Weekly. Subscribe Here!

Wondering if you should update to Silhouette Studio or what the differences are between V3 and V4? This post will help you ease the transition quickly!
