

How To Make A Travel Sewing Kit. Free Sewing Tutorial and Pattern

DIY Kitty Cat Sewing Kit Bag Free Sewing Pattern & Tutorial

I have been wanting to make a Travel Sewing Kit for sometime now. We are in the car quite often and it seems like the perfect place to take along my hand sewing projects.

Travel Sewing Kit Organizer Sewing Pattern & Tutorial

A PDF sewing pattern for a mini sewing kit for holding all your supplies whilst on the go, with different pocket styles and closure options. PLEASE NOTE: This is a PDF pattern and NOT a finished item! The Tri Sewing Kit is a mini case for keeping all your essential supplies to hand! Finished Size Open – 5 3/4” wide x 10” high Folded – 5 3/4” wide x 5” high The pattern guide includes a complete or cross-over pocket style and instructions for an elastic or snap-fastening closure. Materials Needed; 1 Fat Quarter Fabric Wadding Interfacing 4″ square of felt Snap fastening / Elastic The pattern is provided as an instant download, so a PDF reader is required. Once your purchase is complete, you will be able to download your pattern and print it out at home. Please note that this is an original pattern © 2021 by fabric & flowers. All rights reserved. This pattern is meant for personal use only, please do not republish or distribute in any form. The pattern may NOT be used to make and sell commercially without express permission of the author.

Travel Sewing Kit Organizer Sewing Pattern & Tutorial

For my birthday I received a sewing kit from my dear friend Erika. The sewing kit was for a sewing kit, which is kind of a funny thing to say. And in actually it was labelled as an 18th Century Housewife. The kit was a collaboration between Sewstine , one of my favorite 18th Century Costumers and m

All sewers need a Needle Book and here is a most adorable Quilted Needle Book sewing pattern in two sizes. You'll be able to make a Needle Book that is

How To Make A Travel Sewing Kit. Free Sewing Tutorial and Pattern

A curated list of diy sewing needle cases and needlebook sewing patterns, including free needlebook tutorials.
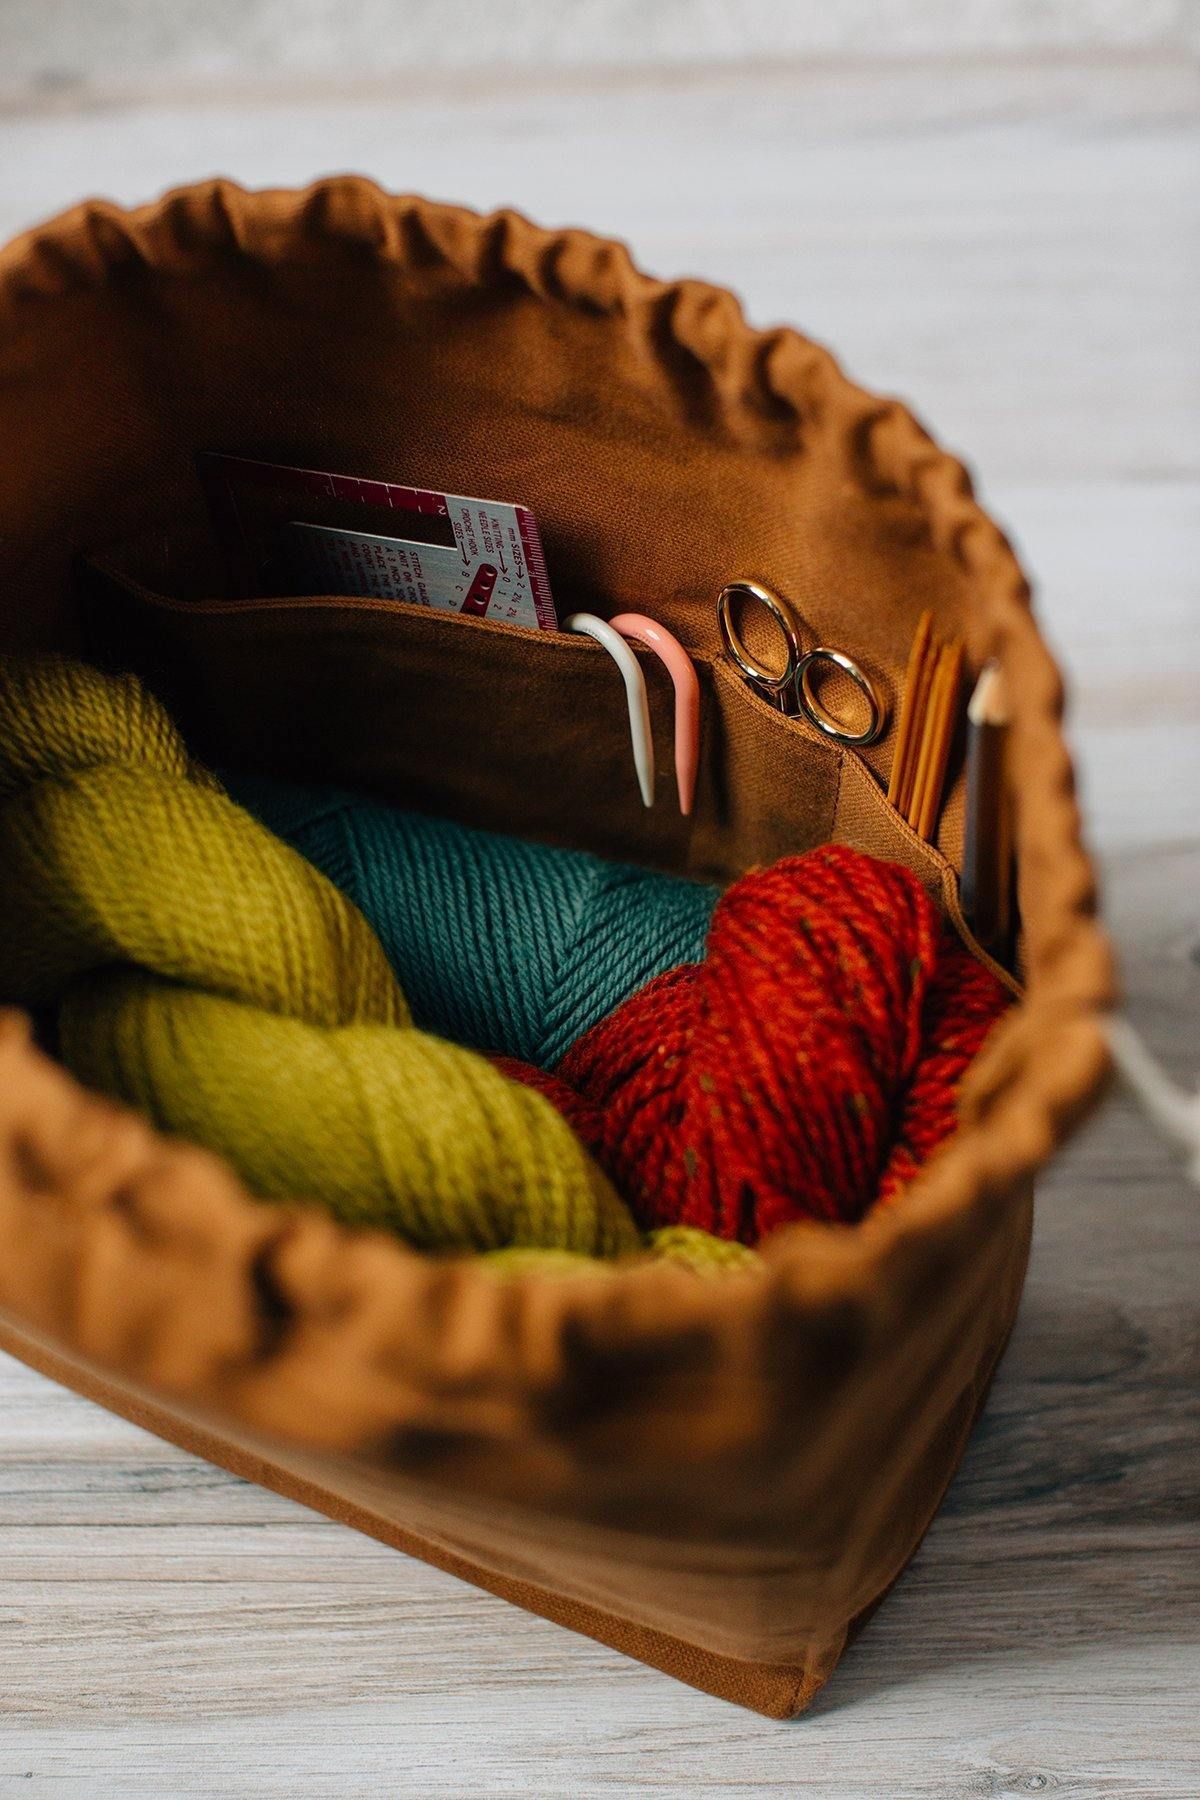
The Field Bag was originally designed and sold by Fringe Supply Co. and is now available to home sewers as a sewing pattern! The Field Bag is ideal for organizing knitting, sewing, embroidery, or other works-in-progress. It features a roomy main compartment with interior pockets designed for corralling tools, patterns,

I get so excited every time a new fabric collection from Tilda comes out! The Harvest collection is due in Australian stores on the 1st of August, 2017. But ...

The travel sewing kit is a fun and cute way to store your sewing items you like to take on the go. Learn how to create it with this video tutorial.

Read the article 'DIY: Sea Shell Sewing Kit' in the BurdaStyle blog 'Daily Thread'.

a handy, compact sewing kit - perfect for slipping in your bag when you're out and about... You will need old glasses case 30cm x 30cm of fabric (for outer) 30cm x 30cm of fabric (for lining) 10cm x 20cm scrap of fabric (for pincushion) small amount of stuffing (for pincushion) PVA glue stiff glue brush sewing needle,pins & scissors sewing machine (optional) 2 small buttons bone folder or knitting needle blue-tack (optional) ...a bit cruel, but I don't have proper step-by-step photographs for this project! You will find it easier using a glasses case which is 'square-isn' in shape, and fabrics which are fine in weight, and/or of fairly loose weave - this will assist smooth corners. If your fabric buckles at the corners, fold neat little pleats at the curves... I've taken a few close up photos from the finished project to illustrate the instructions as best I can and slotted them into the steps below to clarify a bit more... 1 Cut an oblong of fabric several centimetres larger all around than the lid of your glasses case, and another for the base. With one of the fabric pieces right side down and laid horizontally in front of you, fold the bottom edge up by 5mm and glue into position – this edge will lay along the hinge of the case. Do the same with the other fabric piece and leave to one side to dry. 2 Cover the outside of your glasses case first – use PVA glue and a stiff glue brush to ‘stab’ the wrong side of the fabric first(see tip). Leave it for a few minutes so that the glue is not so wet (this will prevent it from oozing through the fabric when you apply it). 3 Centre the folded edge of the glued piece of fabric along the hinge, then gently smooth it out across the curved shape of the case, making use of the grain and bias of the fabric to reduce the wrinkling. Leave to dry. 4 Repeat steps 2 and 3 with the base of the case. 5 Trim the excess fabric down to 5mm all around the opening of the case. Apply glue to the rim and several mms inside the unhinged edges. Fold and smooth the fabric cover, rub it with the bone folder or end of a knitting needle to smooth it and leave to dry. 6 The best thing to do now is to make yourself a pattern for the lining of the case. Use a scrap of fabric and smooth it into position inside the glasses case, which should be open as wide as possible. You can use small pieces of blue tack to hold it in position while you do this. Trim it to fit exactly around all the edges. Remove your ‘pattern’ and use it to cut your floral lining fabric. 7 Repeat the gluing process to insert the lining, making sure your case is open as wide as possible when doing so. Use small sharp scissors to trim the raw edge 1mm or so below the edge of the case rim and rub it all the way around with the bone folder or the end of a knitting needle to ensure it is firmly attached. 8 Make a small pincushion by cutting two rectangles of fabric roughly half the length of your case and the width plus 2cm. Place the two pieces right sides together, and stitch a 1cm seam all the way around leaving a couple of centimetres for a turning gap. Turn right sides out through the gap, stuff and close the gap with small stitches by hand. Finally, stitch the two buttons to the centre of the pincushion, one on ether side with the fabric and stuffing sandwiched between. tip Stab your loaded glue brush on a scrap of paper first, before applying it to the fabric – you don’t want it over-laden, especially when using finer fabrics, such as the lawn for the lining.

As you may know, my daughter has a lot of food allergies. That means we have to carry her epi-pen and Benadryl with us wherever we go. Shortly after I found out about my daughter’s allergies, I joined the No Nuts Moms group on Facebook. They are a really informed allergy support group. One of the articles they shared when I first joined was about how to

This is a FREE pattern + tutorial to make a pouch that you can use to store some basic sewing tools when you are away from home.

Need a new sewing kit? We have compiled a list of different 30 different DIY sewing kits that you can create from your home.

The travel sewing kit is a fun and cute way to store your sewing items you like to take on the go. Learn how to create it with this video tutorial.
