

Using invisible thread can be tricky when working on a quilt project. This video gives a few helpful tips on when to use the thread and the type you should look for.

I have to be honest, woven t-shirts are usually not my friend. I have a hard time fitting them and bias tape makes me cringe (but so do facings)….it’s so hard. But, before my trip to Utah I really wanted to sew up some new rayon tops and was so happy I did – there’s […]

This sewing tutorial will help you learn how to hem knit fabric with a serger or sewing machine. I’ve compiled my tried and true tips on hemming knits so that puckered hems and popped stitches are avoided

Tips and techniques to successfully sew with sheer fabrics. Find out what tools work best and the proper threads to purchase when sewing with sheer.

Tips and tricks on how to sew with chiffon fabric. You can use a pattern designed for cotton fabrics and make it using chiffon fabric.

Velvet is my favorite fabric for creating a high-style look and I like to use all kinds of velvet for my sewing projects but it can be a little bit tricky sometimes. In this sewing tutorial, you will find 12 must know velvet sewing tips and tricks: how to select patterns to sew in velvet, how to cut velvet, how to determine nap of velvet, how to sew velvet on your sewing machine, how to iron velvet, etc.

Who wants to learn how to sew a rolled hem?! For silk or any kind of sheer fabric, you'll want to know how to sew a rolled hem.

Working with faux fur fabric can be tricky but set yourself up for sewing success with these easy tips. The Sewing Loft

Learn the difference between terry fabrics like towel terry and French terry and get tips for sewing with them.

Silk chiffon is soft, floaty, and so, so, delicate. Yes, it’s a bit finicky, but so worth the effort if done right. I’ve been working on a chiffon kimono and thought I’d share my notes on working with

Smooth hems on knits can be tricky to achieve; with Jade we felt like we finally landed on a technique that REALLY worked (no curling; looks smooth, not stretched out...

Tips and tricks to handle rayon challis or viscose material when sewing Hey y’all, today we’re going to talk about one of my favorite woven fabrics for clothing, rayon fabric, or more specifically rayon challis (pronounced ˈsha-lē ). Remember when we talk about fabric, we are talking about both the fiber and the method of construction....Read More

How To Sew Stretch Fabric. Tips how to sew stretchy fabric. Sewing stretchy fabric & sewing on stretch fabric need not be hard. See my guide.

Stretch velvet can be a bear to sew! Here's how to sew stretch velvet, including cutting tips + patterns that work well for this luxe fabric.

Take your sewing projects to the next level using these sewing tips and tricks.

I have an easy way to Gather Fabric that will give you even gathers. Even better, you will not have any broken stitches or tangled threads.

Learn how to sew leather by hand with expert tips Jim Linnell of Tandy Leather including sewing materials, techniques, and the basic saddle stitch.
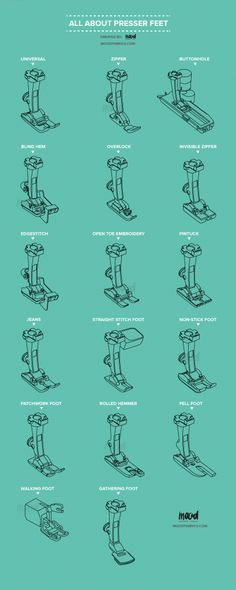
We're back with another guide, and this time we're focusing on presser foot attachments! One of the most important pieces to any sewing machine and project,

Here is a very interesting sewing tutorial for your sewing projects. Learn how to sew with the bobbin thread in the needle. Find out why you may need to do it.

You might be making one or more of these Sewing Mistakes. Learn how to fix them quickly and what to do instead.

What you need: about a half metre (a little more than half a yard) Linen Fabric (or try any white or light coloured 100% cotton fabric) Turmeric Coffee White Vinegar Large Pot (I used 2 cups vinegar, 8 cups water) This process preps the fabric so the dye will adhere to the fibres. Machine wash in cold water and dry before sewing!

Earlier this month at our March NYC Metro MOD Quilt Guild meeting we introduced quick demos - 20-minute sessions with members teaching members techniques, tips, and tricks. An email requesting volunteers was sent out and our VP, Bernadette, requested someone demo Y-Seams, more specifically me! To demo Y-seams I've used an 8 point star (45° points) and I've put together some info here about working with angles around a centre point: The centre of anything has 360° around it - you can add as many pieces as you want around a point and they'll all join up perfectly as long as the angles of each all add up to 360°, English Paper Piecing works in the same way. Your quilting ruler often has basic quilting angles marked on it - 45°/60°/90° or you can use a protractor to really start playing with your angles. Check out large sized protractors in your local DIY store, they're often cheaper than identical tools sold specifically for quilters and artists. Moving on now to a step-by-step photo version of my Guild demo - created for our guild members to refer back to and shared here so you can use it too. Beginner's Guide To Sewing Y-Seams Rather than marking your fabrics as above it's so useful if you can simply use the markings on your sewing machine foot to tell you when to stop sewing. Sewing machine manufacturers know how much quilters love their 1/4 inches so most add markings or grooves to their patchwork/1/4" feet to make life easier for us. Take a look at your 1/4" foot - does yours have markings? If it doesn't you might want to treat yourself to a new foot for your machine that does, it saves you so much time and improves accuracy so could be a worthwhile investment. Aren't those Y-seams easy after all? I hope my beginner's guide makes you want to give Y-seams a go if you do let me know how you go on and share your work too I'd love to see it - Chris :D Featured on: Clicking on an image will take you to a new page of crafty goodness :) Disclaimer: This post is for informational purposes only, no payment or commission is received on click-throughs and opinions are my own. Click to follow me on Follow Linky Parties This post may be linked to some great Linky Parties, always a great source of inspiration too. If you click through to my 'Fave Linky Parties' page you can see where I like to share my work.

When sewing stretchy fabric, one of the most important things to consider is your needle.

How to attach a free motion (aka darning) foot and draw with your sewing machine. Learn the different types of darning feet and how to get different effects.

In order to sew better fitting clothes, you need an understanding of your body proportions. This post - Understanding Body Proportions - will help! #sewing

Sourcing fabric for sewing projects. There are a few main sources to collect the raw materials for sewing projects. If you sew, you will already have definitely realized that you have lots of small scraps of fabric. In this case the journey will be easier for you. Clothing from your closet or close family that you were thinking of getting rid of is a wonderful source of fabric. Another source is charity stores, op shops and the recycle industry. If you have access to the textile industry, the

What is cotton lawn fabric and what to sew with it? Cotton lawn is the perfect lightweight material for flowy clothing such as dresses, blouses & more.

Couching is the process of using embroidery stitches to stitch a cord (or yarn or decorative thread) to the surface of your fabric. It's a fun way to add some nice dimension to your work and it can give you a really unique effect. Give it a try! If you want to couch using your

If you’ve been following along for a while, you may remember this post, but I’ve been getting a lot of French seam questions lately so I figured it wouldn’t hurt to resurrect this tutorial from the blog archives and set it free a second time. I’m first going to do a run through of the french seam and then will show you how to apply it to the armhole. Just a few notes before we begin… 1. french seams are usually best used on light to medium weight fabric. 2. French seams require you to split your seam allowance in two parts. This tutorial is done using a 1/2″ seam allowance, but if you are working with a 5/8″ seam allowance, sew the first seam at 3/8″ and the second at 1/4″. I’ve tried to notate where this applies. With that, lets get to it! Click through to view the tutorial. French Seams on Straight Seams Step 1 | Cut your pieces from your fabric. I only made a half top for this so photographing would be easier, but yours will look normal of course. Step 2 | Sew the sides and shoulder seams with the wrong sides of the fabric together at 1/4″ (or 3/8″ if you have a 5/8″ seam allowance) and press the seam open. I like to do all of the seams at once instead of completing one seam at a time because you are much less likely to end up with one seam backwards. Step 3 | Grade your seam allowance down to 1/8″. Step 4 | Fold and press along the seam so that the right sides are together and stitch at 1/4″. Step 5 | Press both the side seams and shoulder seams towards the back of the garment and this part of the process is over! French Seaming Armholes (and other curved seams) Step 6 | First we will assemble the sleeves, this part is a bit repetitive. Sew the underarm seams with the wrong sides of the fabric together at 1/4″ (or 3/8″ if you have a 5/8″ seam allowance). Step 7 | Press the seam open and grade the seam allowance down to 1/8″. Step 8 | Fold and press along the seam so that the right sides are together and stitch at 1/4″. Press seam towards back of sleeve. Step 9 | Sew a line of gathering threads from the front notch to the back notches. Step 10 | Pin your sleeve and armhole together with wrong sides facing. Begin by matching the underarm seams and notches. Step 11 | Pull on your gathering stitches to ease the sleeve cap into the armhole. Stitch around the seam at 1/4″ (or 3/8″ if you’re working with a 5/8″ seam allowance). After sewing this seam, check for any tucks and remove them if you have any. Step 12 | Press the seam open and grade the seam allowance down to 1/8″. This will be most easily accomplished by cramming a ham or sleeve roll inside your shirt and pressing the seam around that. Step 13 | Fold and press along the seam so that the right sides are together and stitch at 1/4″. Check for any tucks and correct those if you have any. You should now have a french seamed armhole like the one below, congrats! And that’s that! As always if you have any questions leave me a note below and I’ll leave you a reply; I try to respond to all comments. Hope you find this tutorial useful!

Bunching thread? Breaking needles? Skipping stitches? It happens to the best of us. We consulted Becky Hanson of Singer Sewing Company to keep your sewing experience positively seamless.

Wear your favorite clothes longer with these tips for fixing tears, patching holes, sewing buttons, and more.

After sewing for years, I’ve naturally acquired a handful of sewing hacks and tricks. I’ve gathered together 39 of my favorites just for you!

I am so late to the game and I feel like everyone in the sewing community has made the Sapporo Coat except me, but hey, better late than never right?I fell in love with this jacket so fast, I made two in TWO days! My first one was a wool blend with a cotton silk lining (this gorgeous zebra fabric). My second one was a cotton blend jacquard with a cotton/silk lining. As we're heading into Australian summer I'm definitely going to make more out of summery fabrics such as linen or even silk!As much

Learn simple techniques to serge together seam allowances in this step-by-step video featuring Threads magazine author Sandra Miller.

Get insights on how to set in a zipper three different ways, to be used for a variety of applications and projects. … More
