

My sewing tutorial posts are consistently the most popular posts. It’s been a while since I have made one so it feels like I’m due. This free sewing tutorials round-up features tutorials and patterns for the home. So let’s get started! Free Sewing Tutorials for the Home Curtains & Valances Patchwork Curtain No Sew Shabby […]

Visit the post for more.

How to Sew Spandex: In this instructable, I'm going to show you how to construct a one-piece spandex superhero costume using a home sewing machine. Contrary to popular belief, sewing spandex on a home machine is actually quite easy and effective with the right tools an…

This wonderful tip provides instructions for an easy-to-sew, yet elegant wrap for your evening frocks It uses just over 3 yards of velvet and less than 2 yards of metallic brocade. Count on Ruth Wyeth Spears to help you sew up a luxurious evening wrap! Just click the image to view a larger, easy-to-read version.

Hi everyone! I can’t believe it! A whole new year and my blog turns 3 years old today! I hope it was the same for everyone else, but my 2015 was fantastic. I got to make a lot of awesome stuff for …

How to Sew Perfect Scallops. A photo tutorial to help you learn how to sew scalloped edges for the Highland Avenue House.

Discover 26 brilliant, creative and thoughtful DIY items to handcraft to donate to your local nursing home.

This sewing for beginners class will teach you all of the basic sewing skills you'll need to start sewing your own projects! Learning how to sew home decor projects is an easy way to decorate your home on a budget.

Basic Stitches Britannica Online Encyclopedia Dressmaking is a craft of making dresses. It is the basis and the start of the fashion world. When you make dresses, you will be called a dressmaker or historically, modiste. Learning the basics of...

This is a great tip from Ruth Wyeth Spears for the home sewist and the 1920s. It features fagoting, a type of trim that provides a see-through band in a garment (unless you face the back of the fagote

Sweet and simple Lacing Tree Ornaments for toddlers to make and hang on the tree. Great for critical thinking and fine motor-skill development.

Einen Bascetta Stern basteln ist ein kreatives DIY Projekt, das Ihre Kreativität fordert und die Stimmung zu Hause sicherlich aufhellt. Eine Anleitung

This sewing tip from Ruth Wyeth Spears and the 1920s adds a petal collar to a straight evening cape - a "luxury of the feminine wardrobe"! According to Ruth the collar is the most important part of the cape, and given the straight lines of these capes, I have to agree. :) This tip includes a pattern for velvet petals that are sewn in tiers and create a soft, becoming frame for the face. Enjoy!

Wondering what is the difference between a coverstitch machine and a serger? In this sewing tutorial on coverstitch vs. serger we will analyze these machines, find out how to sew with the coverstitch, what operations it performs, etc.

You have almost no cutting and only a few seams to sew with this pattern for a graceful negligee from the 1920s , courtesy of Ruth Wyeth Spe...

Make & Take projects are activities in a makerspace that use affordable materials students can take home to keep. They're great for boosting engagement.

Today Amy from H is for Handmade is sharing a dynamic paper project with us to outfit your home with style. Love this idea!***Hello to all the fine friends of Positively Splendid! I have been looking forward to appearing on Amy's blog for quite some time now and am so thrilled that it is finally

Learn with Play at Home. Play based learning ideas and activities for kids.

I was watching Downton Abbey last night (oh my gosh - don't you just love the costumes for Edith and Mary?!) It makes me want to sew up a whole wardrobe of 1920s frocks. It is hard to believe there is

In this tip, Ruth describes a marvelous technique of artfully adding graceful panels and an elegant draped band ("girdle") at the hips to add beauty to a plain slip-over frock. As always, yardage and

Teaching Kids to Sew: Intro to the Sewing Machine | via makeit-loveit.com
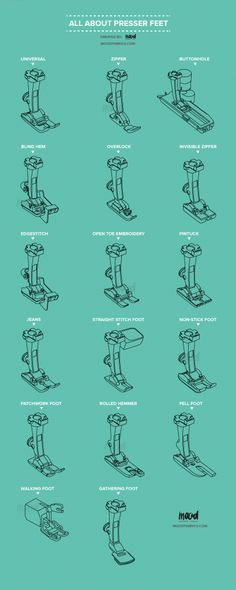
We're back with another guide, and this time we're focusing on presser foot attachments! One of the most important pieces to any sewing machine and project,

Teaching Kids to Sew: Intro to the Sewing Machine | via makeit-loveit.com

Although not extensively illustrated, this "Hand Sewing Lessons -- A Graded Course for Schools and for the Home" by Sarah Ewell Krolik should interest teachers, homeschoolers and anybody else (children through adult) who wishes to teach hand sewing, or to learn to sew. This might have come in handy years ago when I taught my oldest son extremely basic hand sewing. He made his own pillow out of one of his favorite Scooby Doo shirts that he had outgrown. He was so proud of it and LOVED using his own creation. The experience is a fond memory. It's also a huge bonus. Years later, he had a hole in his pants. Rather than rely on somebody else to fix it, he sewed it up all on his own in great, small stitches. Wow, was his grandmother surprised and impressed. The ebook is offered by Homeschool Freebie of the Day. Here's how Jim Erskine describes it: "This vintage instruction manual, originally published in 1905, is a great THREE YEAR course in hand sewing basics designed for home or school instruction. This is quite different than the sewing resource we offered months ago. Lots of helpful instructions for the teacher, with many projects and ideas for teaching. Check it out if you are interested in teaching this largely neglected but eminently practical skill." Illustration for section "Plain sewing" in Encyclopedia of Needlework. Fig. 12. Another kind of sewing-stitch. (Photo credit: Wikipedia) To download your copy go here: http://www.homeschoolfreebie.wholesomechildhood.com/april-14-hand-sewing-lessons/ 'via Blog this' Related articles Fun Free Arts And Crafts Paper and Scissors Book for kids, homeschool, classroom or adults Free PDF Ebook - The Story of William Tell - Homeschool, Classroom, History or Legend Free Vintage Children's Ebook - Peter & Polly in Autumn Check out New Homeschooling & Classroom Facebook Page! Next Free Homeschool webcast soon at 8 a.m.PT 11amET today -- Scheduling Snags

Gorgeous vintage postcard print featuring a fairy or cherub sitting in a swing made of flowers. This print is so pretty. Just click on the image to enlarge then right click to save! I would love to see your projects that you make with any of my free images. I would love to feature them here on my blog. So send pics and a description to [email protected] Also, please if you click on my images and save them leave me a comment! I love to hear from you! Adorable vintage print of little girl with her doll and little brother drummer boy! This one was originally a Christmas card and I did some graphic altering to make it more usable for other things as well. Dashing little Victorian couple! I just love these old sewing machine adds. This one is so sweet for the Singer company featuring adorable little girls making clothes for their dollies. Another precious antique calendar and add by Maud Humphrey for the Clark's thread company. Remember to click on the add to enlarge it, and then right click to save! Remember to send me pics and a description for featuring your creations here on my blog!! Please leave me a comment if you take my images!!! Thanks!!

Teaching Kids to Sew: Intro to the Sewing Machine | via makeit-loveit.com

the all well cardigan coat is a foundational sewing pattern for a simple and versatile layering piece that can fill any wardrobe hole you throw at it! this pattern is appropriate for beginners and advanced sewists and everyone in between, as it’s an opportunity to experiment and make choices as you sew to make a completely unique garment each time you pick up the pattern. the pattern comes with fully illustrated instructions and a free hacking guide (!!!) to help the creative juices keep flowing long after you’ve made the pattern once or twice or five or six times! bring your curiosity and your ideas to this pattern and we will walk with you all along the way! More information, pictures, and fabric requirements can be found on our website. (https://allwellworkshop.com/cardigan-coat) PATTERN SPECS: Six sizes (Bust Circumference 32-62" [81-157 cm}) with three length options and custom sleeve length. For more detailed size information, visit our website! Here's the link: https://allwellworkshop.com/cardigan-coat ALSO INCLUDES: The FREE (!!!) All Well Cardigan Coat Hacking Guide, an indispensable guide to making the All Well Cardigan Coat your very own every time. SEWING LEVEL: This pattern is appropriate for beginners, but will be fun for sewists of all levels to sew. PATTERN INCLUDES: - Print-at-home pdf pattern - Copy shop pattern - Instruction Booklet with illustrations. - Hacking Guide with illustrations, instructions, and tons of inspiration. PLEASE NOTE: This pattern is a digital download. It is not available in print. Once you have made your purchase, you will receive a link to download the print-at-home pattern pdf, copy shop pdf, and instructions pdf. Visit our Help + FAQ page (https://allwellworkshop.com/help-faq) or contact us at amy [!at] allwellworkshop.com or through Etsy if something goes wrong and you have trouble accessing any of the files. PRINTING YOUR PDF PATTERN: In the print settings, set the pattern to print at “Actual size” (or 100% scale). You can print your pattern on a wide-format printer or desktop printer—your purchase includes full-size and tiled versions. The copy shop file is A0 in width but takes up less height (33.1” x 24.7” / 84 cm x 63 cm)). You can print the tiled version on US Letter and A4 paper sizes. When printing at home, just print the first page, then check the test square with a ruler or measuring tape to make sure the pattern printed at the right size. If they’re correct, print the remaining pages and tape them together. For printing help, visit our Printing Help page on our website! (https://allwellworkshop.com/printing-help) This pattern was designed by Amy Bornman (www.amybornman.com) for All Well Workshop and produced in collaboration with Amelia Greenhall (www.ameliagreenhall.com). ©️ Amy Bornman, All Well Workshop. All rights reserved. Written permission is required to copy and/or distribute copies of this document, whether or not you profit from it. Photocopying, digitizing and all other copying to share this document is strictly prohibited. Help support the development of new All Well patterns by sharing the link to purchase with any friends who want to make a copy. Purchase of this pattern entitles you to make as many All Well Cardigan Coats as you like for your personal use, including to give as gifts. Please do not sell garments made using this pattern in any quantity.

From sixth grade on, I lived with my single father. Though I had/have a relationship with my mom, it didn't really include teaching me about homemaking. I have figured most of it out on my own with some occasional help and motivation. (Oh, how the blogging world encourages and teaches me! I find ideas for cleaning and organizing...recipes to try. Being self-taught is one of the reasons why I love to blog and share!) With that said, it is no surprise to know that I taught myself to sew. I suspect it began with buttons and then occasionally mending a bit of clothes. Later I went on to mending. Eventually my dad bought me a basic Kenmore model that I still use today. I was in my early twenties when it was gifted to me...though I didn't know how to use it. I think a friend showed me some basic sewing. I still have to refer to the owners' manual frequently for bobbin help, though it really isn't too helpful otherwise. Before Christmas a friend was telling me how her granddaughter had asked for sewing lessons for Christmas. Then, Big Sister received a Baby Alive (Feel Better) doll for Christmas that came with a pathetically tiny blanket. Immediately, I knew she would want a better blanket for her doll, and I considered making it for her. Then, realizing she is six years old and improving her fine motor skills all the time, I decided to take advantage of Christmas vacation and teach my impressionable and excitable daughter a new skill before she lost interest. I taught my six year old to sew. My daughter made a baby doll four patch quilt. It's not exactly a tutorial, but here are some guidelines to help you also have a positive first experience teaching your son or daughter (or grandchild) to hand sew. Have a purpose. We had a doll that "needed" a blanket. Maybe a neighbor or little cousin "needs" something. Choose the time. I knew sewing a doll baby blanket would take several days due to the amount of guidance needed. I opted to do it during her Christmas vacation when we had plenty of time together. Most of our sewing time was in the mornings and early afternoons. Choose fabrics. Visit the fabric stash and pull out five or six fabrics, purposely holding back on what might be her favorite pattern for the back side. Encourage her to choose four favorites. Cut fabric to size. Cut each fabric into a 9 inch square while she watches. (If I were to make another baby doll blanket I would use 11 inch squares or actually make a 9-patch quilt.) Place squares together to demonstrate what the quilt top will look like so she can see and understand the goal. Mark a seam allowance. Be generous. Using fabric chalk or a fabric marker designed to disappear with a damp cloth, mark the seam allowance in a straight line so your child knows where to sew. I used nearly a half inch seam allowance for my daughter. Prepare to sew. Place right sides of fabric together and explain why. Pin. Thread and knot the needle. I opted to use contrasting thread so she would see it easier. Sew. Demonstrate five or so stitches until she is bursting with excitement and cannot wait another second to sew. Each time we began a new thread, I would sew 3-5 stitches. This frequently modeled for her the proper way and ensured that some sturdy stitches would be sewn. Encourage. Eventually she will (mostly) get the hang of it. Eventually, explain that straight and small stitches are the strongest and will hold the blanket together best. Encourage her to examine the stitch length as she sews and to change it, if needed, before the needle is all the way through. Wait to do this until she understands the basics of stitching. These stitches were some of her final stitches and much smaller than her earlier stitches. Appropriately small and straight for a six year old beginner. Continue... Initially the new sewing student may not want to stop. Encourage a break if you see that it would benefit her. As you talk to her, some sewing vocabulary will be learned. Much help may be needed and given. Patience for all is needed even when she experiments and sews through her own comforter. On purpose. Motivate. When the interest wanes, consider motivation. My daughter was thrilled to know we could show the blanket to a neighbor when she completed it. By the time she needed to be motivated, we were close to completion, yet she did not want to work on it. Mrs. Potts was a great motivator! Be sensitive. My daughter is left-handed. I am not. If you are teaching someone who will use the needle differently than you, consider switching which side of the fabric to sew. I always place my seams on the right side (to be held with my left hand), and begin at the bottom. For my daughter, I learned to place the seams on the left side. My six year old daughter not only learned to sew a basic stitch, she also learned to swaddle a baby! Big Sister really did sew 98% of this blanket! I cut, pinned, and marked the fabric. I threaded the needle and tied the knots. As stated, I sewed a few stitches at the beginning of each new thread. She did all of the other sewing, except when she needed a bit of help! Really, my biggest job was to be patient and encourage her. This time together was incredibly spent. She had my full attention-and I could give it to her since my husband was also home on Christmas vacation- and we had a very special time together learning a new skill. What would you have as a next sewing project? I was thinking a baby doll pillow. Other thoughts? Explore our other children's crafts! I'm linking to ABC and 123's show and tell! ~ Annette {This Simple Mom}

I have been wanting to work on a design with lantern sleeve, and finally I have it to share! The Romy lantern sleeve is a cropped blouse with ¾ structured sleeve. It is a fun and simple project even for beginners. Let’s have a look at how it would be in different colors and prints: As usual, my pattern is made in 10 sizes from XXS to 5XL so you may find a suitable size for yourself. If you are not sure which size suits you, take a look at the measurement table before doing anything here: SIZE GUIDE. The pattern is made using layered PDF, please check for your desired size before printing so you won’t waste your paper. I have included a first page with many details about sizing and printing, so please first read the first page and make sure you know what size you need! If you still do not know how to print a layered PDF, please check for the printing instruction in this post: PRINTING GUIDE. My patterns are now made in both A4/Letter paper and A0 paper format so you can print at home or at any print shop! For home printers, you can print this using your home printer and either A4 or Letter paper. I calculated the printing area so that you will be able to use either type of paper to print the pattern out perfectly. Always print the first page first and check with the test square if you are printing at the right scale before you print out the whole pattern – avoid waste of ink and waste of paper, save the earth! Some PC may print smaller than actual size even when you choose 100% scale – I don’t know why this problem exist, but my HP laptop cannot print true to size. I have to scale up to 103% to get the right size. You may need to check with your PC to see if it prints true to size, if not, scale up a bit. I was informed by a reader that you can also print the pdf as image to get the right scale, however I never tested it on my computer. SEWING INSTRUCTION You will need Fabric of your choice. This pattern is intended for woven fabric. Scissors, pencil or fabric marker, ruler, pins Sewing machine/Serger or needle and thread Printed pattern How much fabric do you need for this piece of garment? To be precise, you may need to check how much fabric you need before buying. It will depend on the selected pattern size, the width, and design of the fabric you plan to use. Just to be sure, print all the paper patterns and lay them out at the width of fabric you plan to use (usually from 90 to 150 centimeters or 35 to 60 inches). Measure how much fabric you will need. Don’t forget to account for pieces that need to be cut multiple times and pieces that are cut on the fold. Cutting instruction: After printing out and taping all the pattern pages together, you will get something similar to this: You will see that there are 2 sets of lines on each pattern piece. The inner lines are sewing line (and you sew along these lines), and the outer lines are cutting lines (you cut the fabric along these lines, remember the folding lines where you have to fold the fabric before cutting). The distance between sewing line and cutting line is seam allowance, and it varies from point to point. For example, the side seam allowance is about 1/2 inch (1.2cm), and seam allowance at hemline is 1 inch (2.5cm). This is the reason why I do not remove the sewing lines from the pattern. Please use it as a guide to know how much seam allowance you need to give at each seam. The fabric will be cut into following pieces: Front: cut 1 on the fold Back: cut 1 on the fold Upper Sleeve: cut 2 Lower Sleeve: cut 2 Sleeve Cuff: cut 2 Bias strip for neckline finish Place the pattern pieces on the fabric, pin the pattern pieces to the fabric to secure them in place. Using sharp scissors, carefully cut out the fabric pieces along the outer lines of the pattern. Take your time to ensure precise and clean cuts, as this will affect the fit and overall appearance of your garment. Make sure to mark all notches and other design features such as darts, pleats, draw marks etc. from the pattern pieces onto your fabric. When sewing the garment, pay attention to notches, they must match up. Sewing instruction: 1. Serge/zig zag stitch the raw edge to prevent fabric from unraveling. 2. Fold and sew the bust darts on Front piece. 3. Place the Front and Back pieces right side facing. Pin and sew the shoulder and side seams. 4. Place the Upper Sleeve and larger end of the Lower Sleeve right side facing, pin and sew to join. Staystitch the seam allowance toward the Upper Sleeve. 5. Gather the other end of the Lower Sleeve to match the measurement of the Sleeve Cuff. 6. Sew the underarm seam of the Sleeve. 7. Sew two short ends of the Sleeve Cuff. Fold the Sleeve Cuff in half (right side out, hiding seam allowance inside). 8. Attach the Sleeve Cuff to the Sleeve by pushing the sleeve opening in between two layers of the Sleeve Cuff and topstitching, catching both layers of the Sleeve Cuff and the Sleeve inside. If you find it too difficult, just pin the Sleeve Cuff to the right side of the sleeve and sew to join. 9. Turn the Sleeve inside out, place it right side facing the right side of main garment, matching notches. Pin and sew to attach the sleeve to the main garment. 10. Use bias binding to finish back neck slit and neckline. You can refer to this post on How to finish edge with bias tape. Method 1 – bias binding, method 2 – bias facing. 11. Fold and sew the hem of the garment. Attach button and loop for back neck slit closure. And here is the download link: ROMY LANTERN SLEEVE BLOUSE (SIZE XXS-5XL) A0 PAPER ROMY LANTERN SLEEVE BLOUSE (SIZE XXS-5XL) A4/LETTER PAPER To download just click on the link above and choose “Save link as”. The PDF file will be downloaded to your device. An advertisement may pop up, just close it and continue with your download. In case some ads attempt to make you enter your personal info, just ignore and close it. I do NOT require any kind of information to download my pattern files. Happy sewing! And don’t forget to share your project on my Facebook page: Tiana’s Closet Sewing Patterns or tag me on Instagram #tianasclosetsewingpatterns, I will be thrilled to see the garment in real life!

They're SO simple to make.

This pattern is simple, beginner-friendly design; you do not need advanced skill levels to make it. You must know the basic crochet stitches and the ability to add wire to a crochet project. The PDF pattern comes with a detailed video tutorial to guide you through the crocheting process. Happy crocheting! Materials Needed: Premium Yarn: Soft, durable, and in the perfect hues to replicate the natural charm of crochet flower. Specialized Hook: Ergonomically designed for a comfortable grip, ensuring seamless crafting sessions. Iron Wire: Malleable yet sturdy, it gives the perfect structure to your crochet flowers, making them stand tall and proud. Flower Rod: for assembling your bouquet, giving it a professional, cohesive look. Hot Melt Glue: for assembling the flowers.

When Lauren from Pattern Workshop approached me and asked if I’d like to review her Creating PDF Patterns: From Sketch to Sale course, it didn’t take me long to say YES! I had already learned several neat pattern designing tricks that Lauren had shared on her blog, and thought it would be great to learn more ways to save...

I’m preparing to show some work at the Alpine Arts Center here in Edwards, Colorado, and it got me thinking about my love for (untied) knots. When a friend of mine got engaged years ago in NYC, I vowed to give her a piece of ‘tying the knot’ themed art. I purchased the Ashley Book of Knots for inspiration. Sadly, my friend didn’t get the knot gift, but when my husband proposed to me a year or so later, I told him the story about wanting to make something for my friend (and never getting around to it) and he told me about a rock climbing knot called the grapevine. We ended up having our wedding rings custom made featuring this knot, which is […]

An image reproduces women's housekeeping and grooming instructions from a 1949 Singer sewing manual.

Are you ready to add a touch of elegance to your wardrobe? The Fold Line offers an incredible free sewing pattern for the Xenia Top by Juliana Martejevs. This sophisticated top is perfect for both beginners and experienced sewists, featuring a chic design that combines comfort and style.The Xenia Top pattern provides detailed, easy-to-follow instructions, making it an ideal project for anyone looking to expand their sewing skills. Whether you're dressing up for a special occasion or looking for a versatile piece for everyday wear, this top will elevate any outfit.Customize the Xenia Top with your favorite fabrics and colors to create a unique garment that reflects your personal style. Download the free pattern from The Fold Line today and start sewing your way to a stylish new look. This project is not only a great way to enhance your sewing repertoire but also an opportunity to craft a beautiful, personalized addition to your wardrobe.Download

Ergonomically designed to support your back & upper body, whilst offering you maximum comfort as you relax. Not only in bed but on the couch/sofa as well. Key Benefits ✅ Alleviate Back & Neck Pain - Relaxing on the sofa or in bed can often become uncomfortable quickly. Especially during those lengthy Netflix binges!...

Olivia top Digital Pattern PDF sewing pattern for women EU 34-52 / UK 6-24 / US 2-20 / AU 6-24. Olivia top is an elegant open back top. It has a beautiful kimono style drop shoulders, open tie back and cropped waist. Dress up with a skirt or high waisted pants for a day or night out. ____________________________________ ✂ SEWING PATTERN ✂ 🌸 No paper pattern will be posted to you. This is a PDF pattern for download only. 🌸 This is instant 24/7 download. When you purchase the item you will find the PDF pattern in your Etsy Purchases. Please note you will not receive a physical pattern, you will receive a zip file download. 🌸 After purchasing, you'll be able to download four files: booklet, pattern in A4 size, US letter size 8.5" x 11" (print at home) or A0 size (print at copy shop). 🌸 The PDF Sewing Pattern comes with sew along with illustrated step by step instructions, making it super easy to make your own garment. 🌸 Youtube video tutorial available. Watch step by step guide video how to make this top (you'll find the link in the pdf). A4 = 18 PAGES U.S Letter size = 18 PAGES A0 = 1 PAGE Fabric usage: - 120 cm wide fabric: 108 cm -117 cm (1.18 yards - 1.28 yards) depending on the size - 140 cm wide fabric: 91 cm - 117 cm (1 yard - 1.28 yards) depending on the size - 150 cm wide fabric: 91 cm - 100 cm (1 yard - 1.1 yards) depending on the size PDF Includes: - Women's Sizes: EU 34-52 / UK 6-24 / US 2-20 / AU 6-24 - A4 & US Letter size 8.5” x 11” patterns print at home format - A0 print at copy shop format - Tutorial with step by step instruction illustrations, making it super easy to make your own garment - Fabric requirements - Print layout plan - Glossary of sewing terms - Size Chart 🌸 Pattern contains: Tiled pattern (include a 1cm (3/8″) seam allowance, unless indicated otherwise) 🌸 Skill level: Intermediate 🌸 Printing: • Ensure you print your PDF patterns at actual size (100% scale) • Verify that the print out size is correct by measuring the scale square. • Align pages following the margins and tape them together using clear tape. Use the references marks as a guide. 🌸 The pattern instructions are written in English only. 🌸 Find the right size using this size chart. The measurements are provided in both cm & inches. For size reference, the size photographed on me is a size EU 36 / UK 8 / US 4 / AU 8. 🌸 If you are having any problems understanding/making the garment or have any questions please don’t hesitate to contact me! I'm happy to help! 💕 ____________________________________ 🌸 Follow & tag us: instagram: @slowmorning.studio Facebook: Slow Morning Studio 🌸 I would love to see pictures of your creations. Please tag @slowmorning.studio or use a hashtag #slowmorningstudiopatterns so I can follow along with your progress. 🌸 Copyright! This pattern is for personal use only. Please do not copy, re-sell or give them away for free. You can make the garment for yourself or as a gift. 🌸 You can purchase a Commercial License if you have a home or online small clothing business. Then you are entitled to sell items made using the pattern for profit. Mass production is strictly prohibited. Purchase the Commercial License here: https://www.etsy.com/fi-en/listing/1318029360/commercial-license-for-1-pattern-listing?click_key=46cf7d72658f9b105a3a82c835715507a449836c%3A1318029360&click_sum=6cd4fa5d&ref=shop_home_active_13&sts=1 # Sewing pattern for women, Sewing pattern, PDF sewing pattern, Sewing pattern PDF, Top sewing patterns, Cropped top, Tie back top pattern

1884 Collapsible Wire Bustle This is an imitation of an 1884 collapsible wire bustle based on a bustle pictured in the Victoria and Albe...

Dynamic proportions and crisp angles make this sculptural jacket an easy-to-wear statement piece. The artist's unique arm awning sleeve design is open on bottom, providing both coverage and freedom of movement. Felted merino wool feels soft against the skin, yet is substantial enough to hold its shape for years of wear.
