

Sewing projects to make with selvedge / selvage fabric ~ Threading My Way

Ever looked at the edge of your fabric and think how pretty the markings are? Well, this list Fabric Selvage Projects will make you wish you've saved them.

Anya of Wellsboro, Pennsylvania just finished this selvage quilt. She used the quilt-as-you-go method, and she doesn't recommend it. "Too many issues" she says. I'll take her word for it. Another interesting fact is that she used the selvages from 72 yards of fabric to make this quilt. I had no idea! (Her friends contributed selvages, of course.) Nice job, Anya. You can read more about this project on her blog: http://www.hillscreekquilter.blogspot.com/ Also see her group blog: www.randomactsofstitching.blogspot.com.

Fabric selvages can be saved from the trash to be turned into treasured projects - learn how with these tips, tricks and tutorials for sewing with selvages.

Learn how to make selvage fabric from the pretty selvage you cut off your other sewing projects. Sewing for Beginners

Here it is- the selvage quilt that didn't make a dent in my collection of selvages! This is my second selvage quilt (Emerald Selvage Spiderweb, 2013) and probably won't be my last. Now that I'm in the habit of saving them, I can't stop! This is where I started a couple of weeks ago. If you are wondering, the red is Kona Tomato. (My grandfather grew the best tomatoes.) It only took about a week to complete the top. Many thanks to Karen Griska for writing a great pattern! I opted to set the blocks on point and skipped the borders. I wanted to make lots of blocks (I cut mine at 10"). This size fits perfectly on my kitchen wall. Selvage quilts are heavy, so a lap quilt wasn't appealing to me. I knew I wanted to quilt this with red and white thread. I started with "organic" vertical lines through the red squares. I figured whatever I quilted in white would disappear, so I decided to practice feathers. (I really stink at quilting feathers!) All that top to bottom quilting means no threads to bury. No marking, no threads to bury = win, win. There are some really cute selvages in here. And so many memories of projects past! Printed copyright dates range from 1994 to 2014. The back is loaded with dots. Why not? The only place you can really see the feathers is on this section of the back. That's OK with me! More practice required. One more glamor shot on the couch with the matching pillow. Yes, it's snowing again! Selvage Log Cabin (needs a cuter name. any suggestions?) 42" X 42" Started January 31, 2015 Completed February 16, 2015 Pattern by Karen Griska

This is a project that I have been planning for months, maybe even years! I have been collecting selvages (or selvedges, whichever you like) over the past few years- in our studio there are separat…

By Nedra Sorensen Quilting, quilting tutorials, modern quilts, family, faith, Arizona

Aleesa Kobi's beautiful new selvage quilt is called "On Edge." It measures 62" x 83." It was something of a family project as her mothe...

Are you comfortable with fabric grain lines? Join Heather Valentine from The Sewing Loft to learn the basics about understanding bias & selvage.

I made this quilt years ago for the AQS/National Quilt Museum "New Quilts from an Old Favorite" competition. This time it was chosen for the traveling exhibit and book: "Sawtooth." This quilt started with the four pineapple blocks in the center of the quilt. I played with them on the design wall until I got them into this funny arrangement. You can see this was made during my 1" strip phase. I like how the fans look like wheels in this quilt. Ironically, these busy wheels seem to provide the "place for your eye to rest" in this quilt. Could it be? Click here to see the pattern for making fans.

on devrait toujours garder nos lisières je fais un trait en haut a 1 cm du bord et jépingle la 1° sur la 2° lisière je couds sur le blanc c'est beau , ça vous plait ? et voilà quand j'en aurait besoin ce sera prêt , je ne coupe pas droit parce que...
Sewing projects to make with selvedge / selvage fabric ~ Threading My Way

What do you do with your selvages? (P.S. According to Wikipedia, it's "selvage" in the U.S. and "selvedge" in Britain - well, what d'ya kno...

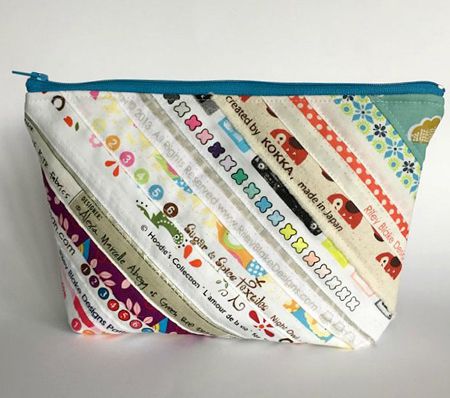
This beautiful selvage pencil case is the creation of my friend Christine in France. Isn't it amazing? You can read more about it on ...

Did you have a great Christmas? Are you ready for 2010??? Someone, please take my Mod Podge away for a minute. I selfishly kept one of the Moleskine three-pack notebooks for myself. The other two w…

If you've considered making a selvage quilt...or maybe haven't heard of one, you will be greatly swayed by this post. Riel from the Q and t...

Yay, I checked on Amazon this morning and there it was -- my new book up for pre-order! I have wanted to share this news for a while, so here I go: I wrote a quilt book! And designed all the quilts

Debbie in Jerusalem just finished piecing this wonderful selvage hexagon quilt top. I love the rainbow effect. Now she's looking for sugges...

This beautiful selvage quilt is the creation of AnnMarie Cowley from Oregon ( Run and Sew Quilts ). You can also find her on Instagram ...

Opening a store filled with quilting fabrics was a dream but not because I was in love with quilting. I love the fabrics and ...

Quilt from SCRAP QUILT SECRETS Come see me in Blairsville at the Misty Mountain Quilters Guild on Tuesday August 28 at 1PM! I'll be presenting all of the quilts from my first book SCRAP QUILT SECRETS

Lynne in New England was inspired by the quilt on the cover of my book "Quilts from the Selvage Edge" when she made this stunning wall quilt. She has such an artistic eye. Look how she handles all those blues, and the little splashes of red, orange and yellow are just right. I also like how the quilting lines echo the selvages. The red cherry dot near the center of the quilt, the brown lacy strip in the southeast corner, and that sparkling black and white binding...oh this quilt has it all! Yayyy, Lynne! Lynne made this selvage quilt for a Doll Quilt Swap. Here's what she had to say about it: "There was a discussion on the swap forum about what some abbreviations mean. I didn't know what kwim was, so I proposed some funny possibilities... like Kisses With Important Messages... Kiwis With Impromptu Mangoes? Kangaroos With Illegal Machineguns? My swap partner (who's flickr name is quiltinkimmie) suggested "Kimmie's Wonderful In Michigan."So when I had this very long, very blank selvage I had a little idea... and wrote that on the edge of the selvage and sewed it in the quilt." Visit Lynne's blog at: http://patcherymenagerie.blogspot.com/. Your time there will be well spent! Her cat Millie also has a blog: darlingmillie.blogspot.com.

While I have not had the chance yet to meet Riel Nason in person, I have seen one of her quilts in real life - at Quilt Canada - and it was fantastic. Riel is creative and playful in her designs, and reading about them on her blog - The Q and the U - has always made me smile. Riel is a Canadian, living in a small town on Canada's east coast in New Brunswick. When Riel asked me if I would share a review of her new book, Modern Selvage Quilting - I jumped at the chance. Riel is not just a quilter, she is also a published fiction author too. Her quilting book is full of her own voice and her own stories. It is a pleasure to read and funny too. All the photos in this post are from the book. Riel points out that selvages are just another kind of fabric scrap. Modern Selvage Quilting provides you with advice on how to save your selvages and how to select and use them in projects. Riel provides three different methods for effectively piecing the selvages and each is clever, fully illustrated and easy to execute. There are instructions for several projects in the book as well, from pincushions to pillows to placemats to quilts. Riel shares many tips as well, all of which focus on using selvages easily and effectively. While Riel gave me a copy of her book for this review, I would have bought my own copy if she had not. If you are interested in selvage quilting, this is the book to get. Now I have to admit to not saving many selvages, although I have a few jars of the prettiest ones. But, armed with this new book, I might just have to change my practices - the projects are just so appealing. Riel asked me which quilt I would make if I had an unlimited supply of selvages. I have to say that I am in love with that giant star and it might just be the push I need to save my selvages. As part of the blog hop introducing Modern Selvage Quilting, I get to give away one copy of the book. If the winner is in the U.S.A. they will get a hard copy and if the winner is from the rest of the world they will receive an e-copy. To win, leave me one comment letting me know if you save your selvages or might start doing so and what you have or plan to make with them. The give away will be open to enter until 10 pm MDT on May 22 and I will draw a winner randomly after that. Please, please, if you want to win a copy of this lovely book, make sure that I can find you. If you are not sure that your email is connected to your comments, put it in the comment too, or your instagram handle or your blog location. If I can't find the winner I will draw again. You should check out the rest of the book reviews on the blog hop: May 10 Riel at C&T Publishing Blog May 11 Cindy at Live a Colorful Life May 12 Yvonne at Quilting Jetgirl May 13 Diane at Butterfly Threads Quilting May 16 Krista at Poppyprint May 17 Casey at The Studiolo May 18 Leanne at She Can Quilt May 19 Sandy at Upstairs Hobby Room May 20 Mel at The Quilting Room with Mel May 21 Riel at The Q and the U Best, Leanne

My quilt guild's annual show was last Saturday. Of course, it had to be the hottest day of the year! That is 105 degrees! There was a fair amount of shade in the park, so we still had a nice...

I am calling it finished. My Iowa tea towel became a bag. A nice big bag. It will be my quilt show bag. Lots of stuff will fit in there. I said to Karen that if i fill it, it could get to heavy to carry. She told me that we can always walk back to the car and unload. Of course, why didn't I think of that? I wavy stitched over everything. Nothing fancy or new there. I was worried that doing that would obscure the towel, but it didn't. I was relieved about that. I used things I had on hand, like the little house blocks. Nothing new there. So what thing would be new to me in putting this bag together? Using selvage edges. I have never used them. I didn't even start saving them until recently. Most of mine have come from fat quarters. They were 18 inches. I needed to make them wider, so a column of the house blocks was added. I stamped the words, Hey! Is this heaven? No it Iowa on some of the blank sections. Then last night.... At the quilt guild meeting, a gal from New Ulm Minnesota came down to show us the buttons she makes. I bought the Minnesota themed button package and picked out the house one to use as a closure on the Iowa bag. Then I thought the house (kind of) went with the package and grabbed a flower instead. My niece Amanda gave me her t-shirts over the weekend. I cut yesterday and have today yet to work on it. I have my doubts about it getting quilted before her graduation. But at least the top can be put on display at her party. Then sent off to be quilted.

How To Make Selvedge Fabric - A Fast & Easy Tute This week I've made a laptop case using selvedges and I thought I'd share with you how I create selvedge fabric. When I buy a piece of fabric I remove the selvedges along both edges by folding the fabric in the correct direction to cut them off as full-length strips. It's up to you how wide you cut them, you may want to cut them wider and see more of the original fabric design. I line the selvedge edge up with a 1" line on the cutting mat and then 1/8" line of my ruler on the next 1" line - lining the ruler over the larger amount of fabric helps hold the fabric in place so it doesn't move while I'm cutting though you do risk making a wrong cut into your selvedge. Update on 11 February 2017 These days I'm cutting my selvedges at 1" instead of 7/8" to allow me to retain more of the print design. The rest of the process of creating the fabric remains exactly the same😊. Update on 11 September 2018 Making fabric from my selvedges has become an important part of my design so these days I have increased the width of the selvedge I cut off a piece of fabric. I'm now cutting at 1-1/8". This gives me more wiggle room for overlapping the fabrics and leaves more of the print section visible on the text selvedge edge. The rest of the process in creating the fabric remains exactly the same😊. To make selvedge fabric first I take a piece of batting or backing fabric - whatever suits the outcome of your project best - and cut it at least an inch wider and longer than the finished size of selvedge fabric that I need. Next, I spray it all over with basting spray such as 505 (temporary/repositionable) fabric spray adhesive - using a repositionable adhesive means you can change the strips around until you're happy with the look. Now comes the fun part - lay your selvedges row by row onto the now sticky backing fabric. Start at the bottom edge of the 'fabric' placing the frayed/finished edge bottom-most. Overlay the next selvedge over the cut raw edge - slightly overlapping it. You may want to vary the amount you overlap the selvedges by so you can see more/less of the colour/design/text. You can use more than one selvedge along a particular row - using up shorter lengths of selvedge - just lay them side by side and leave the side edges raw, any fraying will be minimal and adds to the look of the finished fabric (as in the top row being placed in the photo above) Once the backing batting/fabric is completely covered with selvedges you are ready to sew the selvedges in place. (If you are creating a Quilt As You Go (QAYG) block then at this stage you can spray baste your backing fabric to the made fabric.) The spray basting should hold the selvedge strips firmly in place while you complete this stage. I sew/quilt over the length of the selvedges using my 1/4" foot as a width guide. I choose one very straight edged selvedge as a marker for my first row of stitches and then use this as a loose guide for my next rows 1/8" to 1/4" apart - I'm not looking for a perfectly straight line finish here. Placing the stitch lines so close together firmly fastens down all the selvedge edges and creates the fabric. There're other methods of attaching selvedges that leave the finished edge of each selvedge strip loose from the background fabric but this I like that my method ensures each strip is well attached and often I use a contrasting thread so the stitching becomes part of the finished design also. Here's a finished QAYG selvedge block that I made last year as part of my Something NEW Sampler Quilt. This block contains selvedges from all the fabrics used in making the quilt. This is how the back of the fabric will look - in this case, you're seeing the backing fabric of the QAYG block but if you've just used a backing fabric or batting then you'll see that instead. Once you've finished your 'made' selvedge fabric then you can trim the edges/cut the fabric to size and use in your chosen project. And that's all there is to making selvedge fabric!!! Check out my other Selvedge posts: This time, I used it to make a laptop case Crazy about that Kaffe Fassett blue Millefiore lining I love selvedge fabric - it's so individual and scrappy looking, there's always something to look at and read! I've wondered about crocheting/knitting with my selvedges too - have you tried it? I've crocheted/knitted with lots of materials in the past - one of my favourites is plastic carrier bags - great for making waterproof garden table place/drink mats and chair covers but that's a whole other post! Do you save your selvedges? If you do then share what you've made and if you've used a different method to make selvedge fabric tell us about that too. Updated On 21 April 2014: The laptop case was a present for my daughter's friend Hayley and here's a photo Flicky sent me of Hayley with her case which she tells me she uses every day. The photo is also proof that the sun does shine sometimes in St Andrews, Scotland! Updated at 11 September 2018 I've used a piece of selvedge fabric for a cushion back - I looove how this looks, don't you? See more about this cushion here in this blog post. and another I made last year - read more about it here. How To Make Selvedge Fabric - A Fast & Easy Tute Featured On: Clicking on an image will take you through to the new page of crafty goodness :) Disclaimer: This post is for informational purposes only, no payment or commission is received on click-throughs and opinions are my own.

Have you seen Canadian quilter Riel Nason's recycle symbol selvage quilt? Here's her post about it. Riel is also an author. Her book "The Town that Drowned" is good for young readers and adults alike. I read it and enjoyed it very much. A good story well told. Don't let the title scare you. :) Like Elvis and Oprah, Riel is easily recognized by her first name alone. At least among quilters. Haha. Nice job, Riel!

This amazing heart selvage quilt is the creation of Canadian quilter and author Riel Nason. Her blog is The Q and the U . She is so...

While I was admiring pillowcases with crocheted edges yesterday, I found this elegant fabric/crochet quilt. It's from The Whoot in Australia. It looks like one-patch and four-patch blocks made like pot-holders, then bordered with a crocheted edge. The off-white roses are a very nice touch.

This stunning string quilt "Diamond Fan" is part of the collection of the Mingei International Museum in San Diego, CA. See more of their quilt collection here. I think it would be fun to make a quilt like this!

I couldn't stop at one!

Another square for my second selvage quilt... I used the stars and moon quilt selvages. and... here's what I have so far. I sewed the binding on the Stars and Moon quilt this evening, should have it finished in the next day or so. Just in time, the baby is due next week. :) Click HERE to see Log Cabin Selvage Quilt finish! Click HERE to see Spider Web Selvage Quilt finish! Click HERE to see Kelly Girl Quilts most recent post!

Well, it's almost the last day of July and instead of a "finish" to show you, I"m reporting on a new start! Oops!! I've been saving selva...

blogged duringquiettime.com/2014/04/selvage-whirlwind-complete.html

I have a box full of selvages, I love them! This is the first time I have sewn with them. It was so much fun choosing which ones to use :) Making a selvage quilt is on my to do list. I made this block 3 times! The first time, my block wasn't big enough. I didn't print the pattern (actual size), and that ruined the dimensions. The third time was a charm! Here are the rest of my blocks, there will be 9 in all.

Ok, don’t tell me. You want to see the flimsies first. I know I would want to if that was what you posted on YOUR blog. So without further ado, here they are. (For the uninitiated, a flimsy is just a quilt top before it is sandwiched with batting, backing and quilted). This is my Rainbow Selvages quilt top. It was originally going to contain just 14 columns, but I added the brown column, extreme left, after adding the planned black and white (polka dot) column on the right. It measures 60x72”. I like this so much more now that the top is complete. The texture is so much fun! I have a couple choices for a backing, but have made no decisions yet on that or the binding. I think a fun scrappy binding might be the ticket if I have enough leftovers. Must go stash-diving! The second flimsy is my autumn farm girl type sampler. Please excuse the distracting blue low-tack tape holding it up (in addition to pins); it is too large for my design board. I probably should have just let it hang, but it makes it look wonky. I am pretty amazed at how this turned out. You see, some of the original blocks were made 3 (or was it 4?) years ago during the Vintage Farm Girl Quilt-Along. I was learning as I went, and the block sizes ranged from 12 1/8" to 12 3/4”. They were supposed to be 12 1/2” unfinished. So first, some blocks had to be added to and of course everything trimmed. There went some points. And the 1” sashing didn’t leave much wiggle room. But it got done, slowly, imperfectly. Not a competition-level quilt by any means, but not bad. Then, since I wanted the leaf fabric of the outer border, of which I only had one yard, to orient with the leaves falling down, the cutting was a challenge. That’s why there are cornerstones - there was not enough fabric without them! And then, when it was all sewn up, I measured the top. And nearly fell over. And measured again. The width at the top and bottom were exactly - EXACTLY - the same. Not an eighth of an inch difference! The length at the two sides had a 1/8" difference, which I don’t even care about. How the heck did THAT happen??? Anyway, if it looks wonky now, get over it. It isn’t! YAY!!! My plans are to get these two tops basted this weekend and maybe even quilt one. They are both on my Finish-Along Quarter 4 list, so they will get done before the end of the year! * * * * * * * * * * * * * * I want to thank you all for your thoughtful comments on my post last week about gathering and saving ideas for quilting projects (for the Rainbow Scrap Challenge and quilting in general). And there were many great ideas and comments about scrap and fabric storage, settings, and organization. Thank you all so much! And be sure to check out the rainbow lineup over at Angela’s So Scrappy blog. It’s Scrappy Saturday, and there are always great ideas and eye candy over there! * * * * * * * * * * * * By early in the week, I was digging into my scraps. Since Dark Neutrals (gray, black, brown) are the color of the month at the Rainbow Scrap Challenge, I sorted all the colors and decided to play with the browns first. First I made twelve 4.5” (unfinished) bow tie blocks. This brings me to 214 made of 304 needed. I’ll probably do a few dark gray and black ones, but these will carry over into next year. And then I whipped out the brown strings and made four 8.5” string blocks and sewed them together. In fact, I sewed all my string blocks together into foursomes (like above) and took an inventory. It appears I have 12 more 8.5” string blocks to make: 2 orange (to finish up an orange foursome), 2 blue (to finish up a blue foursome) , then two more foursomes out of any of either red, green or purple, depending on what the scraps dictate. It would be quick work to finish this by year-end if I didn’t have so much ahead of it in line. But I may get to it by the end of the year. If not, it will finish up in the first quarter of 2018. * * * * * * * * * * * * * * * * * * And how fun is this?? Bruce had the day off Friday and we went grocery shopping together. I spotted these Lehi Roller Mills (a local Utah mill and bakery that makes great breads and mixes, etc) items on an end display at our local (Harmon’s) grocery store. What caught my attention? They are all in sacks of Lori Holt Vintage Christmas fabric! Lori, of course, is a local sew-lebrity fabric designer (for Riley Blake fabrics, also a Utah company). So I guess I shouldn’t be surprised at the collaboration. * * * * * * * * * * * * * * * * Finally, I asked last week if any of you were participating in the Bonnie Hunter annual Mystery Quilt-Along, On Ringo Lake. It appears that several of us are! Here is my fabric pull. I decided to go with grays instead of the browns that Bonnie suggested, mainly because I have grays. I could’ve gone out and bought some chocolate brown, but I’d rather use my stash. The grays look good with the colors, and it will all look better in our newly-remodeled living room. Have a great week, and stay warm!

Kathleen Loomis calls this selvage quilt "Jaunty F." Made in 2005, it measures 26" x 30." Here's another quilt by Kathleen. It's one of her Postage series quilts. What a talented quilter!

Learn how to make selvage fabric from the pretty selvage you cut off your other sewing projects. Sewing for Beginners

2011 Fiber Arts Fiesta, Albuquerque, New Mexico
