

Join the Sew Much Moore Quilt Block Club Swap and connect with quilters worldwide in a creative, community-driven exchange

I took a cue from Wanda at Exuberant Color and decided to work on mug rugs this week. With all the rush and food prepping, those smal...

Join the Sew Much Moore Quilt Block Club Swap and connect with quilters worldwide in a creative, community-driven exchange
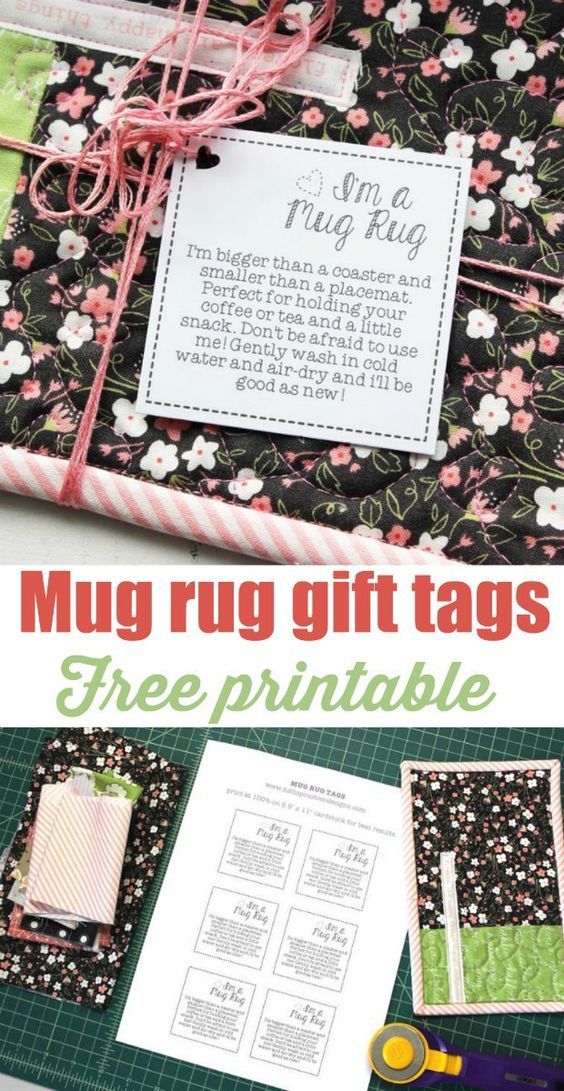
If you enjoy having a treat with your breakfast coffee or afternoon tea, you can probably benefit from a mug rug. We listed fun mug rug patterns and 5 printable mug rug tags and labels.

Raid your scrap box and sew up some of these gorgeous but free mug rug patterns. Make a lovely mug rug in minutes and snack in style every day

This easy quilt as you go mug rug tutorial is a must see - it will show you how to make a mug rug without binding!

I will show you a mug rug tutorial that you can use to make all kinds of mug rugs for your friends and family. Let’s jump right into it!

Mug Rug Coaster Free Crochet Patterns

Learn how to make an easy quilted mug rug using small strips of fabric on a paper backing. Fast and simple to make and beautiful out of batik quilt fabrics.

Join the Sew Much Moore Quilt Block Club Swap and connect with quilters worldwide in a creative, community-driven exchange

Join the Sew Much Moore Quilt Block Club Swap and connect with quilters worldwide in a creative, community-driven exchange

Want to learn to Quilt As you Go? This Rainbow Sunset Mug Rug by Top US sewing blog Ameroonie Designs will teach you how! Click for the tutorial.

I will show you a mug rug tutorial that you can use to make all kinds of mug rugs for your friends and family. Let’s jump right into it!

This sewing project is an easy guide to make a mug rug with the easy binding tutorial using the backside of the fabric.

Ha! I finished my last DIY holiday gifts! I always do kitty thingies for Ashley and Darrin, parents to SIX kitties. And, yes, sometimes it’s hard to find something new. But I lucked ou…

An 8-shaft draft for weaving bright and cheerful cotton mug rugs in many harmonious variations. Includes warp plan and the draft in two formats.

Want to learn to Quilt As you Go? This Rainbow Sunset Mug Rug by Top US sewing blog Ameroonie Designs will teach you how! Click for the tutorial.

Need a quick gift? These adorable coasters will work up in no time. 6 different stitch patterns are included in the directions. Crochet with 4 balls Premier Home Cotton worsted-weight yarn in beige using U.S. sizes I/9/5.5mm and K/10 1/2/6.5mm hooks. Finished size: 7" W x 8 1/2" L (excluding fringe). Designed by Lena Skvagerson for Annie's Signature Designs.

Our Summer Sun Mug rug pattern is the perfect project to practice improv quilt piecing! Improv piecing can seem overwhelming, but it's a great way to stretch your creative muscles!

Hey Guys! I’m back and with another beautiful crochet mug rug pattern. Mug rugs seem to be the only project I want to make these days and the Addison Mug Rug is no exception. But who could blame me, they are so fun and easy to make! They make the cutest home decor accessories and would be such a fun little house warming gift. They would be perfect to stick in a little welcome basket with some handmade dish cloths! I hope everyone loves and enjoys the pattern. Happy Crocheting! The post contains affiliate links that support the content on LoveandStitchDesign.com. Each affiliate link has a * beside it. All opinions are my own. Find more information about affiliate links, as well as my Privacy & Disclosure Policy here. Thank you so much for your support! Pin it for Later! Interested in the pattern and want to save it for later? You’re welcome to save it by using my Pinterest pin by clicking here or the image below! You can purchase an inexpensive Printable PDF on Etsy here! The PDF includes the complete step-by-step pattern so you can follow along on paper, highlighting and making notes as needed. It is a total of 6 pages including the front and back cover pages. Materials *5.00 mm Crochet Hook *Weight 4 Cotton Yarn *Yarn Needle *Scissors Yarn Choice For all of my mug rug patterns I use cotton yarn. Using cotton yarn makes the mug rug super functional because it tends to soak up moisture better than an acrylic yarn. Cotton yarn also gives beautiful definition to the mug rugs and enhances the texture and details. I’m really not a brand snob when it comes to cotton yarn. I usually use Lily Sugar n’ Cream 100% Cotton, but any cotton yarn would work just fine. If you would like to use the yarn I used click here! *KNITCRATE: Get 1 free crate (you pay shipping) and 1 item in the shop for 20% off when you use my code LOVEANDSTITCH at checkout at knitcrate.com. Stitch Key (US Terms) Ch = Chain St/sts = Stitch(es) Sc = Single Crochet Hdc = Half Double Crochet Sl st = Slip Stitch Working in the 3rd loop: Please refer to the attached video here! Special Notes -The mug rug is worked in rows. -The ch 1 does not count as the 1st st. -Stitch counts are located at the end of the rows instruction in parentheses. Finished Dimensions: 4 1/2 inches wide x 4 1/2 inches tall (not including fringe). Gauge: Not necessary for this pattern Pattern Ch 18 Row 1: sc in the 2nd ch from the hook and in each ch across. Ch 1, turn. (17) For a cleaner edge, sc in the back hump of each foundation ch. Row 2: sc in the 1st st, *hdc in the next st, sl st in the next st* repeat until 2 sts remain. Hdc in the next st, sc in the last st. Ch 1, turn. (17) Row 3 – Row 6: Repeat Row 2 Row 7: hdc in each st across. Ch 1, turn. (17) Row 8: sc in the 3rd loop of each hdc from the previous row. Ch 1, turn. (17) Row 9 – Row 12: Repeat Row 2 Row 13: hdc in each st across. Ch 1, turn. (17) Row 14: sc in the 3rd loop of each hdc from the previous row. Ch 1, turn. (17) Row 15 – Row 18: Repeat Row 2 Row 19: sc in each st across. Fasten off and weave in your ends. Attaching the Fringe To create the fringe, cut 6 inch pieces of yarn in the color used for the mug rug. You will need 3 strands of yarn to complete 1 fringe. To attach the fringe, take 3 strands of yarn. Use your crochet hook and push the hook through the far left foundation ch or sc st on either side of the mug rug. Fold the 3 strands of yarn in half and loop the middle of the strands onto the crochet hook and pull the loop of strands through the st about 2 inches. Fold the ends of the strands through the loop. Tighten to create the fringe. Repeat for every other foundation chain (or single crochet) on both sides of the mug rug. To finish off the mug rug, trim the fringe so it measures roughly an inch to an inch and a half (depending on your preference of length). ENJOY! Can’t get enough of mug rugs? Find more mug rug patterns here!

How to make a fast and easy DIY Angled Strips mug rug using scraps of quilted fabrics from your stash.Tutorial with photos to help you with the steps.

See the free knitting pattern below or you may choose to purchase the advertisement-free, printable version from my Etsy shop HERE These easy knit

Create a cute and cozy mug rug with our free cup quilt block and instructions. Turn a mug quilt block pattern into a mug rug.

Make naturally scented mug rugs to protect surfaces from hot liquids and fill the air with delightful smells with this easy pattern.

Join the Sew Much Moore Quilt Block Club Swap and connect with quilters worldwide in a creative, community-driven exchange

Disclaimer: I am not a Real Quilter. I have never taken a quilting class before, nor do I have any other kind of training in the quilting department besides that...

I will show you a mug rug tutorial that you can use to make all kinds of mug rugs for your friends and family. Let’s jump right into it!

This is what I sent to my partner in the mug rug swap- A stack of presents with labels that spelled out her daughter's name- her daughter wa...

Assemble a 6" coffee cup block.

Our Summer Sun Mug rug pattern is the perfect project to practice improv quilt piecing! Improv piecing can seem overwhelming, but it's a great way to stretch your creative muscles!

Whata think partner? Would something like this please you? For now, the Haiku has to stay secret!

Ha! I finished my last DIY holiday gifts! I always do kitty thingies for Ashley and Darrin, parents to SIX kitties. And, yes, sometimes it’s hard to find something new. But I lucked ou…

It's neither a coaster nor a placemat. Instead, it's a mug rug: a perfectly sized piece of fabric that stands between your coffee cup and your table. If you love quilting or working with fabric scraps, it's time to familiarize yourself with the mug rug. We've put together this collection of 40+ Free Mug Rug Patterns for you to try. If you're looking for a free quilted mug rug pattern, you're sure to love our selections. Even if you just enjoy just piecing together leftover fabric scraps, the patterns in this collection can inspire you to start creating. Quilted mug rug patterns are fun because they won't take you all day to complete, but they're just as rewarding! Not to mention, once you get in a groove, you can make several in one sitting! Handmade gifts, anyone? If you're more interested in making the traditional placemat, you'll find placemat patterns in this collection as well. For all those summer gatherings coming up, make festive placemats and napkins to complete your tablescape. They're just right for spring, summer, or any time of year. Finally, use our free napkin patterns to learn how to make napkins that match the rest of your kitchen decor. Anyone can learn how to make napkins with the help of these easy-to-follow tutorials. Sign Up for Free Patterns! PLUS! Become an expert in no time by learning How to Prep a Quilted Mug Rug with this video tutorial from our friend Mary Beth Temple. Once you're finished with this part, learn how to seam bind your mug rug here. Just click play on the video below to watch.

Punch needle embroidery is a beautiful, timeless needle art technique with limitless possibilities. But it can be hard to find the individual materials to get going initially. So, I prepared this punch needle embroidery starter kit for you. This moth design mug rug punch needle beginner kits are for anyone who wants to try punch needle embroidery but doesn't know where to start. Just follow the pattern, you'll get a cute coaster. One starter kit (Pink or Mustard) includes: -A punch needle set with 3 sizes needle and threader. (Optional) -A gripper hoop for working (8.21" - 21 cm diameter) -A piece of punch needle fabric -Pattern -All yarns for the design. Shades of colors and types of yarn may differ from shown in photo) -A little ball yarn and a piece of punch needle fabric for practicing. (Or you can use this fabric for an additional project) -A piece of felt for the bottom. -Basics of punch needle embroidery handbook. It will be e-mailed to reduce paper consumption and leave fewer footprints in the world. The handbook includes step by step explaination of stitch techniques (Flat stitch, Loop stitch, satin stitch and chain stitch), a list of materials that you need, transfering the design methods, thread the punch needle, Punch needle tips, completing the pattern and FAQ. Set of 2 kit (Pink and Mustard) includes: -A punch needle set with 3 sizes needle and threader. (Optional) -A gripper hoop for working (8.21" - 21 cm diameter) -2 pieces of punch needle fabrics -Patterns -All yarns for the designs. Shades of colors and types of yarn may differ from shown in photo) -A little ball yarn and a piece of punch needle fabric for practicing. (Or you can use this fabric for an additional project) -2 pieces of felt for the bottom. -Basics of punch needle embroidery handbook. It will be e-mailed to reduce paper consumption and leave fewer footprints in the world. The handbook includes step by step explaination of stitch techniques (Flat stitch, Loop stitch, satin stitch and chain stitch), a list of materials that you need, transfering the design methods, thread the punch needle, Punch needle tips, completing the pattern and FAQ. I hope you’ll enjoy punch needle embroidery as much as I do.

I am having so much fun with The Splendid Sampler blocks this week and I've just gotta share them with you ....... Block 24 – ‘’Inspector Sidekick’ is a traditional patchwork block designed by Michele Foster. I spun the corner blocks to tie in with the blue polka dots but it would've looked good had I left it. The Splendid Sampler Block 24 - Inspector Sidekick Block 25 – ‘Sunday Best’ is a delightful little applique block from the ever popular Anne Sutton. This block was particularly fun – with little touches added with embroidery (buttons, pocket, flower stem). The Splendid Sampler Block 25 - Sunday Best Block 26 – ‘Dreaming of Dresdens’ by none other than one of The Splendid Sampler organisers, Jane Davidson. The Dresden plate went together well but those little stems and dots were quite fiddly. The Splendid Sampler Block 26 - Dreaming of Dresdens Block 27 – ‘Sewing Machine’ by The Splendid Sampler’s other organiser Pat Sloan. The Splendid Sampler Block 27 - Sewing Machine This block reminded me of my Sewing Machine mug rug and was the inspiration for my first buy-one-get-one-free offer but hurry it ends on 31 May 2016. Get this Patchsmith Pattern free with any purchase until 31 May 2016 Block 28 – ‘Stitching Fashion’. I was very, very excited when I saw that Charise Randell was one of the block designers. I wasn't disappointed and I was thrilled to make Charise's paper-pieced block pattern. The Splendid Sampler Block 28 - Stitching Fashion So much so that I made another dress in different fabrics. The Splendid Sampler Block 28 - Dressmaking And finally, today’s block - block 29 – ‘Scrappy Happy Heart’ – another, albeit simpler, paper-pieced pattern from Christa Watson. I made this block totally from pink and red scraps. The Splendid Sampler Block 29 - Scrappy Happy Heart Tomorrow I shall make another using my blue and turquoise scraps but more about that next week. Until then ................

assorted mug rugs Wrap a 6" square sturdy canvas art board with cotton rug warp or other weaving yarn. 32 wraps starting half an inch in from one side and finishing half an inch from the other side. Tape the ends. Make marks on the board on all sides for convenience. front of the board back of the board. Slide a wooden skewer under the warp on the side you are going to weave first. Use a tapestry needle to lift the warps so you can easily slide it under. Make 4 passes of the tabby weave (standard over-under weave) using the same cotton warp yarn. Be sure to bubble the tabby passes. This is to keep the sides from pulling in when you beat the yarn. make a wide curve this is bubbling to insure an even beat After the first 4 tabby passes, alternate tabby with the fabric passes. Fabric strips should be about 1" wide, give or take. Do not bubble the fabric passes or there will be too much material bunched up. start of first fabric pass Note: I turn the board this way and that as I work on it, whatever is comfortable. The mug rug builds from one end toward the other. first pass of the fabric weft You can fold the fabric in half as it goes in so the right side appears on the front and back of the mug rug. Or you can let it bunch up or twist, as you like. I do all of that for variety. tuck the tag end of the fabric into the first pass Pinch or hold down the starting edge of the weft passes to keep the thread or fabric from being pulled in. Eyeball or measure as you go. The width of the mug rug is approx. 4.5", but it should stay the same. pinch or hold down the start of the weft passes Beat carefully until you can put a hem stitch in place. Once you have woven three fabric and tabby passes you can hem stitch the top of the mug rug. This will allow you to beat as hard as you want. hem stitch every four warp threads finish each bundle of threads with a slip knot Beat the weft harder now. You can move threads up with the tip of the tapestry needle. Don't get carried away. You'll find your happy beat with practice. hem stitch Laying in a new fabric weft. leave a tail overlap new fabric weft over old one Do the same thing with the tabby weft. overlay tabby and bubble as usual Weavy-weave. Ignore tail ends. They can be tucked in when you are done. Depending on your yarn size and fabric width, you will make 16 to 18 fabric passes. It's easy to count the fabric loops. tuck in the end of the fabric on the last pass weave four more shots of tabby hem stitch first mug rug done Now flip the board over to weave the second mug rug. slip the skewer under the warp threads weave away When you finish, use an exacto to slice the mug rugs apart at the top. slice along the top of the board Then cut the loops apart at the bottom. cut the loops You now have two mug rugs. Wet the mug rugs in the sink and press them dry. Do not wring or they'll get misshapen. Leave them to dry on a towel. Tuck any stray threads.

Learn how to crochet the V stitch (V-st) in two different ways and make a boho mug rug, just the perfect addition to your coaster collection

Explore Kim Rayner's 472 photos on Flickr!
