
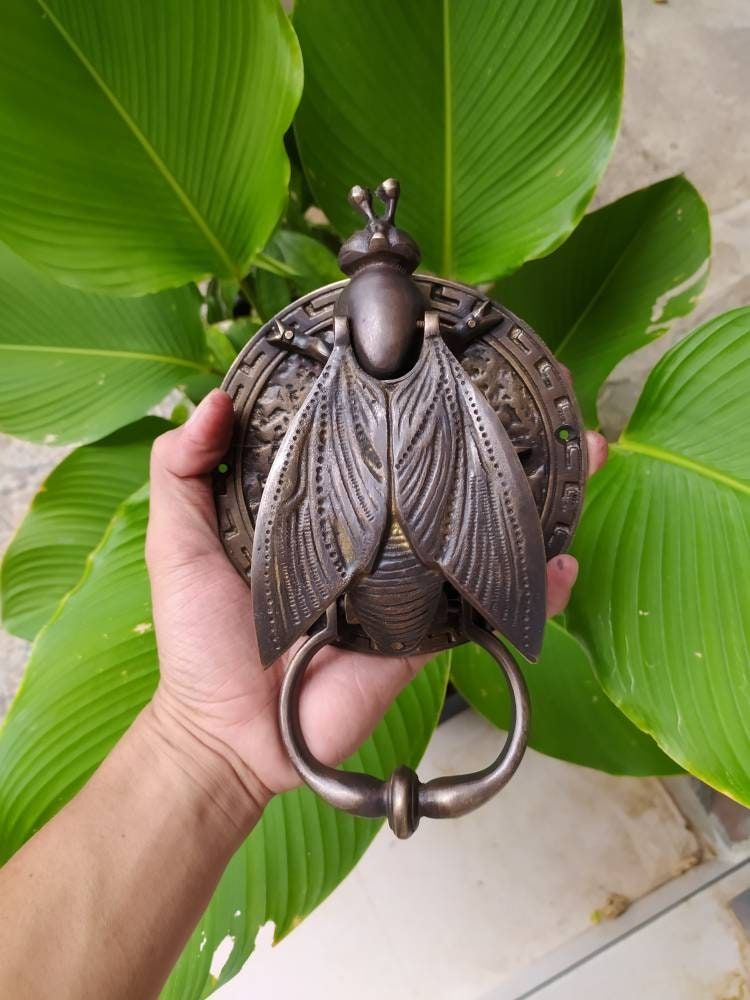
Solid Brass material Antique finish Circle diameter of 14 cm and length of 22 cm (from the top of the head to the beat) Unit price / pcs

Making DIY frames from cabinet doors is a fun way to recycle something that could land in the trash. Old cabinet doors can easily be used as frames. These DIY frames from cabinet doors are

Vintage decoration is getting more and more preferred by many homeowners in recent years. For the simple reason, adding vintage elements to the home not only

J'adore l'art nouveau. Tant en joaillerie, affiches, objets, meubles qu'en architecture, je trouve que ça donne un raffinement désuet et un air à la fois irréel et tragique à tout ce à quoi on l'applique... J'adore les courbes et les idées folles qui sortent des cadres définis comme sur cette porte fabuleuse ! Les gros pois de ce fauteuil sont finalement très actuels... J'adorerais avoir ce genre de meubles chez moi... Voilà en fait, quand je serai riche, ça ressemblera à ça chez moi (ahem, oui enfin suffisamment riche pour convaincre mon chéri...) Là, ce sera le hall de ma gare privée (oui, j'aurai un train à moi, comme dans les mystères de l'ouest, enfin quoi, je serai tellement riche...) Là ce sera l'escalier qui mène à la salle de bain, en toute simplicité... j'adore cette voûte ! Même les entrées de métro parisien sont magnifiques ! C'est ce qui fait le charme désuet de la capitale... Je vais donc entamer une série de broderies sur ce thème. On va dire que ça sera la collection 2011 sur le thème "art nouveau" (du moins jusqu'à ce que j'en aie marre et que je passe à autre chose :) Ca faisait longtemps que j'avais envie d'ouvrir une rubrique "artistique" dans ma boutique, avec des objets uniques brodés, et ne pas faire seulement des commandes personnalisées. Eh bien voilà, je commence avec un premier tableau art nouveau. Des photos dès que j'ai fini, promis ! E.

Give once-dated bifold closet doors a serious makeover with these ideas, including 3 projects in one Georgia home.

Item specificsCondition

Source: Fleamarketgardening

Make your home the spookiest on the block with these easy, budget-friendly Halloween door décor ideas. With a few simple supplies, you can create something spooky and spectacular for you and your family to enjoy!


Modern wall decor ideas, incorporating old wood doors into room design, look creative, impressive and add an artistic touch to home decorating

Up-cycle an old door into a DIY headboard. The easiest headboard you can DIY. Make your headboard yourself and be proud of your furniture building skills!

Uncover the top things to do in Zanzibar with this comprehensive guide. From idyllic beaches to historic Stone Town, and from spice tours to swimming with dolphins, Zanzibar offers a rich tapestry of experiences for every traveler. Dive into the unique cultural heritage, tantalizing local cuisine, and breathtaking natural beauty of this tropical paradise.

These white homes from HGTV Magazine are loaded with inspiring ideas.

Do you have old doors lying around and don't know what to do with them? You might be surprised to learn that there are many creative ways to use them in your

To most of us, the humble door is simply a practical device. Doors can be reincarnated with a dab of upcycling know how. Save money and repurpose your door in one of the following ways.

Love doing DIY projects? Small projects can have the greatest impact. Improve your entire home with these simple closet door ideas.

Framed original art print of detail of old door, Paphos, Cyprus. These are my unique photographs, unavailable anywhere else. Available in 3 sizes. 32x42cm Frame. Photograph dimensions 21x30 cm within the mount. 42x52cm Frame. Photograph dimensions 40x30 cm within the mount. 63x93cm Frame. Photograph dimensions 50x70 cm within the mount. Materials: Photographic print on 170gsm matt art board Mount: 2mm acid-free mount board Frame: Fibreboard Front protection: Polystyrene plexiglass, shatterproof to protect it from damage.

A few weeks ago, I had an idea to change up our bedroom once again. I was getting a new mattress from Lucid and I wanted a new bed to put it on. We d…

This estate property located in Paradise Valley, Arizona is an earthy and balanced interiors project for a young family of four! View more of THELIFESTYLEDCO's #DownToEarthProj on our portfolio.

NO.32 Sideboard - Timeless Old Wood Design with Practical Storage Crafted from Naturally Aged Reclaimed Wood for a Unique Look | Three Drawers and Two Cabinets for Ample Storage SpaceKey Features:Design:Three Drawers & Two Cabinets: The sideboard features three spacious drawers (29" wide) and two cabinet doors that open to reveal four grid spaces. This design provides ample storage for organizing and classifying items.Handle-Free: The integrated handle design enhances the sideboard’s minimalist appearance, creating a sleek and unified look.Buffet Style: The elevated design allows for easy cleaning underneath, maintaining a tidy and clutter-free space.Versatility:Styling: The NO.32 Sideboard’s understated color and natural wood texture make it compatible with various interior styles, including log, antique, and minimalist themes. Its simple elegance adds a sense of calm and timeless beauty to any room.Style & Craftsmanship:Aesthetic: The combination of old wood and a minimalist design makes this sideboard a perfect addition to rustic, vintage, or modern interiors. Its simple lines and natural materials create a serene atmosphere.Functionality: With its ample storage and easy maintenance, the NO.32 Sideboard is not only a beautiful piece of furniture but also a practical one, ideal for organizing and enhancing any living space.Reclaimed Wood Charm: The naturally aged wood brings a sense of authenticity and warmth, with each piece showcasing its unique grain and texture.Why NO.32 Sideboard:Timeless Design: Combines the rustic charm of old wood with modern minimalist design, making it a versatile and elegant piece.Practical Storage: Offers spacious storage options while maintaining a sleek and understated look.The NO.32 Sideboard is crafted from naturally aged old wood with a minimalist, handle-free design. Featuring three drawers and two cabinets, it provides ample storage and blends seamlessly with any decor style, adding a touch of timeless elegance.

Looking for an easy way to transform the bi-fold doors in your home? This DIY tutorial takes your doors to the next level with trim!

Make a unique statement and refresh your home's aesthetic by swapping out old hardware with a DIY oversized door handle, giving your doors a personalized touch without breaking the bank.

Wall Art by Henrike Schenk on Photocircle.net. Custom formats for a diverse range of products such as posters, aluminium prints, acrylic glass prints, framed prints, canvas, and fine art prints.


The unique driftwood was part of the wooden boxes that fishermen used to store fish. Now fragments of shutters ... Now fragments of an old door ... Now a wooden floor ... The fragments floated on the waves for years, and salt water and the sun did their job, smoothing and rounding them. This is how they became the precious beach treasures of the Baltic Islands. You can turn them into works of art, craft supplies, clocks, crafts, rustic wedding decor, and other ideas great for chalkboards. The possibilities are endless, so let your imagination run wild! The boards are clean. No chemicals are used. You will receive exactly these 6 unique boards. Length: 6.2 - 13.3 inches (16 - 34 cm) Width: 1.1 - 1.5 inches (3 - 4 cm) Thickness: 0.3 - 0.9 inches (1 - 2.5 cm) Weight: 14.8 oz (420 g) I will be glad if my boards will help you realize your projects. If you have any questions or requests, feel free to contact me! I will try to help you find the best materials for your crafts! Thank you for visiting my LoveHomeArtBaltic store. With love TRANSPORT: The goods are ready for shipment from Latvia within 1-2 working days. All orders are carefully packaged, have a tracking number, and are easy to track within the EU: 17track.net or track-trace.com/post. United States: at USPS.com. Thank you for visiting my LoveHomeArtBaltic shop on Etsy! Follow the link to my store and find more choices of our product. https://www.etsy.com/shop/LoveHomeArtBaltic?ref=seller-platform-mcnav§ion_id=31686446

We'll show you 6 unique sliding glass door alternatives, a few things to consider with each, the pros and cons, and how to pick the right one for you.

These white homes from HGTV Magazine are loaded with inspiring ideas.

These doors came out of an early 1900's home. I thought they would make a cool room divider, so I hinged them together and started sanding t...

Our hallway doesn't have much wall space. It houses 6 doors and not much else. To make it worse, the doors that were in the house when we purchased it were plain, hollow core doors with gold door knobs. We've managed to take care of the knobs here, but the doors were still a little lack-luster. While on Pinterest the other day, I found just what our humble little doors needed. Over on Jenna Sue's blog, she showed how she pumped up her frumpy plain doors with a little trim and paint for $12. I showed Scott and he was just as sold as I was. We started by grabbing our materials. Most of it we already had, but we needed to buy the wood for the trim. If you are thinking of doing this yourself, I would recommend making sure that you have everything before beginning: -Air compressor/nail gun with brads or nails -4ft x 4ft piece of 1/4 in thick plywood (This ran us about $14.95 at Lowes. I think the original blog must have gotten their for $12. Oh well) -Spackle, sanding sponge, putty knife -Paint, paint brush, small roller -2in hole drill bit for the knob -Saw (We used a miter saw, but you could probably do some of this with a miter box and a hand saw if you don't have many power tools.) -Wood glue We purchased our plywood and immediately ran into an issue. It wouldn't fit in the Rogue. Uh Oh. Scott wandered back inside the store while I stayed in the car. To my surprise and delight, he exited Lowes with a stack of pre-cut 3in. slices of our previously single 4 ft. square board. I would recommend having them cut it in store. This made assembly soooooooooo much easier. Waaaay easier. As in, a lot easier. Easier. You get the idea. Scott took the door off of the hinge and placed it on saw horses. This made measuring and attaching our plywood pieces much easier. After the door knob had been removed, we began laying out the pieces to get an idea as to how they would fit and how much scrap we would have left over. Starting at the top of the door, we cut our first piece (I'll go through an exact step-by-step here a little later). We decided to cut the footer and header as the capping pieces and then align the sides to those. This is definitely the way I would recommend doing it. We then used clamps as we went to hold down the pieces we had previously cut so they wouldn't move. Scott then measured and cut the struts for the middle of the door. Once again, we laid it out and made sure it all looked correct. Using some Gorilla Wood Glue, I slowly worked in the same order that the strips had been cut. I placed a line of glue, lined up the piece with the door, then used the nail gun to nail it into place. Once it was together, we hung it up. Usually you would wait to spackle and paint it outside, but we needed a door on the room. We were doing the Ice Bucket Challenge that night and needed an extra room for people to change out of their cold and wet clothes. (For more on that, check out the bottom of this blog post.) This is when we ran into a problem we didn't really consider. The new door was thicker than the old one. It didn't close! Thankfully it was closed enough for people to change behind, but we knew that we would need to move the hinges for any future guests that might be staying with us. (For anyone wondering, we started with the guest door because it's the only door you really see at a casual glance down the hall. We are going to finish them all like this over time, though.) After the hinge had been moved out a little, we were in business. As you can see, there is a little bit of paint on there, too. I decided that doing all this work just to paint the doors white again might be a bit of a waste. I chose (of course) a neutral grey/blue called "Sanctuary Blue" in Behr semi-gloss because I liked the look of the space in this Pinterest pin. And it seemed to go well in the hallway as well as the guest room when the door was open. After spackling the holes left by the gaps and nails, sanding them all, and wiping away the dust, I gave the door a good coat of the new grey color. I painted the whole front except for around the door knob. Here, I placed a scrap piece of wood (also glued and nailed in place) to help add a nice base for the knob to attach to. Here you can kind of see what I mean. I used the 2" drill bit to re-drill the hole for the mechanism, then painted over it all to make it look like one piece. So far, so good. The door knob had a few scratches, so I gave it a quick touch up with the Oil Rubbed Bronze and some poly and let it dry before attaching it again. Check out that hallway now! Instead of taking the whole door down to do the back side, I just put it together while it was still on the hinges. This wasn't too difficult, but I would recommend taking it down for both sides. Here is the progression for what to cut and attach in what order. I am a very visual person, so if you want to use this as a tutorial, the images might help! (Read in order from top left to right) Finished off by a final coat of paint and the door knob. How about that? Not too shabby (anymore), eh? Only 5 more doors to go. For now, at least, our guests will have a much fancier-feeling room. I'll also add that the weight of the wood trim to the door gives it a nice heft. Oh, and I wanted to clarify: The $15 sheet of plywood was enough to do BOTH sides of this 30 in x 79 in door, so you can easily estimate about $15 per door. I was also sure to use some of the scrap for the back side pieced together. Once it was spackled and sanded, though, it made it much less noticeable. See the three pieces? My pride says you don't! So what do you think? Is it worth it? I'd say so. And so much cheaper than buying "nice" newer doors. I'm really hoping they help our resale, too. PS- For anyone wanting to check out our Ice Bucket Challenge video and possibly donate, you can watch it below. We really appreciate any views we can get and awareness is key. We are also participating in a walk at the end of September and donations can be made to Team Anita here. It's a very personal cause to many of our friends and we would like to do all we can to support them and anyone else who has been touched by this disease.
