

Any fellow bookworms out there? Who could easily spend an entire day reading a good book? My days are usually to full of business to spend an entire day reading, but we have our annual Yale Lake trip coming up and I plan on spending a day doing nothing but reading! The adorable Check You Out stamp set won over my book-loving-heart and was a must have! The little worm and owl are just too cute and the books are the BEST! The little bookworm just makes me so happy! His goofy little grim is too cute! And the library pocket card...who remembers checking out books this way! I remember checking out books from my elementary school library with little cards like these. And isn't this owl such a studious little thing? Adding the glasses is super easy and fun! With the photopolymer stamps, it's so easy to line up the images! Did you notice the fun colors in the Heart Epoxy Droplets and the Frosted & Clear Epoxy Droplets? I added a bit of color to them using a few different Stampin' Blends colors. I love the subtle color they add to these amazing little embellishments! The color possibilities are endless! Just make sure you are using your Stampin' Blends on the epoxy embellishments. The Rhinestone Basic Jewels can be a little rough on your pens! Thanks for stopping by today! This week isn't looking to be as busy as last week, so I'm hoping to spend a bit more time creating! Have a fantastic Monday! Happy Stamping!

Another week has gone by and a few more gifts are started but not yet finished. This last week was so hectic with Halloween costumes to make followed by All Saints Day costumes, phew! I am pretty happy with everything they came out but also glad it is over.Alright so here is the question. Is there […]

Little girl knitting. --- Image by ? Bettmann/CORBIS

This listing is for a crochet PATTERN ONLY. The pattern will be sent through email in a PDF file. Payment is through Paypal. With this reversible toy, a caterpillar goes through metamorphosis and becomes a beautiful butterfly with one flip! It would make a great educational toy to teach metamorphosis or just a fun toy in general. This crochet pattern is an intermediate level because of construction. The stitches used are basic (sc, hdc, dc, sl st, ch, hdc2tog, and tr). The construction is a little bit tricky, but there are pictures and detailed instructions to help you along. The materials needed are yarn of any weight (worsted weight was used in the design of this pattern, but any yarn/needle combination that yields a tight stitch will work), a size F crochet hook, a tapestry needle, 4 eyes or black buttons, 4 buttons for closures, thread to sew on buttons, and a sewing needle. This pattern was designed by me, and you may not resell it; however, feel free to sell the items you make from the pattern! If you have any questions, please ask! Thanks for your interest! This pattern has been thoroughly tested to make sure that there aren’t errors.

¿Quieres convertir un guante en un bonito oso de peluche? Pues aquí te dejamos un avance del tutorial y el enlace a las intrucciones completa. Simplemente genial. Síguenos en ...
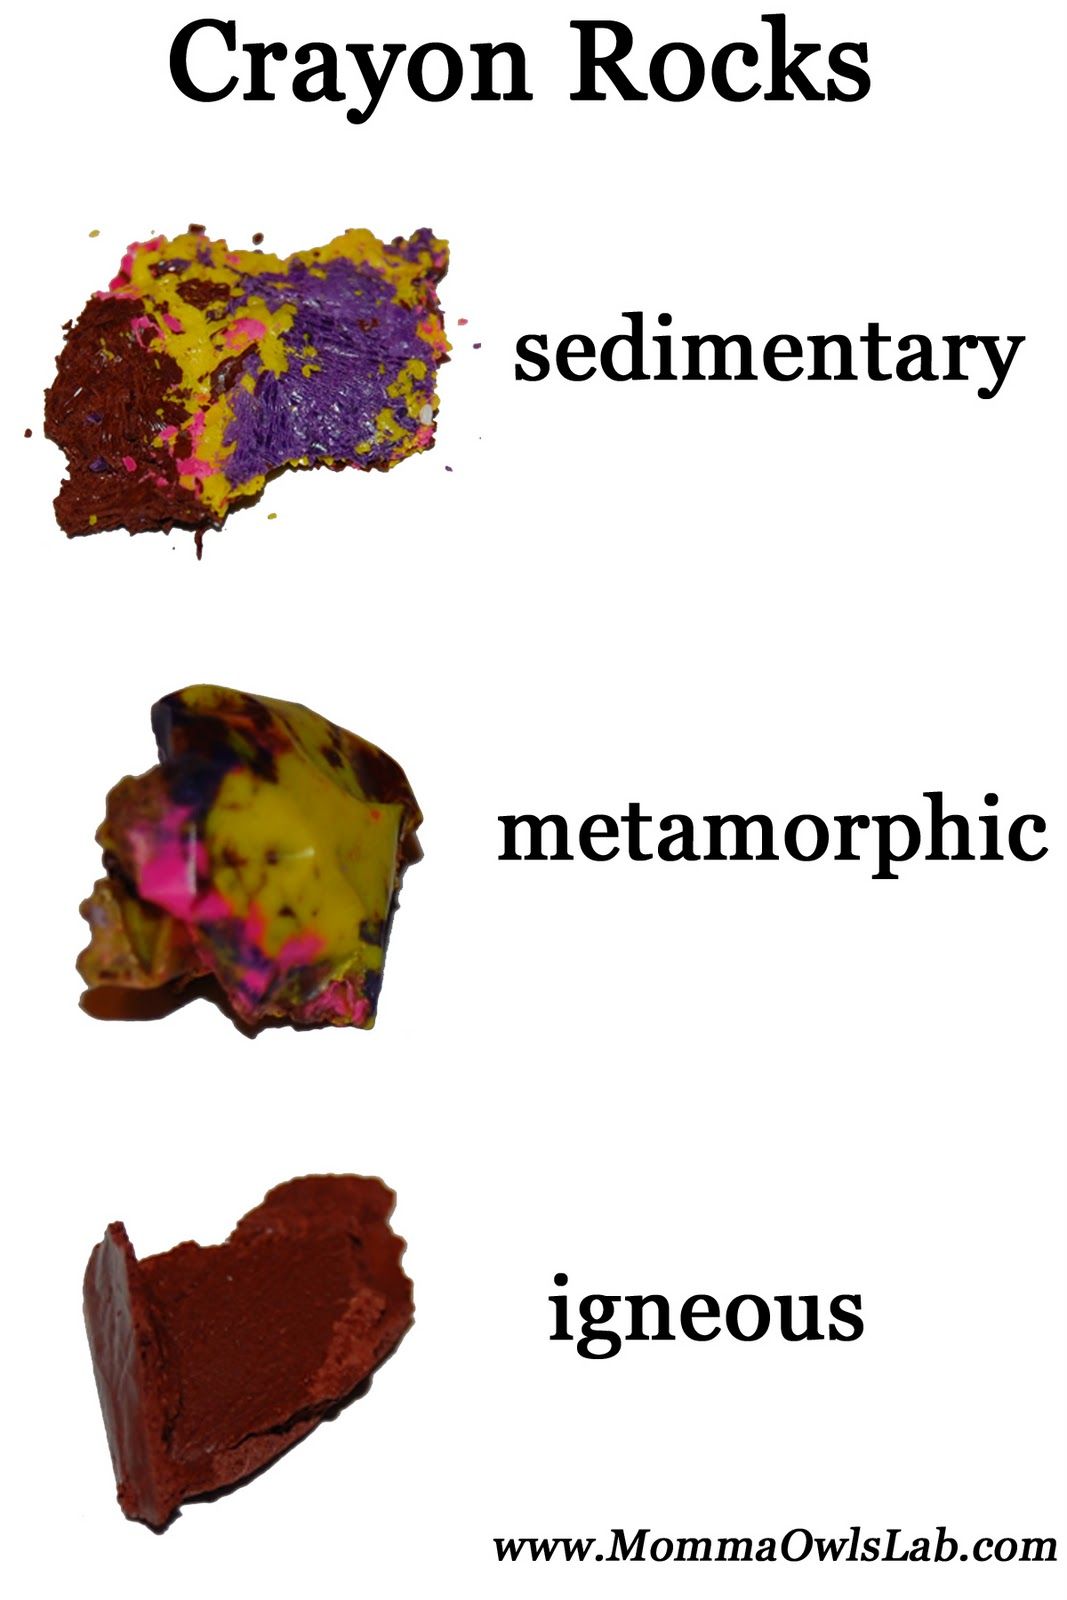
We've had a very, very warm winter here in Michigan. With such little snow, the ground has been exposed and my little rock hounds have been collecting rocks again. I thought we'd revisit the types of rocks again (sedimentary, metamorphic and igneous) - but this time give them a more active and visual way to think about how each are formed. There are many examples of creating rocks from crayons, but this pdf from the the Exploratorium is very helpful. Materials Needed: crayons, several of each in four different colors crayon or pencil sharpener 4 containers for holding the crayon shavings 3-6"x6" pieces of aluminum foil popsicle stick or other disposable stirrer mug boiling water Process: Unwrap the crayons and use the sharpener to create shavings. You can also try to make the shavings use a penny or a plastic knife, although we found that the sharpener was easier and more productive than the penny or knife especially for the little ones. Make sure to keep the shavings separate from each other at this point. Sedimentary rocks Sedimentary rocks are formed from sediments (tiny rock particles that were created by weathering or erosion) that were layered and then compressed. To replicate this with the crayon shavings, take one of the aluminum foil squares and have your child sprinkle each of the colors of shavings into the middle of the square, one at a time so they will form the layers. Fold the aluminum foil up tightly around the shavings and then compress it. To do this, they can press on it with their hands, step on it, place it in a clamp or use your creativity to think of other ways. . This does take a while to get the crayon pieces to stick together and we found that a little body heat "helps" the process along. Carefully unfold the foil and remove the sedimentary rock with care as this is the most brittle of the rocks that you are making. A sedimentary crayon rock. Metamorphic rocks Metamorphic rocks are formed when existing rocks are exposed to heat and/or pressure. To mimic this, take another square of aluminum foil and pile all four colors of shavings in the center. Fold up the sides of the aluminum foil to make a boat. Pour boiling water into a mug (adult job!) and float the boat in the hot water for 15 to 20 seconds, just until the shavings have started to melt. Quickly remove the boat and fold the foil in half so that the shavings are compressed a bit. Let it cool and solidify and then open the foil and remove the metamorphic rock. A metamorphic crayon rock. Igneous rocks Igneous rocks are formed when magma (molten rock) cools and solidifies. To make an igneous crayon rock, repeat the steps for making the metamorphic rock, except leave the the aluminum foil boat floating on the hot water for a minute or more until all the crayon sediments have melted. (This may take more or less time depending on the brand of crayons that you have used.) Then take the popsicle stick and stir the shavings until they are all mixed together. Remove the boat and let the crayon cool and solidify. An igneous crayon rock. If you are using a science journal to record your child's experiments, then you can have them record either the process of making each type of rock or draw a picture of what they looked like at the end (or both). What's Happening? There are three types of rocks (sedimentary, metamorphic, and igneous) which, given the right conditions, can be changed from one into another. This is known as the rock cycle, pictured below. Sedimentary rocks are formed from the compaction and cementation of rock sediments and often have distinguishable layers. They also may have fossils of organisms or other visible rock particles in them. Metamorphic rocks are formed when existing rocks are exposed to heat and/or pressure; they often have distinct bands or blocks of crystals in them. Igneous rocks are formed when magma cools and their characteristics, including crystal size, depends on how fast the rock cools. If it cools quickly on the surface of the earth (extrusive igneous rocks), the crystals are small and pores may be apparent. If it cools slowly under the earth, the crystals have a chance to grow larger. More information of rocks can be found in our Creating a Rock Collection activity. Extensions One thing you could try is to create intrusive vs extrusive igneous crayon rocks. Follow the directions to make two igneous rocks, but cool one in a glass of ice and the other at room temperature. Examine the resulting "rocks" with magnifying glasses to see if there is any difference between them. Please let me know if you try this - this is just a brainstorm idea and I really would like to know if there are any visible differences. If you are looking for a good children's book describing the rock cycle, we like the book "The Rock Factory: The Story about the Rock Cycle". It probably is best for early elementary age kids. Finally, you could try to make the different types of rocks with chocolate. I'm thinking white, milk and dark chocolate. Food + science - what a yummy combination! Pin It

Needle felted of wool over a wire armature, with glass eyes. made by: Helen Rogers

Friðarøy is made with leftover yarns from the pattern Tell me momma and completes the winter suit. However, Friðarøy is knitted tighter: i just don’t like floppy tams! Friðarøy is not for very beginners, but the pattern is charted and written and it doesn’t request a high level (about 1.5/5)

Explore Old Chum's 2804 photos on Flickr!

The mission of the Free Library of Philadelphia is to advance literacy, guide learning, and inspire curiosity.

After doing our Egg-citing exploration experiment the other day and Jake being all into it, I decided to do a couple other experiments with him. Below you will see. How an egg shell disappears? When I saw this over at Science Sparks several weeks ago, I knew Jake would love to do this experiment. Materials: Raw egg White vinegar Container Place the raw egg in the container, then cover with vinegar. You will notice almost right away the egg starts to bubble(that is the chemical reaction that is happening) We left it in the vinegar for 2 days and then took it out and washed it off, it was clear. Then we used it for another experiment(see below). What Jake noticed on this experiment was the egg bubbled, was firm, it bounced on the counter, and got bigger. How to shrink an egg? Materials: Light karo-syrup Shell-less egg (experiment above will get you a shell-less egg) We took the shell-less egg from above experiment and used it for this next experiment. Place egg in container and pour karo-syrup all over the egg. Leave it in there for 12 hours. You will notice after a couple hours it starting to shrink. When an egg is placed in the syrup the water moves out and cause a decrease in mass. This is a result of osmosis occurring. You can see in the picture that Jake is amazed at how the egg shell is gone. Also, you can see that the egg is firm not squishy like the picture above. What Jake gathered from the shrinking egg was it was a brighter yellow, squishy to the touch, and smaller. How to make an egg erupt? Materials: Water and food coloring if you want the egg to be colored Shrunken egg (from above experiment) Toothpick Take your shrunken egg and place in water, we used colored water to give it a twist for the end result. Then wait several hours. Your egg will reabsorb the water and grow again, but will also turn colored if you made the water colored. Then Jake took it out of the water and I had him poke a hole in the top of the egg with the toothpick. Water squirted from it making a volcano. Jake gathered from this experiment was that the egg turned blue from the food coloring, was firm like it was before we shrunk it and grew in size. We had a lot of fun doing these egg experiments over a couple days. Also, talking about how egg looked and felt different with each experiment. The part that amazed me the most was that you could do all 3 experiments using one egg. If you would like to do more egg experiments be sure to check out Science Sparks 10 egg experiments great science for kids. If you like to explore and try new experiments be sure to visit our Science board. Thanks for stopping by to see what fun stuff we are doing. Be sure to come follow us on Pinterest and Facebook

As much as I love working with bone and horn, I have enjoyed carving various hardwoods into craft tools. Below is a selection of tools us...

I got it at the museum, worth the money it’s super fluffy on the inside.

Want to see if a layer of blubber can really help you stay warm in icy water? Try this arctic animals science experiment to experience it.

Explore Abi Monroe's 2776 photos on Flickr!

After doing our Egg-citing exploration experiment the other day and Jake being all into it, I decided to do a couple other experiments wit...

She wiped your nose and tied your shoes. She guided you through those awkward teen years and throughout your identity-seeking college years. Mommas are the best, y’all. Their special day is coming up quick, so you’d better get planning! In our opinion, the best gifts are accompanied by some funny (and often cheeky) cards. You inherited that excellent sense of humor from your mom, didn’t you? Check out these 30 hilarious Mother’s Day cards that’ll have her giggling like a little schoolgirl in no time.

The knitting girl... John McGhie (British, 1867-1952) «Girl knitting» Albert Anker (Swiss, 1831-1910) «Knitting girl watching the toddler in a craddle» 1885 Albert Gustav Aristides Edelfelt (Swedish, 1854–1905) «A Girl Knitting Socks» Anna Nordgren (Swedish, 1847-1916) «Little industry» Jules Emile…

A month ago, I made a vow to my husband, who has started to worry about rising cost of yarns, that I would not buy any new cloths other than pants and underwears. I have to knit all (Have anybody made same silly vow like mine?). Of course, my husband dosen't take it seriously, but well, I will try as far as I can go. Fortunately winter is almost over. I don't need time/yarn consuming heavy garments, I guess several summer sweaters and some tanks may be enough to survive next 6 months. Oh, and several pairs of socks, too. Anyway, This vow is not applied to my daughter almost 8 months now. However, her pants are getting small and running out. She needs more pants! I am not gonna knit my pants, but baby's one should not be that terrible.. So naturally I made one. I call it "Kanoko Pants". "Kanoko" is from Japanese term "Kanoko-ami" which means "seed(moss) stiches". It is knitted from waist and divided into legs. Waist dosen't join, so later waist band can fold in two with waist string inside. SIZE: 3-9[9-18, 18-24]months or finished measurement for waist: 16[19, 21.5] inches without stretching. MATERIAL: 2x Lion Cotton-Ease (taupe) , tapestry needle, stitch holder, size G crochet hook for waist string. NEEDLES: US6 circular 16" , and double points. GAUGE: 18sts x 28rws = 4 x4 inches. PATTERN WAISTBAND RIBBING with circular needle, cast on 72[84, 96] sts, DO NOT JOIN. row1-18: [k2 p2] repeat[] to end. BODY join in to circle. rnd1-6: k to end. rnd 7: [k2, k front and back (1 inc)] repeat [] to end. 96[112, 128] sts. rnd 8: p to end. rnd 9-11: k to end. rnd 12: p to end. rnd 13: k to end. rnd 14: [k1 p1] repeat [] to end. rnd 15: [p1 k1] repeat [] to end. repeat rnd 14-15 5[7, 9] times more. next round: k to end. next round: p to end. next 8 rounds: k to end. next 2 rounds: p to end. put the last half sts (48[56, 64]sts) on stitch holder (for left leg). RIGHT LEG switch to dpn, divide sts on 3 needles. k in circle. rnd1-12: k to end. rnd 13: p to end. rnd 14-16: k to end. rnd 17: p to end. rnd 18: k to end. rnd 19: [k1 p1] repeat [] to end. rnd 20: [p1 k1] repeat [] to end. repeat rnd 19-20 2[4,6] times more. next round: k to end. next round: p to end. next 12 rounds: k to end. next 2 rounds: p to end. next 5 round: k to end. BO. LEFT LEG join new yarn (leave at least 5 inches). do same as right leg. WAIST BAND/STRING make 25-30 inches of chain using crochet hook for waist string. place waist string in waist band ribbing and fold the band in two toward inside of pants. saw the edges at the waist band border. FINISHING using yarn left at the begining of left leg, close the crotch. weave in all ends. I love seed stitch!

All the blood, sweat, and glitter.

blogged @ www.myowlbarn.com

Mummify Barbie! I had my daughter use information that we gleaned from books to come up with a list that we could use in our own mummy activity.

Here’s a video from Questacon Science Squad that demonstrates how to make a fun edible candle. It’s simply a potato carved into a candle shape with an almond for a wick. The almond burns well becau…

This is another 5-senses activity. We did 10 different materials, ranging from feathers to sandpaper and everything in between. We had the kids feel each piece of material and then had them glue them onto the hands. We asked the kids to describe the material and what if felt like to them. I LOVE the answers that we got from some of the kids. My own little girl, had some that made me crack up. The sandpaper felt like Poppa's face, the fake leather felt like a couch and one of them felt like her dog Brody. It was fun to hear their answers. Fabric stores are great to look for material for this project. A remnant can go a long way when your talking about 1 inch pieces. Also look at the craft supplies and hardware stores. We used sponges and Brillo pads, the possibilities are endless.

Discover 26 brilliant, creative and thoughtful DIY items to handcraft to donate to your local nursing home.

Summer is a wonderful time for outdoor art and sensory science activities you can do outside. "Ice Tunnels" combine ordinary salt, ice and...

Teach students to make a cool origami transforming star with sticky notes! It's the perfect indoor recess activity for kids!

Winter is not coming soon enough! I am looking forward to thick socks, warm baths and cuddling up in a blanket to get warm. My favourite type of blankets are of the wool variety. They are super sof…

Momma Told Me: Compromise is key to any healthy relationship. There comes a point in every cat-human slave relationship that you find yo...

Celebrate Chinese New Year with Paper Plate Drums and free printable Dragon Masks.
