

How to Service Your Sewing Machine Yourself: A Step by Step Tutorial

Color: Multi Style: Casual Pattern Type: Vaporwave Art Type: Shirt Neckline: Collar Sleeve Length: Short Sleeve Details: Button Front Sleeve Type: Regular Sleeve Fit Type: Regular Fit Fabric: Semi-Stretch Material: Polyester Composition: 100% Polyester Care Instructions: Machine wash, do not dry clean Sheer: No • 7.23 Oz. Fabric: 95% polyester, 5% spandex.• Features four-way stretch fabric and comfort fit.• Short sleeves, notch lapel collar, self-fabric sleeve cuff detail.• Machine wash, tumble dry low.

With a keen eye for detail, Amanda Cobbett embroiders hyperrealistic fungi, mosses, and lichen with painstaking precision.

Today I'm excited to share a Mitered & Flanged Machine Binding Tutorial. *** It's fun, saves time and looks awesome!! *** Don't be overwhelmed by the number of steps -- after you do it once or twice it will become old hat... I know you'll love it. *** It works nicely for samples, baby blankets, and quilts that will be washed and worn!! (or if you're in a plain old hurry ;) It's the whopper of machine binding tutorials because I decided to include steps for a Mitered Finish as inspired by a YouTube video by Lisa Bongean (Primitive Gatherings) with Kimberly at The Fat Quarter Shop. ** I followed Lisa's steps to prepare the mitered finish -- AND included a link to their (most helpful) video in this tutorial. After watching the video be sure to leave a comment or give it a "thumbs up" -- it's an awesome learning tool! ** Note, the YouTube video does not include instructions for the Flange OR the Machine Finish - it explains nicely though, how to prepare mitered corners and a mitered finish -- it's a great tool and video and helped me tremendously with the mitered finish. Thanks so much ladies !! OK - Let's get started: We're going to make this sweet little flanged binding by machine with mitered corners, a mitered finish and with beautiful top-stitching to show off your pretty Aurifil threads! Begin by choosing a primary and an accent (flange) fabric. * Add in a complementary 50Wt thread for piecing and a 12Wt thread for top stitching. I chose from my #AuriStash -- #Aurifil thread is always my first choice {love}. Determine Length of Binding Needed: Calculate the total length of binding needed by adding the length of each of the 4 sides and adding an extra 10" to the number. * The sampler was 18" square. 18 + 18 + 18 + 18 + 10. = 82 inches. I assumed I could squeeze 41 usable inches per WOF strip, so I cut 2 strips of each the primary and the accent fabric. Cut the Primary and Accent fabric strips: Cut the primary fabric 1&7/16" wide. I did not have 16 of an inch marks on my ruler, so I split the width between 3/8 and 1/2 to achieve 7/16th of an inch. Now cut the accent fabric 1&3/4" wide (by the number of strips you need). Showing: Strips after cutting the correct number of Primary and Accent NOTE: When using solid colors, I sometimes place a pin in the right side of the fabric so I can tell the right side from the wrong side of the fabric. Piece Binding Strips to Achieve Necessary Length: Now you want to prepare the total length of binding. The sample required 82" so I pieced two WOF strips together at an angle (mitered seams). Be sure that your diagonal line is marked correctly before sewing and cutting. After testing the positioning of the fabric and diagonal line, stitch along the marked line with a straight stitch. (Excuse my wonky straight line - it was Free Motion Stitched ;). After stitching, remove the pins and check to ensure you have a continuous length before trimming. Now fold right sides together and trim the seam allowance to 1/4", trimming the tabs too and pressing open to reduce bulk. Repeat the above steps for the primary fabric. Now you've prepared the correct (total) length of each the primary and accent fabrics. Sew Primary and Accent Fabrics Together Lengthwise & Press: Next you'll layer the primary and accent strips right sides together, aligning one raw edge. Sew along the edge with a 1/4" seam allowance Showing the sewn raw edge Position binding on an ironing surface with the Primary fabric on top. Press flat to set the seam Next open the fabric and press the seam toward the Primary fabric. Showing after binding is pressed open toward the Primary fabric Showing back after pressing toward the Primary Fabric Next you'll fold the wrong sides together, aligning the raw edges and gently press the length of binding. I press gently so the fold IS NOT Crisp or Flattened. *** Attach prepared binding to Quilt Back: This section of the tutorial was inspired by a YouTube tutorial prepared by Lisa Bongean (Primitive Gatherings) with Kimberly of the Fat Quarter Shop. You can view that YouTube tutorial here: "How to Add a Double Fold Binding to Quilts" The section applicable to this tutorial starts around the 2:00 minute mark and continues to the 3:40 minute mark. *** Keep in mind Lisa is attaching to the front of her quilt and finishing by hand (on back) -- we will attach to the back of the quilt and finish with machine on the front. *** Continuing... attach binding quilt back: Working on the BACK of the quilt, position the binding right side down with the Primary fabric to the right (aligning raw edge of Primary fabric with raw edge of quilt back). Next fold the top right corner to the left, wrong sides together, to make a 45 degree angle and press. Now fold the binding wrong sides together so both of the binding raw edges are aligned with the raw edges of the quilt back. *** Position the binding about 1/2 way down the side of the quilt. *** You'll need space above the binding to complete the mitered finish. *** You will begin stitching the binding about 6" from the point shown below. Leave at least 5" of the binding un-stitched (pin but don't stitch) and begin stitching with a 1/4" seam allowance. *** Stop a 1/4" from the quilt corner (I marked my 1/4" with a pin - see below). *** When you stop at the 1/4" mark, be sure your needle is in the down position. Showing, stop stitching 1/4" from the quilt corner. Now lift the presser foot and pivot the quilt layers so you can stitch off the edge of the quilt at a 45 degree angle. Showing: After stitching up to corner and with a 45 degree angle to the corner of the quilt Next, trim threads and rotate the quilt counter-clockwise and prepare for the mitered fold. The fold (below) is required to make a mitered corner. *** After trimming threads and rotating the quilt so the stitched binding is running perpendicular to the foot, fold the binding strip straight up. *** When you do this you'll see a 45 degree angle from the corner of the quilt to the folded corner of the binding. Keeping the top fold steady, lay the binding down over itself, so the 45 degree angle is preserved under the top layer and the straight fold is along the top edge of the quilt. Begin stitching a 1/4" seam allowance at the top fold. Stitch to within 1/4" of the next quilt corner and repeat the process. Repeat the folding and stitching process at the next corner. After you've mitered all 4 corners you'll be headed down the last side of the quilt (The side where you started the binding). *** Stop stitching at least 6" (longer if you can) from the Beginning Tail of the quilt. *** You'll now have a beginning tail that is un-stitched and an end tail that is un-stitched. Remove quilt from the machine bed and trim threads. *** Lift the beginning tail up and fold it out of the way. *** Smooth the "End tail" down along the raw edge. Be sure there are no puckers or folds and that it rests flat against the quilt. Now unfold the "Beginning Tail" and position it over top of the "End Tail" -- making sure that both tails are smooth and are without puckers and are flat against the quilt back. Now you'll place a pin in the "End Tail" just a couple of threads away from the Point of the "Beginning Tail". *** Mark this position with a Pin through the top layer of fabric only (only through the accent fabric on the End Tail, do not pin the primary). Another image after putting a pin through the top layer only of the "End Tail" right at the point (pointed fold) of the "Beginning Tail". Now, I use my left hand to unfold the End Tail. Keep the right side of the fabric facing up The Pin should remain on your right and the primary fabric will unfold to the left. Next you'll unfold the Beginning Tail so that the right side is facing DOWN and wrong side is facing you. 2nd image of the Beginning Tail unfolded with wrong side of fabric facing up. The tricky part is positioning the Beginning Tail so it is perpendicular to the End Tail *** Align the Beginning Tail "Point" at the End Tail "Pin" and secure with pins (Thanks Lisa!) Here is where the crease from the fold comes into play -- you're going to stitch on the fold making the finished mitered seam. (Be sure NOT to stitch through the quilt -- only stitch the binding) After Stitching on the Fold Before cutting excess fabric, fold the binding closed again (wrong sides together) and check to ensure that the binding is right sized and not twisted. *** This is a very important step -- do NOT Skip ;) *** Once you've double checked the length and positioning (no twists) of the binding you can trim the mitered finish to a 1/4" seam allowance. Finger Press or Iron Press the seam open Lay the binding along the raw edge and finish sewing it to the back of the quilt with a 1/4" seam allowance being sure to pickup a few stitches into where you stopped and started. You're almost to the FUN PART!!! Roll the Binding from Back to Front of Quilt & Prepare to Machine Stitch: Yippee!! Once you've finished securing the mitered finish on the back of the quilt, you get to roll the binding around to the front of the quilt and admire the beautiful flange... *** I just LOVE the look of the flange added to this binding... Prepare the front of the quilt for machine stitching Prepare each corner by tucking the bottom of the binding fabric into the corner and folding the top of the binding to make a 45 degree angle (or mitered corner). *** Secure with Wonder Clips (love those little clips). After the tuck and fold you should see a perfectly mitered corner -- ready for stitching Secure that corner with another Wonder Clip Next... Top stitch the Flange Binding Use a 90/14 top stitch needle in your machine Choose thread colors that complement your fabric. *** Both the Top and Bobbin thread will be completely visible when you're done stitching. *** Use Aurifil 50Wt or 40Wt thread in your Bobbin Use Aurifil 12Wt thread on Top (my favorite) Set a straight stitch length to 3.0 or higher (a nice "top stitch" length). You may have to adjust your top tension down a bit (try it on a test swatch first). *** Start stitching near a corner, taking smaller stitches to secure the start. *** Note: No need to stitch in the ditch. Show off that awesome Aurifil 12Wt thread by stitching well on the flange You may have to fuss when you get into a corner so there is a stitch just before the miter and one just after you turn the quilt top Slowly stitch all the way around the quilt top to secure the binding and finish with smaller stitches to secure your threads. Doesn't it look just beautiful ? Here is an image of the front (left) and the back (right)... Love, love, love! I hope you found this tutorial helpful. Thanks again to Lisa Bongean (Primitive Gatherings) and Kimberly from the Fat Quarter Shop for sharing the steps for the mitered finish. See links above. *** This binding and the awesome Auriful thread adds great dimension to a quilt top and is admired by all who see it! *** I especially love it because I can do the work by machine and save a little time preparing samples. It's also great if your gifting the quilt to a little person, where a hand-sewn binding might not hold up under wear and tear and tugs... * Thanks for stopping by today -- leave me a comment and let me know what you think Also -- I would love if you share this tutorial on social media AND if you send me pictures of any work you create with it. *** Be sure to follow me on social media (below) for fun and inspiring posts!. See My Tutorials (tab on top of blog) for more detailed and free tutorials and patterns. Is your Shop, Group or Guild preparing for upcoming Programs? I'm offering In-Person and ZOOM based programs. Click HERE to learn more about my featured programs. You can write me anytime: [email protected] or [email protected] Upcoming Retreats!! Did you know? I've teamed up with Wendy Sheppard to share the CraZy Quilting Girls Free Motion Quilting Retreats. Join us June 2023 for the Piecing and Quilting Retreat Click here for more information on the 2023 Piecing and Quilting Retreat. *** Follow Me *** Did you know you can visit me on Facebook at Redbird Quilt Co and/or Follow Redbird Quilt Co on Instagram I post all sorts of fun things there!! ** If you love to Free Motion Quilt consider joining my Facebook Community Group Free Motion Quilting Frenzy group * Plus I share quilting related videos on my YouTube Channel * I'm also on Pinterest and I share other tutorials and patterns on My Tutorials on my blog Thanks for stopping by today... ~ Blessings ~ Karen Note: This post may contain Affiliate Links. If you purchase anything through these links I may be compensated for the purchase. I promise to only recommend those products I know and love -- especially those with fantastic prices!

When we came across this article of the best machine quilting tips we knew we had to share it with our readers. The tips are detailed and contain links to products that will help you to get the bes…

Extreme tinted jeans by Ed Hardy, a straight silhouette style with embroidered tattoo-style features. Complete with a mid-rise waist, belt loops, a button and zip closure, five-pocket styling and printed logo details throughout. Content + Care - Machine wash Size + Fit - Model is 183cm/6'0" and wearing size 32W 32L

Let your bread machine mix flour, water, oil, sugar, salt and yeast to make a delicious homemade pizza dough.

A detailed step by step guide with illustrations and infographics for turned edge applique using paper backed fussible web.

Description Made from the stretchiest and softest ethical bamboo material, our Corea body suit features a high cut leg and gives a seamless silhouette with all of the support. Wear under clothes or to your next yoga class with our Cycad leggings. More information Composition87% bamboo, 9% polyamide, 4% elastane. Care30-degree machine wash using laundry bag. Made inPortugal, raw materials in Europe. Details Single-layer micro-rib carded bamboo blend Scooped neckline, deep-scooped back Slender double straps High leg, thong back Minimal coverage Jacquard swallow logo Fully lined

Easy Broccoli Keychain Free Crochet Tutorial Ideas – Crochet enthusiasts around the world are constantly seeking new and innovative projects to showcase their skills. In the realm of quirky and ... Read more

Have you ever wondered how to make the perfect flat-felled seam? Here’s how you can do it.

Printed with hand carved linocut/block print stamps. Each piece is unique and imperfect and printed at my home studio in Los Angeles. No digital printing or drop shipping here! This shirt features a salmon as its main design on the front of the shirt in maroon. It also features a collar and sleeve detail front and back with hooks and worms encircling:) 100% Heavyweight Cotton Tee Shirt Unisex Sizing (runs a touch slim and long. great for cropping!) Machine Washable. Line dry for longevity of vibrancy or on low heat. Please allow appropriate time for production of this product as each one is made to order before shipping. Some slight variations may occur in placement and color of your printed shirt.

Make a loaf of fresh white bread in your bread machine.

Here’s an easy tutorial that will show you how to add a fun bartack detail to your shirts using your sewing machine.

This guide tells you all you need to know about machine appliqué with clear examples of different styles and lots of tips to give you confidence.
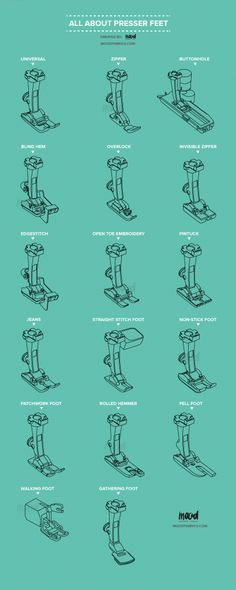
We're back with another guide, and this time we're focusing on presser foot attachments! One of the most important pieces to any sewing machine and project,

Elevate your summer style with the Lace Tie Back Cami Top from LA Hearts. This charming cami features a delicate lace front detail that adds a touch of femininity. The tie-back design not only adds a hint of allure but also allows for a customized fit. Woven fabric Lined Square neckline Tie back closure Lace front detail Cropped length Self: 92% rayon, 8% linen; Lining: 100% polyester Machine washable Model is wearing a size small SKU: 0731461580346

*Product Details - Sustainably sourced and economically friendly. - Quality ink - Unisex T-shirt - Ribbed knit collar - Without side seams - Shoulder tape - Runs true to size *Fabrication - 100% cotton *Care Instructions - Bleach as needed - Do not iron - Do not dry clean - Machine wash cold - Do not tumble dry. *Processing and Shipping Times - Production time: 1-2 days - Standard shipping takes 3-5 days - Please note that these times are estimated by USPS and may take longer - Please make sure your shipping address is correct before placing an order - Printed and Shipped in the USA *Returns & Exchanges - All sales are final - No returns or exchanges *Disclaimer - Colors in listings may slightly vary depending on what device you are using - Prints may appear smaller depending on the shirt size ordered - *Please contact me* if you have any questions, concerns, or before you leave a negative review! We strive for 100% customer satisfaction and will work with you to address any problems! *Visit my shop for more! https://www.etsy.com/shop/DreambyGigi

Birds & snacks ❤️🦆 ☺ 50% cotton & 50% polyester blend, with a cosy, fleece lining inside. ✐ Dreamed up, hand drawn, designed & embroidered in the UK. ✿ Hand wash if possible. Or machine wash, inside out, at 30°c. ♥ Everything is uni-sex sizing, yay! Please take a look at our size guide for more details (it's just next to the product title). ☻ Sade is a UK size 8 & wears a size L navy sweatshirt ☻ Luena is a UK size 14 & wears a size XL pastel green sweatshirt ☻ Amelia is a UK size 12 & wears a size L grey sweatshirt

Let your bread machine mix flour, water, oil, sugar, salt and yeast to make a delicious homemade pizza dough.

We've collaborated with Relax Lacrosse to make the cutest mesh shorts adorned with front tie bows! Details Mesh lacrosse shorts with an elastic waistband and two bow accents on the front. This short is slightly fitted and worn at the waist. If you are looking for a more relaxed look, we recommend sizing up. 100% Mesh Machine wash cold with like colors, dry on low heat Made in USAModel is wearing a size small Size Waist XS 23"-27" S 24-28" M 28-32" L 32-36" XL 36-40" XXL 40-44"

I have talked before about my love affair with homemade bread. My very first blog post EVER was a recipe for the bread machine and this pillowy Buttermilk Yeast Bread has been know to send friends and family to their knees when I serve them a slice slathered in butter and honey. It...

Learn about Sewing Knits Fabrics. Here you'll learn how to sew stretch fabrics, with and without a serger. Become a knit fabric expert.

If you sew and machine embroider a lot, you collect a lot of thread. Here are some creative ways to organize sewing and machine embroidery thread.

Stay cute with my very own knit cardigan! It's super soft, comfy, and will help keep you warm! Made of acrylic material - soft and similar to wool. Please hand wash or machine wash on gentle/cold and hang to dry. No bleach and low iron if needed. This cardigan is available in ladies sizes Small - 3X, please reference sizing details below and also note that there is stretch. One extra button included on inner tag of cardigan just in case you need a spare! * Measurements are taken lying flat and unstretched, there is more room given the fact that these cardigans are knit and have stretch! SMALL: 38" chest / 27" length MEDIUM: 40" chest / 28" length LARGE: 42" chest / 28" length XL: 44" chest / 29" length 2X: 46" chest / 29" length 3X: 48" chest / 30" length SMALL: 38" chest / 27" length MEDIUM: 40" chest / 28" length LARGE: 42" chest / 28" length XL: 44" chest / 29" length 2X: 46" chest / 29" length 3X: 48" chest / 30" length

A comprehensive step by step tutorial for the simplest and the most widely used applique technique - raw edge machine applique with fusible web.

Learn how to easily calibrate your Cricut Explore Air 2 machine (and some helpful tricks to avoid having to repeat the process!)...

If you want to learn how to shirr fabric easily, then this guide is for you! I also explain how to shirr fabric with a Brother sewing machine.

Transform the heart of your home with our quality plywood worktop. Precision cut on our CNC machine and finished by hand, this Formica worktop is the perfect blend of functionality and style. Our careful eye for detail ensures complete perfection, with its crisp lines and smooth robust surface, this worktop will be the talking point of any kitchen.

Birds & snacks ❤️🦆 ☺ 50% cotton & 50% polyester blend, with a cosy, fleece lining inside. ✐ Dreamed up, hand drawn, designed & embroidered in the UK. ✿ Hand wash if possible. Or machine wash, inside out, at 30°c. ♥ Everything is uni-sex sizing, yay! Please take a look at our size guide for more details (it's just next to the product title). ☻ Sade is a UK size 8 & wears a size L navy sweatshirt ☻ Luena is a UK size 14 & wears a size XL pastel green sweatshirt ☻ Amelia is a UK size 12 & wears a size L grey sweatshirt

When you’re working with lightweight fabrics, a French seam is often the finish of choice. But if there’s a side-seam vent, you need a way to neatly end the seam…

Learn the best kept secret on your sewing machine!

I've been stitching some free-motion flowers for journals in progress. And thought I would share the steps for those who might be interested... The first couple of steps involve setting up your machine. As far as I know, you have...
