

you’re new to sewing, you may have just started with the standard presser foot that comes on the machine and haven’t yet changed it out.

I know many of you are just learning to sew…..or maybe you have sewn for a while but aren’t as familiar with sewing terms. I have been meaning to do thi

Take your sewing projects to the next level using these sewing tips and tricks.

Here are some of the most important lessons I picked up in my first year of sewing. This isn't an exhaustive list, but these are some of the things that I struggled with or that confused me at first. These tips and tricks should help a beginner who is just learning to sew.

Make Your Own DIY Sewing Cards using craft items found in your home. This is an easy beginner's sewing project. Introduce how to sew to a small child.

12 clever sewing hacks you absolutely need to know! Must-see clever hacks that will make your sewing easier. Get the most out of your sewing machine!

Say good-bye to all of those messy threads, clippings and cuttings that are generated while in creative mode. My Sew In Style Thread Catcher Pattern is an Instant Digital Download and is a combination pincushion and scrap bag all in one! How clever is that? What would likely hit the floor will now have it's own tidy little landing place. Oh, and don't forget the handy little scissor holder, too! It's not only a pretty addition to your work space, but oh-so-practical, too! Bet you can't make just one... These items make great gifts for anyone who sews, quilts, scrapbooks, does bead work or any other activity that produces clippings or cuttings. The downloadable PDF TUTORIAL STYLE PATTERN includes easy to follow, detailed instructions along with 38 photographs illustrating the steps along the way. There are also fabric cutting instructions, tips and hints. FEATURES: - Receptacle bag measures 5 1/2" tall by 5 1/2" across - Pieced Pincushion measures 7" x 3 3/4" - Pincushion is filled with crushed walnut shells or filling of your choice - Handy scissor holder - Removable pincushion is attached to fabric covered tile base with hook and loop tape. - Non skid rubber backing keeps thread catcher in place on the work surface - Portable for taking to classes and workshops Basic sewing skills are needed. You may wish to purchase the Sew In Style Thread Catcher Pattern/Supply Kit Combo or the single Supply Kit, both available here in my shop. https://www.etsy.com/listing/150614492/sew-in-style-thread-catcher-pattern https://www.etsy.com/listing/150573755/sew-in-style-thread-catcher-supply-kit or... you might want to buy a finished product. Check them out here. https://www.etsy.com/shop/CurryBungalow Note to buyers - Pattern text is written in English with imperial measurements. Materials and Supplies needed are: • Outside Bag Fabric - (1) Fat Quarter • Bag lining, ceramic tile cover, hanging tab, scissors tab - (1) Fat Quarter • Contrasting Trim Strip Fabric – 18" long • Coordinating scraps for pincushion • Thread to match fabrics • Ceramic tile – (1) 3” x 6” “Subway” tile (available at hardware stores, Home Depot, Lowe’s) • Heavyweight Sew-In Interfacing • Boning • Hook and Loop Tape, ¾ inch or 1 inch wide (such as Velcro) • Crushed Walnut Shells for pincushion or filling of your choice. • 1 small piece non-slip shelf liner • Scraps of cotton batting - Warm and Natural type • Water Soluble or Disappearing Ink Marking Pen • Ruler – A small clear acrylic quilting ruler works well • Tacky Glue or other craft glue. • Optional for Posy - Two coordinating squares of complimentary fabric One (1) 5 ½” square of HeatnBond Ultrahold Iron-On Adhesive One (1) button for the center of the posy. A rotary cutter, clear ruler and cutting mat are helpful for cutting the materials. Please note that this is an INSTANT DOWNLOAD PDF pattern and NOT a paper pattern or a finished Thread Catcher. This pattern requires Adobe Acrobat Reader (a free download...) to view and print. Instructions are in English and U.S measurements. Once your payment has been accepted, a ‘download’ button will appear and you will be able to download the pattern straight away. If you have any problems accessing the pattern, please convo me and I will email it to you instead. Please remember to include your email address. If you have not received the email, be sure to check your spam/bulk mail folder. Note to Buyers: All pattern sales are final and are non-refundable. See shop policies for terms of use.

Well it's the end of a busy week! I don't know about you, but I'm pooped! But I'm pleased to say we've had some gorgeous, sunny days here in N.I. this week, and there's a lovely Autumn feel to the air! As always, the things I've been working on this week I can't show you yet (soon I promise!), so I'm going to give you a wee tute on how to use up every last wee bit of fabric shavings, you know those bits that end up all over your cutting mat after trimming blocks and hsts? We'll here's a cool way to turn them into a new type of fabric. As far as I know this product doesn't have an official name - I learnt it at college and it wasn't called anything then, but if you know the official name of this craft, please let me know. 1. Save up your fabric shavings & wee bits of offcuts that are too small to be useful (you can also cut up wee bits of fluffy wool, ribbon, sparkly threads etc.). Bigger pieces will need to be snipped down smaller. 2. Take a piece of plain sheeting/calico and lay a load of shavings on top. You can colour code your savings as I have done here, or have a multi-coloured mess! Make sure it's thick enough to cover the backing fabric, but not too thick to sew over. 3. Lay a piece of water soluble fabric over the top and pin/sew round the edges. This stuff is really cool - you can get different brands in a craft shop or online. I've used Avalon Water Soluble Embroidery Fabric by Madeira. 4. Now sew, sew, sew over the top of the w.s.fabric, either by free motion quilting or straight & wavy lines all over. Try not to leave any big gaps where the shavings can later escape from. 5. When you have stitched this to within an inch of its life, take the pins out and under a luke warm tap or in a sink/basin, allow the w.s.fabric to melt away (it goes a bit slimy as it melts off so rinse it well). 6. Give your new piece of fabric a good squeeze to get the water out and then allow it to dry on the radiator. 7. When dry, draw your desired shapes on the back and cut out. If you want to, sew more stitching on top to highlight details, for example veins in leaves, or sew on beads, sequins etc. 8. You can now use your fabric shapes to embellish/decorate cards, cushions, make letters or Christmas decorations etc. etc. The possibilities are endless! Another way to use this wonderful water soluble fabric is to roughly sketch a shape on to it & then put it into an embroidery hoop. Repeated sewing and shading with thread will close all the gaps, so that when you take the fabric off the hoop and dissolve the w.s.fabric you are left with a completely embroidered shape. Have fun & let your imagination run wild!

mailed this today, it is my first time sewing a zipper. I was not brave enough to use the machine so I just sewed it all by hand..

Ruching fabric is so easy and can be used in many ways, from gathering up the sides of a shirt to shortening sleeves. How to sew ruching.
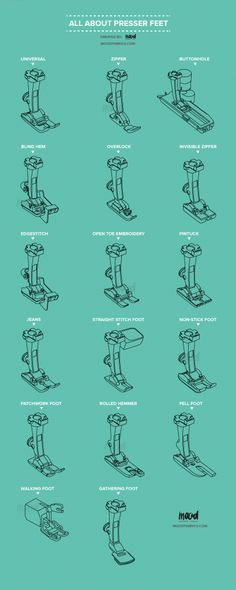
We're back with another guide, and this time we're focusing on presser foot attachments! One of the most important pieces to any sewing machine and project,

Messy stitches. Loose threads. Clanking metal. Lint clogs. When you’re in the quilting groove, there’s nothing more frustrating than an out-of-whack sewing machine. Luckily, there are a few tips and techniques that can get your machine up and running in no time, and Rob is just the guy to show you how! In fact, he gets pretty excited about taking care of his machines! This week Rob has released a series of three video tutorials to guide you through do-it-yourself repair and maintenance. He’ll also help you diagnose problems that require professional attention. With over 15 years of experience as a sewing machine technician, youRead More →

A round-up of 10 helpful household tips to streamline various aspect of life.

Have you ever bought something that, made you feel a little bit guilty to throw out when you were finished with it? Perhaps you're just the kind of

Hello All, Today I will venture into yet another new country, Serbia. It is more difficult to find material on Serbian Folklore than it is for Croatia, for example. I am not sure why this is the case. Serbia has been a very forward looking country since they emerged from under the Ottoman Empire. I will be covering the most common Serbian costume, that of central Serbia, or Šumadija. This is the heart of Serbia, extending from Beograd south along the Morava river.This costume comes in several forms, varying mostly in the type of skirt. As in most of my posts, I will not be able to cover every variation. This photo above shows one of the more common versions. http://en.wikipedia.org/wiki/Serbia http://en.wikipedia.org/wiki/%C5%A0umadija The basic garment, as in the rest of the Balkans and much of Eastern Europe, is the chemise. Typically there is a band collar and no cuffs. One typical feature of the Serbian chemise is that the sleeve is gathered just above the elbow. Very often a red garter or ribbon is tied around the arm at this point, as in the photo above. There is embroidery around the sleeve opening, around the neck opening, often on the lower part above the hem, and very often a spot design on the upper sleeve, above the gathered area. There is very little material on the traditional designs used. Today what is seen in almost all cases is multicolored cross-stitch floral designs which are very reminiscent of Berlin Work. This is of recent origin, not going past the mid 19th cent at most. There are various cuts used for the chemise, here is one version. There are also versions in which the sleeves are set in perpendicular to the body. The pieces used are narrow because the constraint of a hand-loom does not permit wider pieces to be woven. There are various vests or bodices worn with this costume, called pamuklija, djudica, grudniak, zubun, etc. The most commonly seen today is the one called jelek. Each of these vests has a different cut. The jelek is short, coming just to the waist, it hooks closed in front, with a point in the center and a curved opening on either side. It is usually red or black, and typically has rich ornamentation consisting of couched gold braid. For young women the neckline is low, functioning as a bustier, but for older women the neckline may be considerably higher. There are various types of skirts worn with this costume. One of the oldest and simplest is the two apron version. This has two aprons of a single panel each, the front apron being ornamented and the rear apron mostly plain, with ornamentation just along the bottom. This is common over much of eastern Europe. Here is a painting by the artist O. Benson showing a young woman from the village of Kumodraž near Beograd. On the left is a rear apron, on the right is a front apron. This is part of a painting by the artist Carol Pop de Szathmari, of a scene in a market in Beograd in the mid 1800's. What is most commonly seen today is a closed skirt woven in narrow stripes or plaid, often of two widths of cloth sewn together horizontally, with the plaid deliberately not matched. This is pleated finely, and usually has a black velvet hem and lace sewn onto it above that. See the image at the top of the article. Some forms of the skirt were plain in color with a decorated hem, either wide or narrow. Here is another part of the same painting by Carol Pop de Szatmari. The artist has painted himself into the scene at right. He was apparently a Hungarian Orthodox Priest. Below is another painting by Benson showing a young woman from the village of Kusadak. Some contemporary versions of the skirt in particular communities have become quite short.The first photo is from Užice. The second is from southern Pomoravlje. The most spectacular version of the skirt is basically the same as the narrow pleated one, but is not sewn closed in front, and is worn with the corners tucked into the waistband behind. This gives the outfit a lot of movement. Typically the hem that shows is ornamented with crochet and embroidery. See some of the images above. Here are a couple more images of that type of skirt. The kerchief wrapped around the torso seen in these last three images was commonly worn in the mid 1800's, under influence of Western fashion of the day. This has died out and is no longer seen. The last image is of a painting by Nikola Arsenović, who also painted in the mid 1800's. The apron is traditionally woven in tapestry technique, with colorful geometric motifs. Today it is more commonly made of red or black wool with floral cross-stitch or crewel embroidery. In the past, unmarried girls and brides often wore embroidered linen aprons, as you can see in this painting by Arsenović This is rarely seen today, however. There is often a striped sash tied around the waist. The stockings are hand knitted, either with geometric, or more often, floral designs either knitted into or embroidered onto them. The traditional footwear are moccasins, which are called opanci, They have thin goatskin strips woven on the uppers, and stereotypically in Serbia have curled toes. This is not traditionally true for all communities, but they have become somewhat of a symbol of Serbia. This last painting is by the celebrated Jugoslavian artist Vladimir Kirin. Thank you for reading, I hope that you have found this interesting and perhaps inspiring. Here is a website showing how a Serbian community in France made a 'parade giant' figure in Serbian costume named Bela Rada. There are many photographs of the finished figure, of the details of her costume and how she was made. Quite fascinating. http://belarada.canalblog.com/ A couple of Serbian groups performing traditional dances. Serbian dances are famous for small precise intricate footwork. http://www.youtube.com/watch?v=rUlnyX-ijxM&feature=related http://www.youtube.com/watch?v=NBHMgfJAB4g&feature=related This video shows the winged skirt. http://www.youtube.com/watch?v=tVaUo-DApwo&feature=related Feel free to contact me with requests for research. I hope to eventually cover all of Europe and the Former Russian Empire/Soviet Union. I also gratefully accept tips on source materials which i may not have. I also accept commissions to research/design, sew, and/or embroider costumes or other items for groups or individuals. I also choreograph and teach folk dance. Roman K. [email protected] Source Material: Mitar Vlahovic et al, 'National Costumes of Serbia - Watercolours by N. Arsenovic', Beograd, 1954 Erina Shobich, 'Odezhda i Ornament Serbii', Beograd, 1956 Vladimir Kirin, 'Narodne Nosnje Jugoslavije', Zagreb, Mirjana Prosic-Dvornic, 'Narodna Nosnja Sumadije', Zagreb Nikola Pantelic, 'Traditional Arts and Crafts in Yugoslavia', Belgrade, 1984 Vladimir Salopek, 'Folk Costumes and Dances of Yugoslavia', Zagreb, 1989 Kaoru Tanaka, 'World Folk Costumes in Natural Color', Osaka, 1961

As a novice sewist, I find that I keep coming across words I just don't understand. To me, bias is not liking someone because they're a Vikings fan, and the

Step 2 Choose one rectangle to start with. Turn ONE long edge under 1/4 inch. Press to set the fold, then open it back up. You won't be stitching this down yet, but the piece is so small that it will be almost impossible to measure and press this fold after you sew so we're

If your child doesn’t have home economics, you should consider teaching your child how to sew on a sewing machine at home instead.

Enjoy this project excerpt from

Deze tutorial lijst de beste tips op voor het naaien met paspel. Hoe krijg je een perfect resultaat? Hoe maak je zelf paspel? Hoe naai je de hoeken? Welke naadwaarde gebruik je? Moet je je stof in schuindraad knippen? Enzovoort.

We all know that practice makes perfect and that's especially the case when it comes to hand sewing. Whether you want to get your kids into sewing, are a beginner yourself, or simply want to improve your stitching skills, you're in the right place. Instead of wasting fabric, using paper to practice is the best way to perfect your methods and movements. Our exclusive hand sewing practice sheets pdf pages provide excellent hand stitching practice for beginners. Or, perhaps there are certain types of stitching you have yet to tackle and want to practice that. There are different sewing lines on paper to download and print to appease every skill level. Use regular thread, embroidery floss, or even yarn to practice with. Most hand needle types and sizes can be used as well. No ruining or wasting fabric. These free three sheets have all sorts of lines and designs to help you. Print the full set or choose the individual page you want to work on next. There are beginner-friendly straight lines, curves, and angles along with more advanced lines and shapes for those who want a bit of a challenge. By the way, before getting started, you'll want to check out our guide: How to Start a Hand Stitch.

Here is a great FREE pattern & video from an awesome sewing website and designer.

Vintage Singer Sewing box found at a thrift store for $4.

you’re new to sewing, you may have just started with the standard presser foot that comes on the machine and haven’t yet changed it out.

UPDATE - this pattern was offered for free on BluPrint. When the new Craftsy took over they decided not to offer the sewing pattern library, and we've not

If you have no idea what a planket is...that's okay. Cause I'm pretty sure it's made up. BUT...once you see what it is..you will be itching to sew one because they are just that cool.

We've got your leftovers covered. Single use plastic wrap is getting a not-so-fond farewell from us over here. We've long wished for a prettier and more lasting way to cover our bowls, and these reusable cloth covers are just the ticket. Designed exclusively for Food52, the soft fabric covers have an elastic band that fits snugly over bowls—so you can protect your leftovers, bread doughs, batter, or produce. The best part is that you can use them over and over again, and the tight fit means no struggling with getting plastic to stick or stay. When they need a refresh, just toss 'em in the washing machine. The natural and oatmeal covers 100% linen while the striped covers are 100% cotton—winning fabrics one and all. Set of 6 includes (2) 6.5" bowl covers, (2) 8" bowl covers, (1) 11" bowl cover, and (1) 14" bowl cover. Each set of six includes two 6.5-inch bowl covers, two 8-inch bowl covers, one 11-inch bowl cover, and one 14-inch bowl cover. Now, let's give all those extras a new lease on life... Sixteen (yep!) recipes to make the most of leftover egg yolks The best way to use up leftover sweet potato A leftovers pot pie recipe that doesn't taste like leftovers Made in: Brunswick, Georgia Product Warranty: Shipping & Returns: Free Standard Shipping on Orders $199+ and Easy-Breezy Returns Single use plastic wrap is getting a not-so-fond farewell from us over here. We've long wished for a prettier and more lasting way to cover our bowls, and these reusable cloth covers are just the ticket. Designed exclusively for Food52, the soft fabric covers have an elastic band that fits snugly over bowls—so you can protect your leftovers, bread doughs, batter, or produce. The best part is that you can use them over and over again, and the tight fit means no struggling with getting plastic to stick or stay. When they need a refresh, just toss 'em in the washing machine. The natural and oatmeal covers 100% linen while the striped covers are 100% cotton—winning fabrics one and all. Set of 6 includes (2) 6.5" bowl covers, (2) 8" bowl covers, (1) 11" bowl cover, and (1) 14" bowl cover. Each set of six includes two 6.5-inch bowl covers, two 8-inch bowl covers, one 11-inch bowl cover, and one 14-inch bowl cover. Now, let's give all those extras a new lease on life... Sixteen (yep!) recipes to make the most of leftover egg yolks The best way to use up leftover sweet potato A leftovers pot pie recipe that doesn't taste like leftovers

Our Wrap + Turn Short Rows Tutorial guides you through this simple technique so you can shape your knitting with ease and confidence!

Explore 30+ creative projects to sew and sell today! Profit from your sewing skills with in-demand projects ready to be sold.

Dealing with dull scissors? See how to sharpen a scissors to get it just like new. Sharpening scissors is easy and makes it easier to cut.

Elevate the quality of all your sewing projects with mitered corners! Here are 3 simple ways to sew a mitered corner that you have to try!

Hi everyone!!!! I have two cool things to show you today ~ hopefully inspire you to try them. I have done these very cool tags for heAR...

You SEW Girl has a great tutorial for all you sewing enthusiasts! Learn how to turn those crinkly or curled paper patterns into cardboard patterns just

Ruching fabric is so easy and can be used in many ways, from gathering up the sides of a shirt to shortening sleeves. How to sew ruching.

Given the choice, I prefer hand sewing over machine and appliqué has got to be one of my favourite techniques. It’s like a form of art, I guess – the way you can take the teeniest, tin…

קשר.הפעם הראשונה בה התנסיתי בקשירות מקרמה הייתה בשיעור מלאכה בבי"ס היסודי עם המורה חנה.בסוף השבוע שעבר, אחרי יותר מ 36 שנים, חזרתי לקשור בסדנת בוקר
