

The subtly formed wooden frame of armchair FRIDAY 1 has a back section of butt leather and the design is reminiscent of a pattern cut.

A roundup of 30 most famous chair designs ever made. These chairs depict innovative style, showcase inspirational form and function.

How to build a DIY outdoor chair for just $30 in lumber! This DIY patio chair matches our DIY outdoor couch to complete your DIY outdoor furniture set!

Furniture is expensive. If your existing furniture has good bones and a solid, sturdy frame, chances are you can reupholster it. Think it's just for the pros? Nope. Here is our round up of projects that show how to reupholster almost anything!

Get more from Cowbuild on Patreon

Do you need plans for a DIY Floor Rocking Chair? I have printable PDF plans available with 3D illustrations and step by step tutorial.

Tips & tricks for how to reupholster dining chairs - plus how to upholster rounded corner seats so they look perfect!

Adirondack Chair: PopularMechanics.com For more on Adirondack Chairs, see our original story. Our version of the Adirondack chair has come a long way from the early types that had flat backs and seats-and, we've added a matching table. Don't be intimidated by th…

Modern DIY Adirondack chairs made from 2x4's.

Easy to build, sturdy modern outdoor chairs for deck or patio - free plans step by step plans with diagrams by Ana-White.com. We love that these chairs are beautiful from the back and the front! These chairs looks great with stacks of outdoor pillows. This is a free woodworking plan with step by step diagrams, shopping list and cut lists from Ana-White.com Also check out our matching loveseat plans.

I got a new comfy chair for my yarn studio today! I had been sitting on a stool that was hurting my back after hours of crocheting and blogging. So I opted for something a little bigger with a a nice cushion and depth to it so I could really sink in and relax while

Gallery spaces vary in size, functionality, and aesthetic appeal based on their intended use. Sizes range from small home galleries of 130 square feet (12
Inspired from Ana White plans, this Adirondack chair only uses a miter saw and jig saw to put together and are perfect for your backyard.

April Wilkerson shows you how she built this classic Adirondack style rocking chair with a matching foot stool and end table. April Wilkerson Adirondack Project Plan: http...

Upcycled Macrame Chair: My family likes to hang out on the patio in the backyard a lot, so we always have furniture out there. However, some furniture is more equipped to handle year round outdoor weather than others and most eventually succumb to the elements. These two c…

How to Build the Easiest Dining Room Chair Ever: This is a step by step “how to” on a super easy chair build. It doesn’t take expensive tools, and many of the cuts are the same so you can build a lot of them very quickly. If you have issues during the build, be sure to check out my video below t…

I don’t know if somebody else has already shared this or not...but I went to sit outside today and the chair was just gross looking! I started to clean it, and…

Free plans to build your own outdoor chair frame designed to fit deep seat cushions. This is an easy, beginner woodworking project that makes a very comfortable and sturdy patio lounge chair. Free step by step plans from Ana-White.com

Hey guys, I’m on this garden kick and have collected a vast volume of exquisite gardens. (link to last post if you missed it). There are so many ways a garden can be classified, but today, I’m focusing on the urban garden. some are on the roof (lucky devils) some are in a courtyard (if […]

Happy Trashy Tuesday! Well whatever day it is...in the Spirit of Trashy Tuesday.... Over the years I have found more of one type of furniture than any other. CHAIRS! Bonus! I recently updated this popular post and added a new project, 22 ways to upcycle an old chair! Enjoy. Triple Bonus! If you want more

Stacey shares her DIY patio makeover. She talks about how to redo a small outdoor space. This is also an affordable patio makeover.

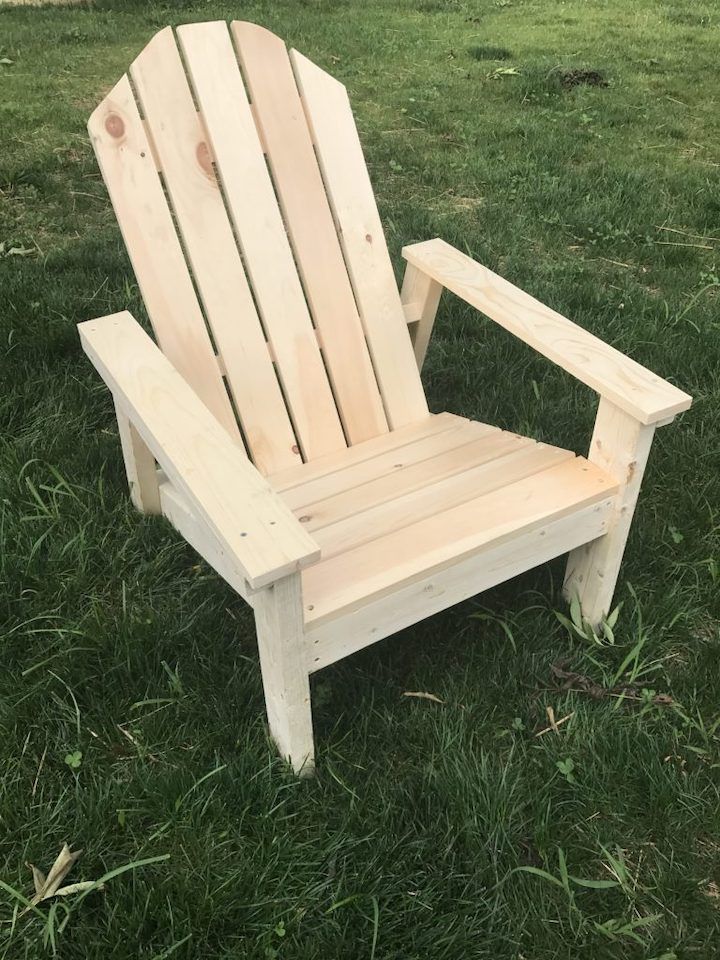
Want to build a modern adirondack chair? Look no further! We'll show you how in this step-by-step tutorial.

I built two modern Adirondack chairs for less than $100 with no previous woodworking experience except a shelf in seventh grade shop class. If you already have tools and a small garage workshop, you may just need the lumber which is only about $40 per chair!

How to build adirondack chair without any knowledge? This guideline helps you to understand How to build adirondack chair from step by step.

British and European Education Furniture Standard BS EN 1729 Part 1: Functional Dimensions Part 2: Safety Requirements and Test Methods The introduction of the new... read more

DIY adirondack chair plans from Ana-White.com This plan features a more upright seating angle, more traditional styling, with a chunkier base. Photos by Hamilton Park Home

After we finished our DIY deck back in March, it became even more apparent that we needed more outdoor seating. The only seating we had at the time was a round patio table with 4 chairs. Initially, we looked around for sectionals, but everything we liked was at least $2,500. Then we came across some plans to build your own outdoor sofa from Ana White...for around $50 in lumber! The cushions are the most expensive part of this project, but even so, we were able to build 3 sofas for under $800 total. Here is the original Ana White sofa design that we modeled our sofas after: Ana White Outdoor Sofa Plans It's a great basic design, but I wanted to modify it slightly by adding a couple more 2x4's for extra back support, as well as some 2x2's under the arm rests for more detail. We also built our sofas to the size of our cushions, so we used one less 2x4 on the seat bottom. Our sofa seats ended up being about 23.5" deep. Here's a comparison of the original vs. our sofa: I assumed the most difficult part of this project would actually be finding cushions that we liked in our budget, so we decided to pick out our cushions first & then build the sofas to those specific dimensions. Ideally, I wanted something in the grey family, but the few grey cushions I came across were either too brown, too thin, or too expensive. We ended up going with the IKEA KUNSO cushions in black instead: Here are the dimensions of our cushions: Back cushion dimensions: Width: 24 3/8 " Depth: 17 3/8 " Thickness: 7 1/8 " Bottom cushion dimensions: Width: 24 " Depth: 24 " Thickness: 4 " The entire sofa was built out of pine 2x4's, with the exception of the "X" detail under the arms - which were pine 2x2's. We did not use treated lumber for this project since I planned on staining & sealing the sofas - so we saved a little money by going with regular pine AND the lumber was also not as heavy since it wasn't treated. If you can afford to build with cedar, that is the way to go for outdoor furniture (since we were on a budget we went with pine). My dad helped us build the first sofa, but then we were on our own for the remaining two. Before we added the "X" detail: Another change we made was to the top 2x4 on the back rest - we decided to attach the 2x4 vertically to give the back a little more height and notched out the ends to fit on top of the arm rests: Here are the sofas after we added the 2x2 X detail under the arms: For extra support, we also screwed in two vertical 20" 2x4 supports on the back of each sofa: *UPDATE* Here are some more detailed photos of the back of the sofas from April 2020: Once all three sofas were assembled, I filled the holes with exterior wood filler & gave them a light sanding all over. I focused on the edges - particularly around the arm rests. Next, I gave them all one coat of semi-transparent stain & sealer in the color Pewter by Rustoleum: The stain is subtle in person (and even more difficult to tell the difference in photos), but the stain sort of reminds me of that gray driftwood Restoration Hardware look. I could have done a second coat of stain, but I was honestly exhausted & just wanted to be done. You can see the stain the best in this photo: Ana's original lumber list only calls for (11) 2x4x10' boards, but because of our modifications we ended up needing to buy the following for each sofa: (12) 2x4x10' (1) 2x4x8' (2) 2x2x8' Here is the final approximate cost breakdown: ONE SOFA: $65 lumber + $180 cushions = $245 THREE SOFAS: $195 lumber + $540 cushions = $735 We also spent $37 in stain, so our total cost was about $772 ($735 + $37). Please keep in mind there can be other costs involved depending on what materials, tools, or stains you already have on hand. We already had the screws we needed (mostly 2 1/2" & some 4" galvanized screws), sandpaper, wood glue, and tools - so all we needed to purchase was the lumber & stain. Overall, we love the sofas - they are comfortable & very sturdy! Since I didn't give step by step instructions, please let me know if you have any questions on our building process. We also ended up building an X-base dining table for our new deck as well. I will write a post on how we built that in the near future... Thanks for reading! Mel

Hello Hello Readers! I am excited to share with you yet another Illustrated Chalk Painted piece of furniture. Done up in a cheerful colo...

The Becket Chair: Folding Wood Beach Chair Under $6 in Under an Half Hour*: This is a great beach/lawn chair that folds up into itself. It is deceivingly strong as well. The version made with 1x2 supports easily holds a 200lb person. For large people I make the supports out of 2x2, but I don't even know if it is necessary…

A month or so ago we were perusing a local thrift store when I noticed this chair. The left armrest was pretty wobbly, but other than that it was in great shape. The seat was dirty but in good condition and there were no cracks in the wood. I could see that it was a Louis XV reproduction, probably made in the early 80's, and once I found the price tag I knew I had to grab it right away! After about 20 mins of finagling, we fit it in my car and took it home. First, I removed the seat by unscrewing the 4 screws attaching it to the frame. The next hurdle was to de-wobble the armrest. For that I simply flipped the chair over, pre-drilled and countersunk a hole, and screwed in a heavy-duty 3 inch screw.That took care of 90% of the wobble. So, I also added a couple 2 inch finish nails to the back of the frame where the armrest meets. No more wobble! I wanted some paint resistance, so I chose not to prime the frame. I lazily roughed up the surface with some 150 grit sandpaper, just to make sure the whole thing didn't peel off. I then brushed on 2 coats of white, latex, semi-gloss paint. The paint I used is supposed to be a "one coat paint" because of it being a "paint and primer in one", but clearly I needed more than one coat. Two coats covered nicely. I then applied the glaze. I used Martha Stewart faux effects glaze (not my favorite, but not terrible) mixed with about 10% raw Umber and 10% Burnt Umber. I didn't do a heavy concentrated glaze because I wanted the frame to still look white. I just wanted to bring out some of the detail in the piece. That's part of the reason why I used semi-gloss. I wanted the glaze to only minorly darken the paint color. Had I gone with a satin finish, the paint would have absorbed too much color. The semi-gloss finish allowed the glaze to slip right off it. Using some 100 grit sandpaper I went around and distressed the raised areas, causing some chippyness. I then sealed it with two coats of my favorite, Polyacrylic in satin. Although it's super smooth and even, it did turn out a bit more shiny than I like due to the semi-gloss paint underneath. Oh well. Time to upholster! The seat went quickly. I'm sure most of you have re-covered a seat before, or at least watched someone do it, so I wont go into an explanation on that unless someone asks. Time to address the caning! I really debated on what I should do with the caned back. Most people these days see caning and think of their grandma's house and cats. Well, due to the large amount of caned furniture in the mid 20th century, I can see that. It really is beautiful and functional though. It can stretch over curves, and it gives great texture. In fact, just the other night I was flipping through the most recent Restoration Hardware Children's catalog where I spotted 2 different caned cribs! Maybe it's making a comeback? A lot of the caned chairs you come across second-hand are in bad shape, but this one was intact, making my decision even harder. I ultimately decided to upholster over it for two reasons. I wanted to try something new, and I figured it would be a usefully tutorial to most of you. I first grabbed some old newspaper and made a template. I kept the caning intact because it would be easier than removing it and having to create some kind of sub-structure. Had the caning been removed, it would have made tracing my template much easier. I then transfered the shape to some 1 inch thick foam (sorry, no photos for this step, my battery was charging and I was impatient). I had to reshape the foam a small amount, but it fit pretty well. I then secured the foam with some spray adhesive. I repeated the same process to fill the recessed space in the back of the chair. Next, I cut a piece of batting and a piece of fabric larger than the area I was going to cover, layering the batting first, and the fabric on top. I then went around the opening, stapling to the frame, making sure to pull the batting and fabric taught. With some help from the husband pulling, I secured both layers all around. I then trimmed off the excess, cutting close to the staples, but making sure to stay within the recessed grove. This step probably would be easier with a sharp utility knife, instead of bulky scissors. I repeated the steps to the other side and now the chair had an upholstered back. You have some options to cover the staples. I wanted this chair really look like a french Louis XV chair, so I went with braided trim. For a more contemporary or simple look, I would use double-welting (if you don't know what that is or can't find it, look it up online. There are a few good tutorials on how to make your own). This chair took about 5 1/2 yards of trim. Simply lay down a thin bead of hot glue over your staple line and smooth the trim over the border. Make sure to seal the ends of the trim with a bit of the glue so they don't fray. And that's it! I now have a beautifully upholstered arm chair. I love the fabric! It has some texture but still feels soft, and the color is a perfect, neutral beige. Let's be friends! Follow along so you don't miss a thing!

Want to build a modern adirondack chair? Look no further! We'll show you how in this step-by-step tutorial.

You simply can't go wrong with it.
