

Bee Ginghams by Lori Holt for Riley Blake Designs is a collection of an array of ginghams in different sizes and colors. These gingham prints span every color in the rainbow, and feature both straight and diagonal prints. This fabric features a red gingham print. Width: 43"/44" Material: 100% Cotton Image Swatch Size: 8" x 8"

Eco Printing or Eco Dyeing on Fabric. How to make Eco Prints with leaves on silk chiffon and cotton fabric with an iron modifier.

Hammered Flower Prints on Fabric are a great way to preserve some of that beautiful spring/summer flower color and make a great gift or card. Hammer away!

Sun prints are so easy, fun, and exciting to make with kids. They are also called cyanotypes and can be made on fabric as well as paper.

Say buh-bye to the days of searching for that perfect bolt of fabric. Block printing is the easy way to create custom fabrics for one-of-a-kind sewing, quilting and home decor projects. If you'

The beauty of plant-stamped fabric lies in the wonderful imperfection of the print. You can add a hand-made touch to your house and print some cushions, tea towels, table runners or bags. Don't worry about your skills, it's really easy! Follow this tutorial to learn how to do that.

I tried a new printing method today. It's an easy DIY project and includes fabric ink and fresh vegetables!

Eco Printing or Eco Dyeing on Fabric. How to make Eco Prints with leaves on silk chiffon and cotton fabric with an iron modifier.

Second blog of a tutorial on stencil printing.

Find out how I made a botanical mandala print on fabric using the flower hammering/pounding technique. Follow along with my steps and create your own printed mandala… and find out what I learnt from my experiments. It’s lots of fun and the possibilities are endless! You can learn this fun technique from Samorn Sanixay who...

Check out this free video for a few helpful tips on sewing with flannel. You’ll see how this fabric can be used to make a variety of fun and creative projects!

Monoprinting is a lovely technique that allows printmakers to be spontaneous, painterly and experimental. This simple monoprint project produces beautiful delicate prints using a piece of scrim and an etching press. Begin with a piece of perpex, a plastic inking plate or a sheet of drypoint plastic. use masking tape to tape off a rectangle on your perspex. … Continue reading "Monoprinting with Scrim"

Create amazing prints with the sun! See How to Make Cyanotype Prints on Fabric! It's an easy photographic process for amazing blue art!

Learn how to print fabric with flowers. This kid-friendly craft project can be done using supplies you may already have!

♥I'm so happy you're here! This hand carved stamp is so easy to use for any of your creative projects. It can be used to decorate any type of invitation or card, envelopes or letters, the outside of your notebooks or with the right paint can be used to create patterns on fabric! These ones might be perfect for a teacher! This stamp is suitable for any type of ink or paint, but I recommend Lino Print Paint or Stamp Ink when using to stamp on paper. PLEASE NOTE: Every stamp is carved out by hand, thus each stamp is unique and not identical to the listing images. This is what makes these hand carved stamps special♥ Yours will be completely unique. STAMP SIZE: 3,4cm x 6,6cm (Approximately) CARE FOR YOUR STAMP: -For water-based inks or paints- wash gently by hand under luke-warm water -Wipe off gently with a baby wipe. All stamps are made to order, and will be shipped 3-5 business days after order. All shipments are sent with Post NL. ♥Please leave a review, and have fun!!

In fact, cyanotype prints were often used to print maps and plans, that’s where we get the term blueprint.
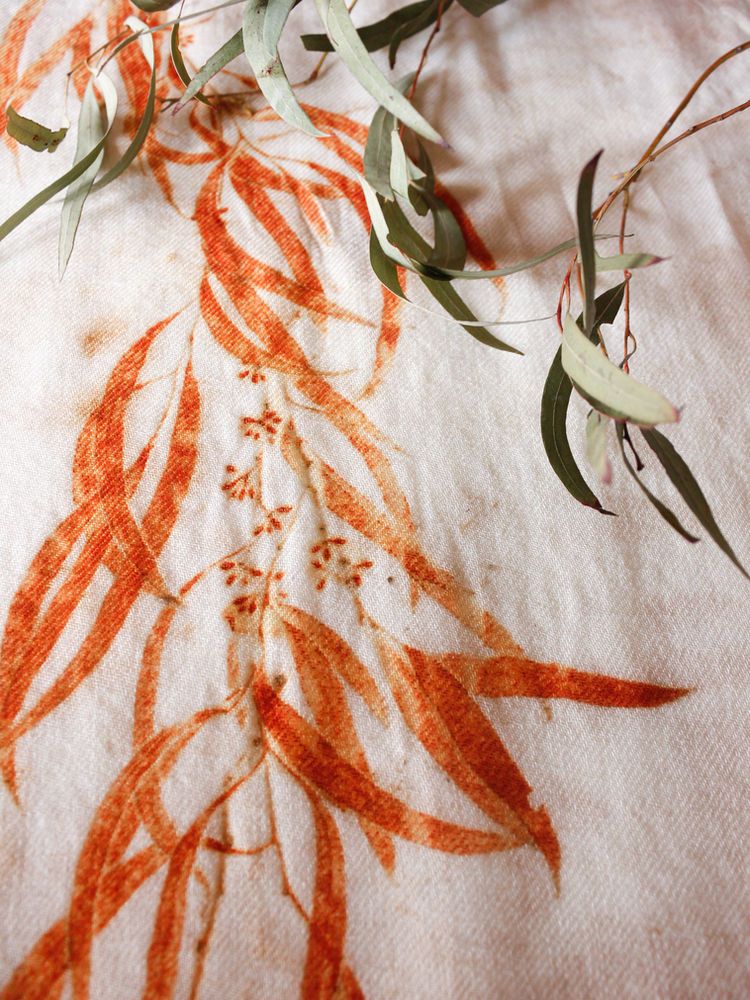
I’ve just released my new ebook all about eco-printing so I thought this might be a good time to write a quick post about the leaf that started it all for me, eucalyptus! I first learned about eco-printing in my natural dyes and weaving class in college over ten years ago. I saw an example of eucalyptus leaves printed on silk and I was shocked to see they printed a beautiful orange. It took me many years and lots of twists and turns before I finally got a chance to try the method myself and when

Learn a fun new technique called rust dyeing fabric that uses vinegar soaked fabric and old rusted metal to create gorgeous pieces of dyed fabric.

data:blog.metaDescription

Sewing Tips ✓ Fabric Tips and Tricks ✓ Fear No Fabric ✓ Double Gauze ► Find tips and tricks for sewing with double gauze.

How to Print on Fabric - Freezer Paper Method. Today I'm sharing a fun way and economical way to print on fabric, using your home Inkjet Computer!

In this blog I want to show you the results of different mordants with different leaves.

"Canchovies"? Sardines? These fish are both cozy and SALTY. One of our most popular nautical patterns, its chock full of sampler stitches perfect for the ambitious beginner.Craft kit includes: pre-printed pattern on unbleached cotton fabric 15cm (6”) embroidery hoop embroidery floss (2 full skeins) BOHIN size 3 embroidery needle instructions in ENGLISH and FRENCH Ambitious beginner friendly. Approximate package dimensions:8 3/4” x 8” x 3/8”22cm x 20cm x 1cmMade in Canada

Windham Fabrics black and white zebra print fabric. Width is 44"/45". 100% cotton.

Een voetbal tekenen. Voetballen zijn leuk om mee te spelen, maar kunnen lastig zijn om te tekenen. Een traditionele voetbal is gemaakt uit twee platte vormen; vijfhoeken en zeshoeken. Een vijfhoek heeft natuurlijk vijf kanten, terwijl een...

Hey creative mamas! Have you ever thought that it was possible to get your kids right into nature through a fun crafty activity? Eco print with natural dyes will do just that. It's totally safe,

A tutorial on how to mordant plant based fibres succesfully, with full step by step instructions. Enjoy!

Essential Dots by Moda Fabrics is a basics fabric collection that features polka dot prints in several colorways. This fabric features a mottled cranberry red background with off white polka dots. Width: 44"/45" Material: 100% Cotton Swatch Size: 6" x 6"

Paperbag shorts are one of the most popular items when it comes to hot summer days. I am sharing the pattern for the Pipa paperbag shorts, which can be a quick and simple project for those who wants to have something new to wear in the coming summer months. The Pipa paperbag shorts feature half thigh length, elastic waist, relaxed fit and slanted pockets. It can be made with linen, jeans, khaki or any fabric that you love. Try it with different colors and prints for a fun project! The Pipa paperbag shorts are a trendy and versatile item that can be styled in various ways. Here are a few tips on how to style a pair of paperbag shorts: Tuck in a fitted top: Paperbag shorts have a high waist, so it's best to pair them with a fitted top that can be tucked in. This will accentuate your waistline and create a flattering silhouette.Add a belt: If your paperbag shorts don't come with a built-in belt, you can add one to cinch your waist even more. A skinny belt in a contrasting color can add a pop of interest to your outfit.Layer with a denim jacket: A denim jacket is a classic layering piece that pairs well with paperbag shorts. The combination of the structured jacket and the relaxed shorts creates a balanced look.Wear with heels: Paperbag shorts can be dressed up with a pair of heels. A block heel or a strappy sandal will elongate your legs and add a touch of elegance to your outfit.Go for a casual look with sneakers: If you're looking for a more casual look, pair your paperbag shorts with a pair of sneakers. This is a great option for running errands or a day out with friends.Accessorize with jewelry: Adding some jewelry can elevate your outfit. A statement necklace or a pair of earrings can add some sparkle to your look. Remember to have fun with your outfit and experiment with different combinations until you find what works best for you! My pattern is made in 10 sizes from XXS to 5XL so you may find a suitable size for yourself. If you are not sure which size suits you, take a look at the measurement table before doing anything here: SIZE GUIDE. The pattern is made using layered PDF, please check for your desired size before printing so you won’t waste your paper. I have included a first page with many details about sizing and printing, so please first read the first page and make sure you know what size you need! If you still do not know how to print a layered PDF, please check for the printing instruction in this post: PRINTING GUIDE. You can print this using your home printer and A4/Letter paper. I calculated the printing area so that you will be able to use either type of paper to print the pattern out perfectly. Always print the first page first and check with the test square if you are printing at the right scale before you print out the whole pattern – avoid waste of ink and waste of paper, save the earth! Some PC may print smaller than actual size even when you choose 100% scale – I don’t know why this problem exist, but my HP laptop cannot print true to size. I have to scale up to 103% to get the right size. You may need to check with your PC to see if it prints true to size, if not, scale up a bit. SEWING INSTRUCTION You will need Fabric of your choice. This pattern is made for woven fabric, but you can also use knit fabric.Scissors, pencil or fabric marker, ruler, pinsSewing machine/Serger or needle and threadPrinted pattern How much fabric do you need for this piece of garment? To be precise, you may need to check how much fabric you need before buying. It will depend on the selected pattern size, the width, and design of the fabric you plan to use. Just to be sure, print all the paper patterns and lay them out at the width of fabric you plan to use (usually from 90 to 150 centimeters or 35 to 60 inches). Measure how much fabric you will need. Don’t forget to account for pieces that need to be cut multiple times and pieces that are cut on the fold. Cutting instruction: After printing out and taping all the pattern pages together, you will get something similar to this: You will see that there are 2 sets of lines on each pattern piece. The inner lines are sewing line (and you sew along these lines), and the outer lines are cutting lines (you cut the fabric along these lines, remember the folding lines where you have to fold the fabric before cutting). The distance between sewing line and cutting line is seam allowance, and it varies from point to point. For example, the side seam allowance is about 1/2 inch (1.2cm), and seam allowance at hemline is 1 inch (2.5cm). This is the reason why I do not remove the sewing lines from the pattern. Please use it as a guide to know how much seam allowance you need to give at each seam. The fabric will be cut into following pieces: Front: cut 2 mirroredBack: cut 2 mirroredLarge Pocket Bag: cut 2 mirroredSmall Pocket Bag: cut 2 mirroredWaistband: cut 1 on the fold Place the pattern pieces on the fabric, pin the pattern pieces to the fabric to secure them in place. Using sharp scissors, carefully cut out the fabric pieces along the outer lines of the pattern. Take your time to ensure precise and clean cuts, as this will affect the fit and overall appearance of your garment. Make sure to mark all notches and other design features such as darts, pleats etc. from the pattern pieces onto your fabric. When sewing the garment, pay attention to notches, they must match up. Sewing instruction: 1. Serge/zig zag stitch the raw edge to prevent fabric from unraveling. 2. Place a pair of Front and Small Pocket Bag right side facing, so that the slashed edges of the Small Pocket Bag and the Front match. Sew along the pocket edge. Staystitch seam allowance toward the Small Pocket Bag. 3. Place the Large Pocket Bag and Small Pocket Bag right side facing, matching the curved edges of the pocket bags. Sew to attach 2 pieces together. 4. Lay the Front and Back right side facing (make sure the pocket lays flat). Pin and sew to join the Front to the Back. Do this with both legs. 5. Sew the inseam of the legs. 6. Turn one leg inside out, put it into the other leg, matching the crotch curve. Pin and sew the crotch curve. 7. Sew two ends of the Waistband. Fold the loop in half so that the seam allowance is hidden inside. Pin the waistband to the main garment (careful with the pocket opening). Sew to join the waistband to the garment, leaving a 2in/5cm opening to insert elastic. Insert elastic and sew to close the opening. 8. Hem the shorts. Super easy and quick – you will get your piece of garment in a few hours! And here is the download link: PIPA PAPERBAG SHORTS (SIZE XXS – 5XL) To download just click on the link above and choose “Save link as”. The PDF file will be downloaded to your device. Happy sewing! And don’t forget to share your project on my Facebook page: Tiana’s Closet Sewing Patterns Tiana

Lois Ericson shows you how to create uniquely colored and patterned fabrics with ordinary household bleach.

Get stunning results with the simple technique of sun printing on fabric also knows as Cyanotype. Upgrade your fabrics with leafy patterns!

Lois Ericson shows you how to create uniquely colored and patterned fabrics with ordinary household bleach.

How to print on fabric with just 2 materials you probably have in your house right now. Freezer paper and an inkjet printer. WARNING: totally addictive.

Monoprinting is a lovely technique that allows printmakers to be spontaneous, painterly and experimental. This simple monoprint project produces beautiful delicate prints using a piece of scrim and an etching press. Begin with a piece of perpex, a plastic inking plate or a sheet of drypoint plastic. use masking tape to tape off a rectangle on your perspex. … Continue reading "Monoprinting with Scrim"

If you have been swept away with the Sashiko stitching craze (like me) you are probably looking for easy ways to transfer designs onto your fabric without the hassle of tracing out grids, or buying expensive templates. I have found a fabulous way to transfer your design onto fabric using an ink jet printer (these are the ones generally used at home with ink that is water soluble) and freezer paper. Freezer paper is the old fashioned way to wrap and store meat in the freezer and can be readily found in the supermarket. If you have trouble finding it, you can make your own (and I'll go into these steps in another post). You willl need: Freezer paper Scissors Fabric (any light weight fabric will work) Iron Printer Step 1 Iron your fabric first to remove any wrinkles. You can work with any light weight fabric and I often use muslin (calico) because it is a good weight and it prints well. I often dye my fabrics before printing to create extra depth and interest, however plain fabrics work well too. The above sample was printed on indigo dyed muslin and the black ink contrasts well against the deep blue. Step 2 Cut out a section of freezer paper to the same size of your printer paper (either 8.5"x11" or A4). I use a piece of printer paper as a guide or you could use card stock for something more durable. Step 3 Place the freezer paper shiny side (plastic) down towards the fabric and iron it. The plastic will melt and adhere to the fabric. Step 4 Cut around the paper making sure you have no frayed edges and that you are cutting close to the paper edge. Step 5 Place your fabric/paper into the printer facing the correct way. ie with my printer HP Envy 4000 I place it fabric side down with the paper side visible on the top. This ensures that the print goes on the fabric and not the other side. (if you get confused and accidentally place it the other way around, simply flip it and run it though the printer again) Step 6 Press print! It should run through the printer ok and out comes an image printed on your fabric. Step 7 You can peel off the paper and start sewing your design. Step 8 I use a water base ink so that I can wash off the printed design after I have finished embroidering the pattern, however there are waterproof inks available if you wanted to have a permanent design. These are some examples of fabrics that have been printed using my inkjet printer. The one below you can see wasn't completely ironed onto the freezer paper and was wrinkled going through the printer. But it still went through ok without getting stuck! You can find lots of sashiko stencils online to download onto your computer to print. Happy Stitching!

♥I'm so happy you're here! This hand carved stamp is so easy to use for any of your creative projects. It can be used to decorate birthday cards or invitations, envelopes or letter, the outside of your notebooks or with the right paint can be used to create patterns on fabric! This stamp is suitable for any type of ink or paint, but I recommend Lino Print Paint or Stamp Ink when using to stamp on paper. PLEASE NOTE: Every stamp is carved out by hand, thus each stamp is unique and not identical to the listing images. This is what makes these hand carved stamps special♥ Yours will be completely unique. STAMP SIZE: 3.5cm x 2.5cm (Approximately) CARE FOR YOUR STAMP: -For water-based inks or paints- wash gently by hand under luke-warm water -Wipe off gently with a baby wipe. All stamps are made to order, and will be shipped 3-5 days after order. All shipments are sent with Post NL. ♥Please leave a review, and have fun!!

Learn the basic techniques use to make your own beautiful eco-prints. Follow along to see how to print on paper and turn your art into inexpensive decor.

Some of you guys may know that one of my favorite crafting techniques is printing on Fabric! You will love these 6 easy DIY methods!

Coordonné's Poppy Curry is a floral inspired wallpaper in Yellow/Orange color. Enchanting flowers picked by a gallant suitor.
