

DIY Wire Frame Fabric Tote Bag Free Sewing Pattern + Video

This is a great super, fun and easy tote bag tutorial that you will want to make over and over again! (updated 04/18/2014) Please read entire instructions prior to cutting fabric or starting. What you need is: 1/2 yd of 2 different fabrics 2 yds coordinating webbing 2 pieces batting, thin like warm and natural 15"x 10" -not meant to cover whole bag From these items you want to cut you're fabric into these measurements: 2 pieces batting (thin like warm and natural) 15"length x 10" wide 2 bag pieces 15"length (left to right if using directional) x 20.5"wide (up and down) 2 pocket pieces 15"length x 16.5" wide cut webbing into two 1 yd pieces Now you're ready to start! First fold pocket piece in half and press, then you're going to layer your pieces You should have 2 sets of these sandwich like sets.. Next take one set and pin one of the webbing yards, to make the straps. Starting at the bottom leave about 4" between each strap. do this to the other set, so both look like this.. Now you're going to stitch the strap to all 3 layers, starting at one cut end of webbing, sewing along the edge of the strap. You will stitch pass the pocket and up to where your batting edge ends. (this will allow the fabric to show at the top above the pocket when finished) Pivot your bag with needle down and sew the other edge of the strap back down to where you started. This will tack down both edges of this strap. Repeat this to other side of strap on same side of bag your working on. Repeat to other bag side. Once both are complete you are half way DONE! Now layer the 2 bag sides one on top of each other right sides together. At this point your straps are loose on the inside of the bag, just make sure to keep them out of the way, when you sew. Pin together leaving a 5" opening at the top center. (remember sewn straps are at the bottom of the bag) Stitch 1/2 inch around all 4 sides. Remembering to leave a 5" opening. Now you're going to shape corners of bag and lining. (bit tricky) You're going to open up the corner and press it down so it looks like this. then pin it and measure 2" from the point and about 4" across and sew along that 4". Do this to all 4 corners. Does you're bag look like this? (TIP before you cut the corners I would make sure that the lining fits great, just in case you need to make some adjustments...I'm talking from experience) NOW slowly turn it inside out, and if you're lining sits great, then go ahead and cut the corners. You can now stitch closed the lining (the 5" opening) with a small stitch.. and lastly you're going to top stitch the top of the bag...Remember you're top stitching so make a bigger size stitch, like a 4.0 would be great.. isn't this cute? my friend made this one for her little girl.. even her inside looks so professional.. Now both of these bags used the same pattern, but obviously they turned out a little different..(I think my bag measurements were a little off.. to my defense it was about 7pm and my brain shuts off at 5p...) but they both still look good. so with that said if you bag comes out a little bigger or smaller it will still do it's job and know one will know but you.. Go and make some and send me pictures. I would love to see what you can create! My elephants bag was made from Daiwabo Japan Fabric, Tip Top Elephant Walk grey, lightweight Cotton canvas and zag stripe chevron in pink. Friends bag made from Patty Young Sanctuary line, Aromatherapy sherbet and glass tiles sherbet from lining.. all fabric can be found HERE and batting and webbing can be found at any local fabric shop. I got mine from jo-anns. Our bags finished size (yours could come out slightly different) width 13.5" height 10.5" including handle 16" high depth 4"..

The finished measurements of this bag are approximately 14¾″(37㎝) W × 11½″(29㎝) H × 4″(10㎝) D.

DIY Fabric Crafter Organizer Bag Free Sewing Patterns

The good season is approaching - or at least I hope it is! - so it'd be good to have a nice bag ready. This shape requires little cutting and sewing, because it's a long narrow stripe. It's fun and quick to plan and weave, but any other long stripe of fabric will do. This is how the stripe is folded to obtain the bag - the proportion between handle and bag can be varied, depending on how you are used to carrying it. The finished stripe is about 17cm wide and the total length is about 230cm, not including the inside pocket. If you want a pocket, you have to plan a little more warp length, in order to have an extra fold that you can keep to the inside (or even the outside!) of the bag. If you like, you can round the corners at the bottom and add a nice lining - this one is made of cotton and goes in the washing machine with no problem. Happy weaving!

Copy Right Anne Ibach 2021 (I’m really happy that a lot of people are making this bag! Since it’s free, when you post a photo of your bag on social media, please credit me, use the hash…

This tote bag pattern comes together in just 15 minutes. Click through for a quick and easy tutorial that is perfect for beginners.

Looking for other crafty inspirations? Check out the patterns I have for sale in my Etsy Shop. Here is a little tutorial to show how I make my quilted fabric wallets. There are quite a few tutori…

The designer of this tutorial on how to make her Fold-Up Tote Bag has been very kind and given us all her tutorial for FREE. She even shows you the best way

This is a tote bag in which the inside of the bag is divided by a zip pocket. The outer and lining of the bag hold the zipper pocket together, giving the bag

Easy Boston Bag Sewing Pattern Have you all made box pouches at least once? Today, I will introduce a Boston bag with a simple design simi...

Large Fabric Wild Flowers Tote Bag Free Sewing Pattern

This no sew t-shirt tote bag made from old t-shirts can be whipped up in just ten minutes! It's perfect as a DIY tote or farmer's market bag...

Block print a plain bag Printing on fabric is so much fun and you get to show off your work everywhere you go with this simple tote ...

Easy bags to sew! A bag has simple seams, can be made from just one or two fabrics, and most are super quick and easy sewing projects.

This handy tool is needed for all kinds of sewing projects. Get the easy to hold seam ripper that Amazon reviewers swear by! DIY Denim tote bagHere is…

How to use scrap fabric in quilt patterns! Use these tricks to make Suzy Quilts patterns with recycled fabric and make a scrappy quilt.

Are you looking for that special something for Mother’s Day? We have a solution to your problem: a lovely, easy-to-make tote bag. It's perfect for carrying

DIY WINDMILL TOTE BAG Here's a nicely designed handmade bag. It was called a windmill bag because it looked like a windmill while making...

Simple lined tote

We learned to do crumb quilting some time ago. This time we’re going to use the crumb quilt pieces to make a tote bag. If not interested in making the bag with fabric scraps you can make it w…

In this post, I'll guide you through the process of making a zipper closer tote bag for travel. Whether you're a beginner or an experienced sewer, you'll find

These triangle totes are handy-dandy little things. Use them to hold make-up, coins, little toys, a handful of crayons and a small notebook - anything you can think of. Materials you'll need for all three pyramid bags: Two fat quarters of contrasting fabricThree zippers - 7 inch, 5 inch, and 3 inch (follow package instructions
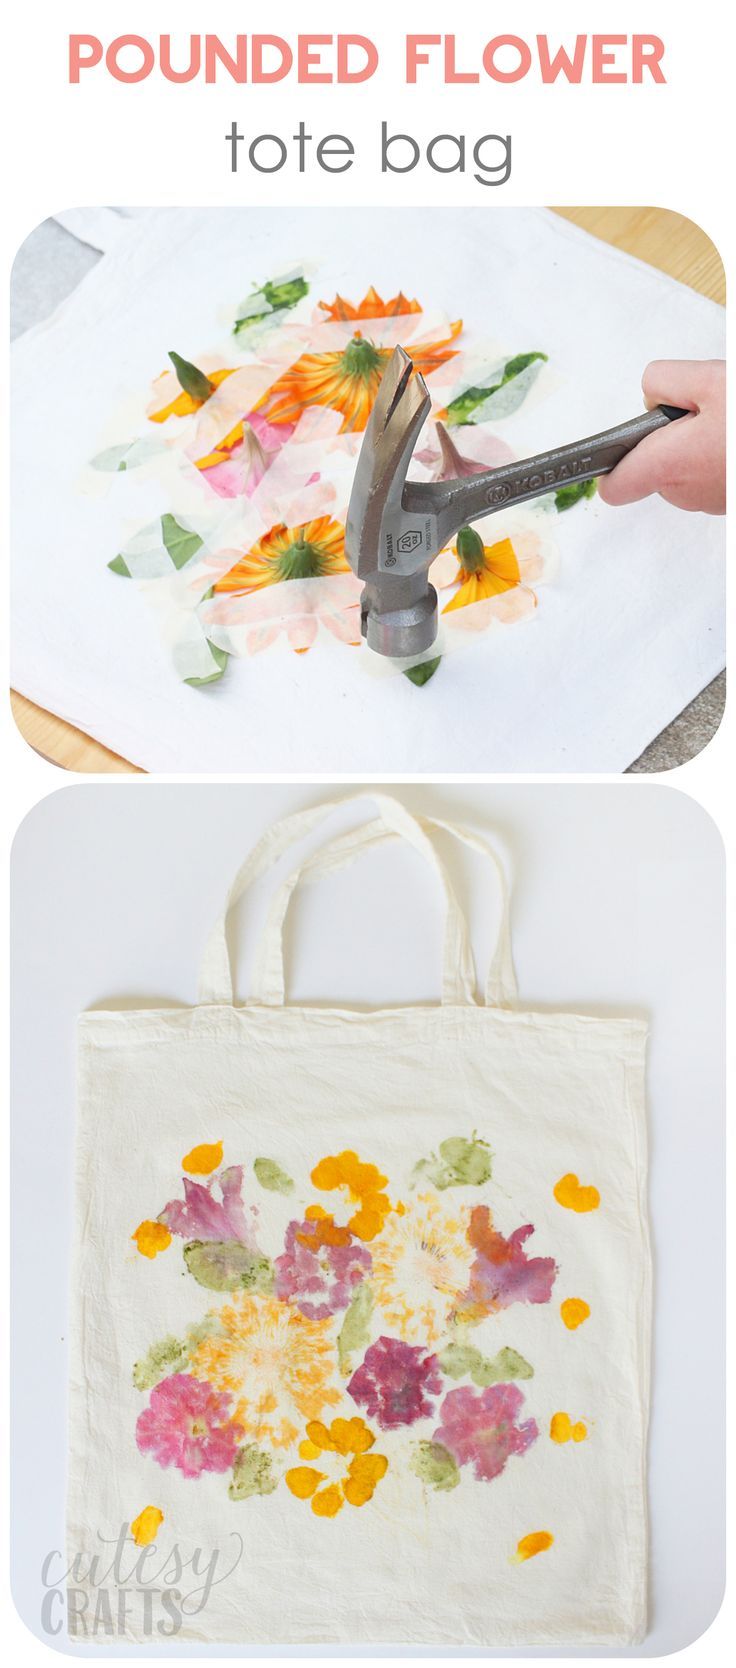
Did you know that you can dye fabric by pounding flowers? This unique flower tote bag makes a perfect gift - and kids will love making it!

Adding a rigid bottom to a bag adds shape to the bag and helps to strengthen and stabilize the base. Items can then be arranged more easily, and heavy items can be carried without putting too much…

Hi Everyone, Well, my first day of spring break was completely unproductive. But it felt GOOD to be unproductive! haha! Thank you so much for all of your positive feedback and comments on my finished project. I really appreciate them. I am very excited by how Finding my Marbles turned...

Quilted Duffle Bag Free Sewing Tutorial

Here is the tutorial for my Origami Market Bag in case you missed it the first time over on WhipUp. I decided to whip up a simple tutorial for a handmade market bag called “The Origami Market Bag”. The name is taken from its unique folding technique. It makes up in a flash and is nice and roomy for all of your market treasure. My version of this bag was originally based on a bag I received many, many years ago that was handmade by a family friend from the Philippines. That first bag was made from old cotton rice sacks (similar to vintage flour sacks) and the handles tied in a knot. Not long after receiving it, I made my own bag using a couple of bandannas sewn together. In the years since, I have seen many versions of this very simple bag. Many variations of it have shown up as craft trends come and go, then come around again. I have seen similar patterns in vintage craft books, Japanese craft pattern books and high end leather bags on the runway. I have even seen some in macramé! This is my updated version of that original bag that I received years ago. You will need fabric, thread, scissors and a sewing machine. For the fabric, I suggest something a little heavier such as: canvas, linen, denim, or home décor type weight. We start off with a piece of fabric whose length is 3 times the width. I found using a piece that is 17” X 51” (43cm X 130cm) makes a good size bag; you can play around with sizes if you like. Once you have cut your piece of fabric to size, hem all of the raw edges. (In the following photos I’ve used a smaller piece of unfinished fabric just to show the folding technique) Start by laying your fabric with your hems facing away from you and follow the folding technique as shown below. Now pin and stitch as shown for both sides of the bag. I used about a 1cm seam allowance. It is ok if your bag is a little off center, this may happen if your hems are not perfectly even to one another. Now that you have sewn your 2 seams, you can leave the bag as is for a nice triangle shape, or you can create some shape by sewing boxed corners, or simple angled corners. Now turn your bag right side out and press if needed. The next step is to create the handle for your bag. I used some coordinating fabric for a handle. Cut a piece of fabric that is 3.5” X 6.5” (aprox. 9cm X 16.5cm) turn under and hem the 2 short sides of this piece. Fold the piece in half length-wise with right sides together and stitch raw edges with a ¼” (just under 1cm) seam allowance and turn right side out creating a tube. Take one of the long top triangles of your bag and thread it through the tube of fabric as shown. Overlap the other top piece with the bit you have threaded through the tube and pin. Now stitch in place. Slide the tube over the stitched overlapped section and center it. Ta Da! You now have your very own Origami Market Bag! Go ahead and make a few more, you know you want to! Please note, this tutorial is intended for personal use only. Therefore, do not reproduce, sell or commercialize in any form. Thanks for understanding!

Join artist Amanda Whited for a digitally-led Fabric Manipulation Workshop, exploring fabric manipulation techniques to craft a personalized lumbar pillow cover. From ancient smocking to contemporary gathering and tucking, this workshop unlocks the world of three-dimensional textile art. Embrace creative play with ample room for exploration, crafting a pillow cover using your design composition that perfectly complements your home and personal style. Bonus materials encourage extending newfound skills to embellish tote bags, clothing, and more. Whether you're a seasoned enthusiast or a beginner, construct your personalized pillow cover with simplicity and comfort, choosing from two sizes and utilizing a sewing machine or hand-sewing for flexibility. This digital class includes: A detailed digital workshop led by Amanda Whited Digital download with written instructions to complement the video tutorial Please note: This listing is for video-only workshop access. Materials are not included. If you would like to purchase the FULL workshop (video + curated tools and materials), click here: GET THE FULL WORKSHOP

I made a tote bag with zip closer today. You can see how to sew a recessed zipper in a tote bag. It's easy to sew and convenient to use. And I've shared a

La sérigraphie textile est une technique d'impression très ancienne et remise au goût du jour par les créateurs. Elle est incontournable et doit être absolument connue des graphistes textiles.
