

We invite you to cast a quick glance at the DIY driftwood decor ideas and simple glaze at the immense beauty showcased by the piece of wood, glaze at the tremendous amounts of details organically developed along a few centimeters and wonder how world`s most extraordinary architect, nature, could have realized it better.

Wood is one of the easiest materials to work with, it can be shaped in any desired form, morphing your most imaginative thoughts and transforming any ambiance t

Because some stuff on the beach is just too good to leave behind.

What better way to dress up your cottage than with a piece of art made from driftwood? There's nothing more rustic than wood that's been washed ashore by

Driftwood recycling ideas can inspire anybody

A great summer craft project.I've been wanting to make driftwood sailboats for quite some time and finally I did it this week … diy driftwood sailboats.

Been to the beach lately? My favorite beach activity is collecting driftwood. I love its weathered, rustic look that makes great DIY home decor. But, first, how do you clean and preserve driftwood? Read on for tips to get rid of the salt and junk from the ocean so it will last for years.

Welcome to my decorating and e-design blog! I'm a Sherwin Williams and Benjamin Moore paint color expert offering affordable online decorating/design consults.

What can I say... We had such an amazing day! Exactly the way we had wanted it, great weather and all the people we love! Because I am who I am, I made a lot of the decor myself. Here are some images captured by Wonkyeye Photography. My beloved bouquet! Made from coffee filters, maps and sheet music. Ribbons tied to the cedar archway on the beach. Place cards waiting to be picked up. Table numbers also created from maps. Mason jars filled with sand from the beaches we have been to together. A candle lit in each one. The driftwood centerpieces made into candle holders with the help of a friend and the right tools. Instead of a guest book, our guests wrote in these little notebooks with lots of good...and fun ideas.

Sea Glass, also known as beach glass or mermaid tears, is a shard of glass that can be found on just about any coast in the world. The pieces of […]

There’s a certain feeling that comes from creating something with your own two hands. No matter what it may be, the time and effort put forth always leaves a reward, and the satisfying feeling of accomplishment. The art of weaving is one of those things that takes time and patience. I’ve always been drawn to […]

Artist Michelle Dickson has transcended the boundaries of what a self-portrait can be. In her current surrealist sculpture series, Neither Mine Nor

Human faces created with driftwood show a unique talent and love for natural materials

As predicted, I have been spending more time outside than in. This year I am doing better at balancing time though, and have managed to complete a few projects a long the way. Soon I will be ready to list a batch of jewelry on my etsy store, and that will be a milestone... My garden is slowly filling in, getting better each year. This has been a spectacular year for flowers. Here are some scenes from yesterday morning in the garden... Come through the garden gate with me... I call these peppermint roses. It is an ancient vine that climbs up the trellis over the gate. In the fall it is full of the most wonderful rose hips. Last winter I brewed tea out of them and instantly felt healthier! Vegetable gardening has never been my strong suit, and here, between the moles, gophers, deer and crummy soil, it is really frustrating. This year I am container gardening veggies. My cherry tomato already has baby fruit. I have some peas and beans in containers out front of the bus where they get full sun and am converting my garden area to herbs and flowers just for the joy of it. As you will see, it is coming along nicely. The iris's are spectacular this year. Some wonderful yellow ones opened today, but I have not taken pictures of them. I received a bag of rhizomes last year and stuck them here and here. It turns out they are all different colors, and oh so beautiful. Need I say more? I keep as many things in the garden as I do plants. Decorating life is one of my favorite things. Last year I made a short bed border out of half buried bottles. This year they became little terrariums! This is the view into my garden from my 'bedroom' window. Since we live in a bus it is all one room, but up front, where we sleep overlooks the garden. If you look close you can see part of the bed border I put in with different plates. Its kind of fun. Last fall I transplanted a bunch of strawberries and they are kicking. I ate the first ripe one today. There are about 25 plants and they are all full. Hopefully the birds and rodents will save a few for the girlies and me. Our bus is behind this breathtaking rose vine. The blooms start out a sweet pink and turn a lovely lavender as they fade away. It only blooms for a couple of weeks a year, but is certainly worth the wait! The structure in back with the slide is the home of our future chicken coop. Our landlady has purchased nine chickens and my husband is in the process of converting an old play structure into a chicken coop with a large wired-in yard all around. The slide is going away... I am on chick duty this weekend. They have gone from little balls of fluff to this in a matter of weeks. In a couple of more they will be ready to move to the coop and in six months should be blessing us with eggs. Life doesn't get much better! In between gardening and creating I managed to give a minor face lift to our bathroom. We are in the process of remodeling everything so anything I do is temporary. It works for me. I used the staple gun to put up the map 'wallpaper' and elmers to cover the old dresser. I looks much better than it did! In April my little granddaughter Melanie had her ninth birthday. She is on a horse kick and wanted all horse stuff, and her own tools. She likes working with my husband in his shop. So we put together a tool kit for her and I covered a carrier to keep them in, and made her a horse poster collage to hang above her bed... Being of the Orthodox persuasion, we just celebrated our Easter, or Pascha, the first weekend in May. Here are some eggs I managed to get together for my five grandchildren. They have a little tree they hang their egg collection on. These filled it out nicely. During Lent this year I decided to spend much less time on Pinterest. I do love it so, and have gotten so many incredible ideas out there, but was spending way too much time looking and far too little time doing. I have piles and piles of mending and vowed to spend the time I would on Pinterest sewing on buttons and patching holes, some of which I did do...but I also did some altering of clothes just for the fun of it. This sweater looks better on and was so much fun to put together. Our Pascha celebration begins at 11 at night and it is always chilly, so it was perfect to wear on that special night. This vest was made for a cardigan. I really liked the color and stitching but it was too big so I cut off the sleeves (and made leg warmers out of them) and added trim and the two big pockets because in my opinion clothes without pockets are worthless. I made myself these earrings our of copper sheet, rusty dresser lock plates and old clock hands. They go good with my new vest and one of the green feather necklaces I made. The next few pictures are of a couple of mobiles I made this spring and have listed on my etsy site. I have a third one completed but have not photographed it yet... And here is my newest passion...tin Just this week I finished these three 'medals' that I am going to list for sale. They are made from vintage tins and embellished with a variety of treasures. The inspiration came from none other than Pinterest, but as with all my creations, are given my own spin. Today I started my next project, a tin circus necklace with bottle cap bezels. It should be cheery and fun when done... I guess I have been accomplishing more than I thought! I feel like I never have enough time at my studio...but now that I see my blog I realize I have been more productive, and that is a good thing. Until next time I wish you happy creating...

Debra Bernier is an extraordinary artist from Victoria, Canada. She uses natural materials, such as driftwood, clay, and shells to create mesmerising sculptures. These intricate pieces represent the spirits of nature as human fusing together with the natural material. "When I work with driftwood, I never start with a blank canvas. Each piece of driftwood is already a sculpture, created by the caresses of the waves and wind" Debra told Bored Panda. "The wood tells a story and I try to think of its journey as I hold it in my hand. I extend or shorten the curves and contours that already exist into familiar shapes of animals or peoples' faces."

“When I work with driftwood, I never start with a blank canvas. Each piece of driftwood is already a sculpture, created by the caresses of the waves and wind.” –Debra Bernier
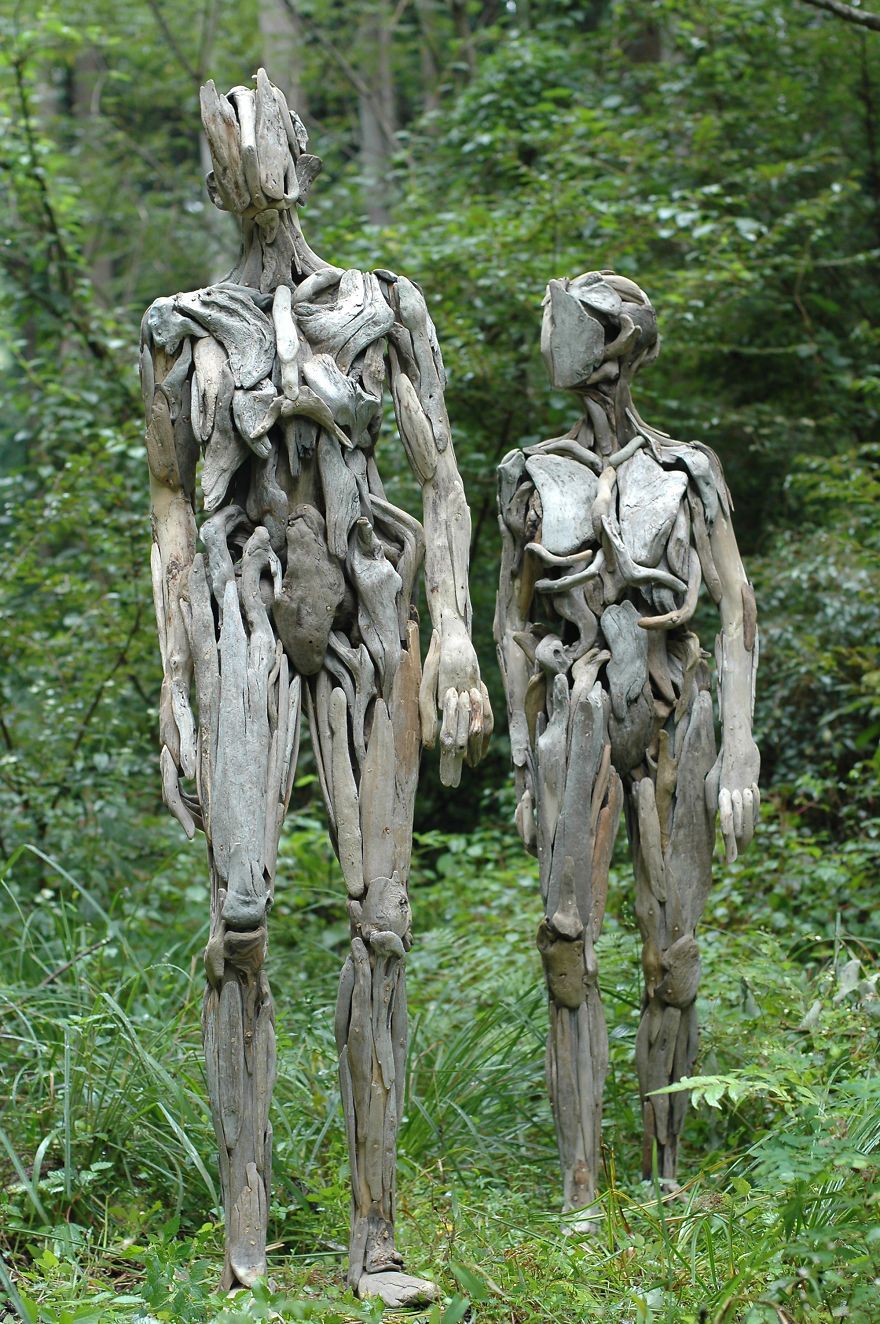
Nagato Iwasaki is one of those artists you don't know much about. But his art talks for itself. The Japan-based artist creates incredible driftwood sculptures.

Bonjour les amies, J'espère que vous allez bien et que chez vous aussi le beau temps est revenu. Que ça fait du bien ces journées ensoleillées, ça sent le printemps. Ici il met un peu de temps à montrer son nez, car les nuits sont encore bien froides,...

Calling all beach combers! Don't toss your collected driftwood. Come see 15 Driftwood Crafts you can make on your own!

Instead of throwing your egg cartons away, try these organization hacks and gift ideas from HGTV.com.

artnet

You won't believe how easy it is to give your home a makeover with these really quick, easy-to-do, wallet-friendly ideas!

IF THIS IS A GIFT PLEASE CONTACT ME SO I CAN SET UP THE RECIPIENTS ACCOUNT WITH FIRST AND LAST NAME AND EMAIL, THANKS! For immediate access to this class COPY & PASTE this link: https://www.artsybohemian.com/soldering-101-sales-page THIS IS AN ONLINE CLASS. NO KIT IS INCLUDED, NO PRODUCT WILL BE MAILED. When you purchase this course, Etsy will send an email with a PDF download information page with specific details and instructions to register for the classroom at ArtsyBohemian online school. Once you have followed the instructions, Robin will set up your class within 24 hours usually a lot sooner, which activates an email from the online school to set up a password to access the course. Once you have enrolled in the class and registered, all the course materials, supplies, resources and video instruction are made available for you to use online. This is a self STUDY course with no expiration date! **IMPORTANT** The email address used for your Etsy checkout (usually your Etsy user account) is where all correspondence is directed to access your class. If you need to send an alternate email address, please contact me before you purchase. Thanks! IF THIS IS A NEW HOBBY FOR YOU, PLEASE KNOW THAT YOU WILL NEED TO INVEST IN TOOLS AND SUPPLIES TO COMPLETE YOUR SUN CATCHER. Please note: This class uses a soldering iron and lead free solder. This is not a torch soldering course. This course is designed for beginners and intermediate students. Do not purchase this course if you have several years of experience soldering, unless of course you want to! Have you always wondered how to make those pretty little charms with metal around them? Well let me illuminate you! With over 10 years of teaching this fun craft you’ll finish this this class with a large basket full of techniques and a beautiful project (FYI this sun catcher has been pinned on Pinterest close to 500,000 times and counting)! Even if you are seasoned or need to dust off your iron, I guarantee you’ll learn something! Expect to make dozens of charms including how to solder a glass vial, flat back marbles and charm sandwiches! Even though this class is geared toward making the sun catcher it really is a lot more than that. All of the techniques I teach will start you on your way to make your own artisan jewelry and ornaments to sell if you wish. The first part of the video series we’ll learn what soldering equipment I use and the safest materials for this type of soldering. You will also learn the following: *How to drill holes into the drift wood and attach head pins to hang the chain and samples of other things you can use instead of drift wood. I’ll also demonstrate how to attach the hanging wire. *How to prepare “simple” charms using game pieces, dominoes, “hole” less objects, small rocks and more with copper foil tape. *How to solder the simple charms and attach jump rings in an efficient way (my exclusive jump ring secrets). If you’ve ever soldered and quit because you couldn’t attach the jump rings I’ll get you over that hump. *My one simple trick to make sure your soldering tip will always be tinned and you’ll never have to use toxic sal ammoniac to clean it! *Once you’ve mastered the simple charms (games pieces, small rocks etc) we move onto charm sandwiches (2 pieces of glass with something sandwiched in between) and all the variations of charm sandwiches and ephemera to use inside them. * How to solder small glass vials and 3 different ways to solder them. I’ll show you how to make a wire “basket” handle along with 2 other secrets to enclose the lid. *How to patina your charms to age them (optional). *How to avoid common mistakes with regards to soldering and what to do with the “bad” charms. *How to wire wrap the charms and make your own jump rings to attach to the chain. We’ll finish by attaching everything to the driftwood. Why should I take a class with you? Here is what I can offer: 1. Short cuts and tips, from over a decade of soldering and jewelry design. 2. A library of tested resources, 3. Detailed step by step instruction. 4. High definition video presentation that you can watch over and over again from the comfort of your home. 5. The experience imparted in one course from me is worth thousands of dollars and countless hours because..... All the soldering and jewelry making mistakes I’ve made are your victory. Meaning you probably won’t make the same mistakes I did because I’ll show you how to avoid them. Even if you do make mistakes I’ll show you how to make it pretty! I eat, live and breath my craft, every day. Decades of accumulated knowledge, teaching and making. It’s what I do and now I’m going to show you that you can do it too. Who is this course for? Anyone and everyone, beginners to advanced, with a sense of adventure and a can do attitude. Anyone who wants to start a new hobby or brush up on skills to the serious artist wanting to make a living selling artisan products from skills learned in my class. Who this course is not for: If you have many years under your belt with this type of soldering or don’t think you can learn anything new or you solder consistently this class may not be for you. FREQUENTLY ASKED QUESTIONS (FAQ’s): I’ve never soldered before can I still take this class? YES! I cater to newbies and seasoned solderers alike, plus you can re-wind any segment a zillion times until you get it! Will there be an online forum to ask questions? YES! There is a Facebook group for all of my online classes to share successes and concerns. I want to buy supplies so I’m ready when the course starts is there a supply list? YES! Once you purchase the class I will send an email with all the resources to purchase materials and tools and everything you’ll need to start. I’ll also have recommendations for online and brick and mortar sources. I’ve never taken an online course how does that work? When you sign up for class you’ll receive a password within 24 hours that will allow access to the classroom. Think of it this way, when you take an in person workshop, you drive (or fly) to the workshop location and enter the classroom, sit down and take the class only for this class you don’t have to fly or drive anywhere and you can turn on your device or computer in your jammies and eat cereal while you watch the instructional videos! If you know how to turn on your computer or phone or ipad and are familiar with the internet or have bought things online or have any social media you should be able to take a course online no problem. Will you have kits? No, however you will be provided with resources to purchase the tools and supplies you'll need. This is an online class. Your receipt will be your paypal or credit card invoice and access to the class will be your paypal or credit card email unless specified otherwise. After you purchase the class you will receive an email with in 24 hours (usually a lot sooner) with access to the classroom. All pictures above are class samples and for example only. FYI you will need a computer or device that is connected to high speed internet or wi-fi to view this course.
