

Got an awkward under-stair space but also an adorable pup in need of their own domain? Transforming that odd unfinished area into a cozy canine retreat is a great option! In this article, I'll share

Available in 8 colors, this classic chunky Cable Knit Turtleneck Dog Sweater will keep your fur baby warm on cold autumn/winter nights. Made of 100% Cotton, this thick sweater comes in 4 sizes and is suitable for small dogs weighing up to 13 lbs. Product Description: Available in 8 colors Cotton polyester blend Machine washable Pullover design Sizing: Designed for small dogs weighing up to 13 lbs. Please measure using the Size Chart below before ordering, allowing an extra ¾ inch-1¼ inch (2 cm-3 cm) for some wiggle room Available in S, M, L and XL When in doubt, or if between sizes, opt for the larger size Size Chest Girth (cm / in) Back Length (cm / in) Reference Weight (kg / lbs) S 24 cm / 9.44 in 27 cm / 10.6 in 1-2 kg / 2.2-4.4 lbs M 30 cm / 11.81 in 31 cm / 12.2 in 2.5-3.5 kg / 5.5-7.7 lbs L 34 cm / 13.3 in 41 cm / 16.1 in 4-5 kg / 8.8-11 lbs XL 37 cm / 14.56 in 44 cm / 17.32 in 5-6 kg / 11-13.2 lbs

Dog crates can be expensive and/or ugly. Build your own DIY dog kennel to suit your decor and size/breed of dog.

Anyone who owns a dog knows that dogs can get dirty quickly. Especially during the muddy season. For these days, having a dog wash station at home is what some …

From dog bowls, pet beds, toys & tech, to pet gates, doggy doors & more. Check out our dog room decor wrap-up for all the best dog room decorating ideas.
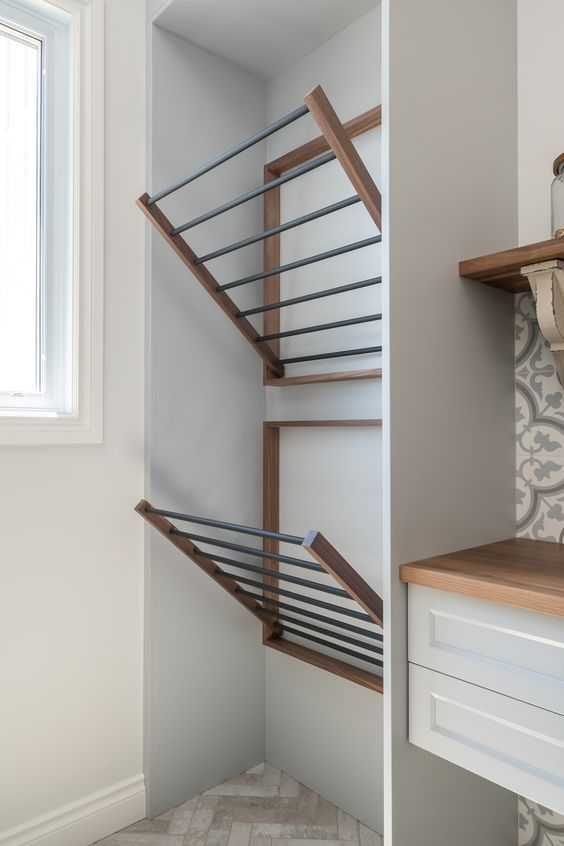
In this guide, we'll delve into over 29 meticulously curated laundry room ideas that promise to revolutionize your space. Laundry rooms often get the short end of the stick when it comes to home design

Got an awkward under-stair space but also an adorable pup in need of their own domain? Transforming that odd unfinished area into a cozy canine retreat is a great option! In this article, I'll share

Veja ideias de como incluir o espaço dos bichanos na decoração da casa

Does your pup need space? Give your dog a relaxed, elegant and playful area with your DIY ideas for a dog room.

Tem coisa melhor do que se jogar em um puff gigante? Confortável e macio, esse é o elemento que faltava para deixar seus dias mais relaxantes e, porque não, um pouco mais preguiçosos também. Mas antes de levar o seu para casa, confira as dicas e ideias de puff gigante que separamos aqui nesse post.

How to make a giant cork board for under $100.

Does your pup need space? Give your dog a relaxed, elegant and playful area with your DIY ideas for a dog room.

If we could build the perfect room from scratch, what would it look like? What features would it contain? Let’s have ourselves a little daydream… You ever notice how, far more so than an ability to perform high-level tasks, it is the most mundane ones that test and/or reveal a person's intelligence? Forget about astro

Dot to dot printable worksheet for numbers 1- 33: drawing a dog. Browse more dot-to-dot worksheets.

Dog Paws Stepping Stones: I wanted to put stepping stones from our walk gate and could not find ones I like so ...... I made them. The idea I had was to make dog paws and as the idea evolved personalizing them with all of our past and present pets became a part of it. Making…

New! Our super cute hand painted sausage dog illustration features beautiful Liberty of London details on the coat. We offer a large choice of Liberty print fabrics - please see images for choices and select your favourite or the one that you think will best suit your theme/room. Each print is lovingly hand finished & crafted in our Cheshire studio. Should you require please type your details into the personalisation box. If you would like the text 'keep rollin' please specify otherwise it will come blank. made from: Liberty 'Tana Lawn' Cotton on a beautiful 275gsm lightly textured paper stock. dimensions: A3 Portrait - H42cm x W29.7cm OR A4 Portrait H29.7 x 21cm Framing not included. All of our prints are perfectly packaged in a protective cellophane sleeve with added board support within a sturdy envelope. We are confident your print should arrive in perfect condition, however should any damage occur during postage please contact us and we will be more than happy to send a replacement. Wendy x

This a cute Free Vintage Dog Image! This one is an Antique Victorian Scrap Die Cut piece.

Welcome to ArtDeco - Printable digital collage sheets on Etsy. ArtDeco Printable Images are great for your art and crafts projects. This is a digital item, no physical item will be shipped. You can print these images as often as you like. These vintage dog prints are from a 1950s encyclopedia that was originally from the twenties so I'm not sure exactly when these dogs were illustrated. They have a nice vintage charm to them. The dogs on this page are the toy dogs, the Maltese, Papillon, Pekingese, English Toy Spaniel, Yorkshire Terrier, Miniature Pinscher, Toy Manchester, Toy Poodle, Pomeranian, Toy Manchester, Chihuahua, Brussels Griffon and Pug. This is an instant digital download! You will receive jpg files of these images in the email you have registered with Etsy, shortly after you purchase the listing. They are high quality 300 dpi files that will print out nicely at 8 by 10 inches. ````````````````````````````````````````````````````````````````````````````````````````````````````````````````````` SAVE MONEY ~ use coupon codes: Spend $15 and receive 20% off - Enter the code: FOR5FIVE Spend $20 and receive 25% off - Enter the code: FOR10TEN …or take advantage of the special deals that I have featured on my home page. It's a good value! Just go to my shop's home page and click on one of the featured package deals, from there you let me know which images you'd like. ********************************************************************************************* Reviews from happy customers: "High quality print. Excellent personal service from the seller." "excellent art - exactly what i was looking for. great price, great item." "So easy to download and a great quality that I can use for multiple sizes and purposes." "The image is perfect- very clear!!!" "Super fast service and the images are amazing (I use glossy photo paper to print mine). Thank you, I will be back for more!” ********************************************************************************************* See more vintage images on social media: Instagram: artdecodigital Pinterest: redbudart Tumblr: redbudart

Does your pup need space? Give your dog a relaxed, elegant and playful area with your DIY ideas for a dog room.

A blog about art making and art education explorations in a humble art room for adults and kids of all ages.

Download this Premium Vector about Cute Dog Coloring Page,Dot Markers Activity Paint Daubers For Kids., and discover more than 15 Million Professional Graphic Resources on Freepik

Happy Dog Spice up your space with our unique dog print wallpaper mural. This black and white dog portrait wallpaper mural are suitable for a variety of rooms. Why not add some cool personality to your bedroom, living room or your child's room to give these space a fresh new look?

I've been wanting to do this project for ages, ever since I saw it on the blog [email protected]. You can find Natalie's original post here. After many illustration and painting projects under our belt, I wanted to do a paper art project with my kids, and knew this one would be perfect for all ages. And boy, was it fun! Be aware that this project is rather time-consuming, as it requires many steps and is done on a large format. It took us three 90-minute classes, but it worked out well, since we lumped the three main steps into one class each. Day 1: Students chose to do either a cat or a dog (large or small breed). I prepared tracers of cat eyes, dog eyes, cat nose, and a small and large dog nose. I used simple cardstock for this. I don't usually use tracers, but felt they were fitting for this projects since the focus was really on pastel blending, painting for dimension and definition, and collaging, and the tracers really saved us a lot of time and effort in an already lengthy, multi-step project. Students traced their eyes and nose on good watercolor or acrylic paper. Eyes were colored using 3-4 analogous oil pastel colors. Starting at the outer edge of eye ball with the darkest color, students colored a ring of color always coloring in the direction of the pupil. The next lightest color was applied in the same way, but slightly touching the first ring of color in order to have the two colors blend. The third and fourth colors was applied in this same way. This process created slightly blended colors where one color ring transforms into the next, and it really looks like the streaks of iris color. You're best off watching Natalie's eye coloring tutorial here. Once irises were colored, black acrylic paint was used to color in pupils and the outer edge of eyes. Reflection spots were added in white acrylic paint. The dog nose was painted using black acrylic paint with white, to create grays. Cat noses were painted with red with white, to create pink. Highlight spots were added here too. Watch Natalie's nose painting tutorial here. This was all we managed for day 1. Day 2: To hugely save on time and cut down on mess and waste, I had prepared and pre-torn strips of paper is various colors, patterns and textures. I used as many different kinds of paper as possible for maximum interest - atlas paper, book paper, painted paper, printed/stamped paper, deco paper, wrapping paper, graph paper, dotted paper, colored construction paper.... and I had my (biological) kids help me create paper using different mediums (watercolor resist, printing with stamps, painting with stencils, scribbling and drawing, printing with bubble wrap and other found objects, etc). I then tore these up into long strips. You could do this step on a separate day with your students (the kids would love it) but I was pressed for time. So, day 2, students were given a large 50x35cm black paper and were told to collage strips of paper in as many different colors and patterns as possible (mindful of balance and harmony, so perhaps repeating a few colors and patterns here and there). Strips should head towards the center and go slightly beyond the edge of the paper. We used acrylic gel medium for our glue. As always with gel medium, we glued under and over, which really helps to firmly seal our strips. This process took nearly the full 90 minutes of class. Collaged strips Day 3: We glued our eyes and nose onto our collage paper. We had many visuals of dogs and cats at our desks, to helps us visualize the facial order, features, texture and fur of our animals. We noted that with animals (and people), eyes are generally placed only as wide apart as the width of our noses. We glued these down and went over them with glossy acyclic gel medium, which gives our eyes and nose that glossy shimmer. Then it was time for adding definition, dimension and texture, and to make our eyes and nose harmonize with and look like they 'belong' to our collaged background. Using only black and white paint (and creating our own grays), we defined our eyes, created a snout shape and chin, considered dimension and facial structure. Again, we looked to visuals of cats and different dog breeds for inspiration. Cheeks, chins and snouts were pushed forward in that we used more white and light grays here, while eyes were pushed back in that we added more black around the edges. Using feather brushes and other fur-rendering paint brushes (fan brush, wisp brush), we added furry lines and texture around eyes, forehead, along the edges of our snouts, and anywhere we wanted that furry look. To make the eyes less 'startled' and to give our eyes more character, we painted over the upper edge of the iris. This softened the look a bit. We even abandoned brushes and used our fingers to finger paint some definition here and there. Fun! All my ages groups, from age 6-14, really enjoyed this multi-step process.... perhaps without even realizing just how much learning was happening! A real winner of a project! Thanks again to Natalie from Elementaryartfun.blogspot.com for the awesome inspiration! Ages 8-11 Ages 8-14 Ages 6-7

When customizing our cabinets, we worked with our cabinet builder to create a built-in hidden dog gate, perfect for our family!

Part of our fabulous new range of wallpapers. Our new colourful dog wallpaper is a wonderful statement piece, featuring an array of dog breeds in different colours, set against an off white background. This wallpaper makes a wonderful addition to a dog lovers home, and would suit any room, it would also make a lovely children's wallpaper. Roll Size: 52cm x 10m Repeat size: 52cm Printed onto premium toll non-woven wallpaper. Delivery information: Our wallpapers are bespoke and printed to order we advise delivery can be up to four weeks. All tracking information and a delivery window will be sent to your contact details entered at the point of order. Wallpaper Instructions: Please read these instructions carefully before hanging this wall covering. It is advisable that a professional decorator is used. Preparation Walls should be dry, clean and even. Remove any old wallpaper and loose paint. Roughen painted surfaces with sandpaper. For best results we recommend that walls are cross lined using a good quality lining paper. Sizing the lining paper will aid adhesion. Lining should be allowed to dry out completely before hanging the wall covering. Pasting and Hanging This is a paste the wall product. The decorator should paste the wall and not the back of the wall covering. A good quality, solvent free, fungicide protected ready-mixed ‘tub’ adhesive should be used. Paste should be evenly applied to the wall to hang one length at a time, to an area slightly wider than width of the paper. Butt joints and use a decorator's brush to smooth down the wall covering, working from the centre to the edges to express air bubbles. Avoid squeezing paste out of the joints and ensure paste does not get onto the brush or roller. No paste should be allowed to come into contact with the surface and hands should be kept clean and dry whilst hanging the wall covering. Paste will damage the surface. The company cannot accept responsibility for marks or damage caused by paste. Should any paste have been allowed to come into contact with the surface, it should be lightly sponged whilst still moist, using a clean damp sponge. This information has been supplied in good faith, but without guarantee. Site conditions are beyond our control. It is the responsibility of the buyer to ensure that the environment is suitable for the wall covering. If need help calculating how many rolls you need, we recommend using B&Q’s calculator.

Printable 3D pattern art dog craft for kids. Make a cute doodle art dog with pointy or floppy ears using our template

Make bath time more comfortable and convenient for you both — and keep the mess out of your house.

Every family member deserves a room in every house that includes your four-legged pet. Give them a safe place to rest with these 39 best indoor dog kennel ideas that we gathered from the internet for your inspiration.

It never fails that I come across something eye-catching each time I scroll through Pinterest. You too? One recent morning it was the winso...

Michel Keck This was our big FINALE project of the 'Art Room' year. It incorporated so much of the learning and techniques we had explored over this last year, with a particularly strong focus on value, texture, contrast, balance, form and variety. Our final results are absolutely stunning, especially considering these kids are between 9 and 14 years, with most being on the younger end, between 9 and 11. Michel Keck A few approaches will help students experience success, and will lead to artwork that is rich, layered, exciting and interesting. Kids aged 9-11 Kids aged 9-14 Day 1 Objectives DAY 1 and DAY 2 We looked at the work of Michel Keck, and noted her use of collage paper to reproduce the different values (lights and darks) in her dogs. To make her dogs look realistic, despite being made in collage, she often paints the eyes and nose. She also often adds a bold, whimsy contour around the edge of the dog, for contrast and emphasis. Dog Trace and Transfer: Students each chose a photo of a dog. I had printed many options for them, where the contrast of light to dark was strong. All white dogs, all black dogs, or yellow labs may not be the best option since this project, since it is about mapping out values. Dog photos were found on the internet and printed as large as possible on regular printer size paper. This will be the size students will collage on. Googling 'Dog Portrait Photography' will give you some great photo options. Using transfer paper, student transferred their dog onto their 20x30cm watercolor paper by tracing all the contour lines, eyes, nose, and the larger value 'shapes'. Collaged background in neutral papers Background: Students pasted neutral tones of collage papers all around the the space around their dog. For VARIETY, students must use different types of papers for this step. At their disposal were: book papers in various fonts and stages of yellowing, newspaper, lined paper, grid paper, butcher paper, sheet music, dictionary paper, recycled paper with hand written notes, etc. Important is that the papers are all neutral tones. Papers were torn or cut in larger pieces, to quickly and spontaneously fill up the paper. The background will be painted over later, so this stage shouldn't require too much thought or time. Its purpose is to create texture and interest in our background. * We used acrylic gel medium to paste, but mod podge would work too. The rule to gluing with gel medium is: 'glue under and glue over', much like you would with decoupage. Beginning Collage: Student chose maximum 10 types of paper which roughly represent a value of 1-10, or lightest to darkest. Limiting their papers will result is a more BALANCED and HARMONIOUS end result. Student must repeat the use of each paper for this same reason. For VARIETY and interest, students were encouraged to use a range of papers, including patterned, plain, painted, map, cools and warms, and neutrals. Tearing or cutting their papers, students begin pasting their collage papers on their dog, looking for good value matches. For example, perhaps a darker area under the chin and in the ears will be represented by a darker blue painted paper, while a lighter area in the chest and forehead will be represent by a lighter, patterned paper. A middle value might be represented by a plain pink color, etc. Important is that the value relations are roughly correct. *Tip: It's easiest to collage larger value areas first, then address the smaller value areas by layering these over top the larger areas. *Tip: Avoid straight paper edges or corners as this looks unnatural and inorganic. Tear these away. *Eyes and nose are avoided (to be painted later), but carefully collaged around. *Painted paper made the biggest different for this project. I paint my own papers, with leftover paint from our palettes after class. I paint papers in color families, or analogous schemes, to keep the colors in harmony. This way, my students can always reach for papers in the color family they need (reds, blues, greens, etc). We found that our painted paper really looked like fur, because of the brush strokes and because of the random streaks of color. It gave our dogs lots of dimension and interest. This is what our dogs looked like at the end of Day 1 and Day 2. Day 3 Objectives DAY 3 Final Dog Touches: On our third day we painted the eyes and nose. We attempted to paint these as realistically as we could, looking closely at Michel's Keck's dogs for inspiration. I encouraged the students to be inspired by the painted eyes in Keck's wok, rather than trying to paint from our photograph, because Keck's painting style is somewhat reduced, yet still realistic, and easy for the kids to recreate. Noses were painted with attention to light and shadow, and all the values in-between. Students could add a few minor black lines around the mouth area for emphasis. Using a black posca pen (in thick and in thin line), students emphasized the contours of their dogs, with some whimsy squiggles and peaks to indicate fur, just like Keck does. Background: Students painted their background in layers of paint and stamps. They could either stick with a neutral palette, using white, grey, ochre, etc., or a color palette. Our goal was to still allow hints of our collage paper to peek through here and there, and to create lots of interest and texture. Our collage papers were painted over with a thinned color. We 'lifted' paint up by scrubbing or rubbing it up with rubbing alcohol (this reveals bits of our collage papers). We created subtle texture by stamping and printing using various stamping materials (bubble wrap, wine corks, corrugated cardboard...). **Important in this step is that a similar color is used, so the texture is subtle. For example, on a red background we might stamp with an orange-red color; on a gray background we might stamp with a lighter gray. We then add more paint in sheer coats, or dabbed some more color here and there, until we get a cloudy, soft, textured, rich look. Scrumbling or stippling the paint with our brush, or smearing paint around with our fingers, works here. As long as the end result is soft and does not overwhelm the dog (our main focus), it's all good. Once we found a good balance of texture, interest and color, we stopped and were done! These results just floored me! The kids worked hard on these, but spreading the steps out over three 90 minute classes gave them plenty of time to bring it all together. I think they all loved the mixed-media and very tactile nature of this project. I special shout out to my oldest student, Marko, 14, who asked if he could do a tiger. And what a great job he did!!

Make bath time more comfortable and convenient for you both — and keep the mess out of your house.

This week, our Carmel Mountain Preschool kids created silhouettes from water color paints.

I've been wanting to do this project for ages, ever since I saw it on the blog [email protected]. You can find Natalie's original post here. After many illustration and painting projects under our belt, I wanted to do a paper art project with my kids, and knew this one would be perfect for all ages. And boy, was it fun! Be aware that this project is rather time-consuming, as it requires many steps and is done on a large format. It took us three 90-minute classes, but it worked out well, since we lumped the three main steps into one class each. Day 1: Students chose to do either a cat or a dog (large or small breed). I prepared tracers of cat eyes, dog eyes, cat nose, and a small and large dog nose. I used simple cardstock for this. I don't usually use tracers, but felt they were fitting for this projects since the focus was really on pastel blending, painting for dimension and definition, and collaging, and the tracers really saved us a lot of time and effort in an already lengthy, multi-step project. Students traced their eyes and nose on good watercolor or acrylic paper. Eyes were colored using 3-4 analogous oil pastel colors. Starting at the outer edge of eye ball with the darkest color, students colored a ring of color always coloring in the direction of the pupil. The next lightest color was applied in the same way, but slightly touching the first ring of color in order to have the two colors blend. The third and fourth colors was applied in this same way. This process created slightly blended colors where one color ring transforms into the next, and it really looks like the streaks of iris color. You're best off watching Natalie's eye coloring tutorial here. Once irises were colored, black acrylic paint was used to color in pupils and the outer edge of eyes. Reflection spots were added in white acrylic paint. The dog nose was painted using black acrylic paint with white, to create grays. Cat noses were painted with red with white, to create pink. Highlight spots were added here too. Watch Natalie's nose painting tutorial here. This was all we managed for day 1. Day 2: To hugely save on time and cut down on mess and waste, I had prepared and pre-torn strips of paper is various colors, patterns and textures. I used as many different kinds of paper as possible for maximum interest - atlas paper, book paper, painted paper, printed/stamped paper, deco paper, wrapping paper, graph paper, dotted paper, colored construction paper.... and I had my (biological) kids help me create paper using different mediums (watercolor resist, printing with stamps, painting with stencils, scribbling and drawing, printing with bubble wrap and other found objects, etc). I then tore these up into long strips. You could do this step on a separate day with your students (the kids would love it) but I was pressed for time. So, day 2, students were given a large 50x35cm black paper and were told to collage strips of paper in as many different colors and patterns as possible (mindful of balance and harmony, so perhaps repeating a few colors and patterns here and there). Strips should head towards the center and go slightly beyond the edge of the paper. We used acrylic gel medium for our glue. As always with gel medium, we glued under and over, which really helps to firmly seal our strips. This process took nearly the full 90 minutes of class. Collaged strips Day 3: We glued our eyes and nose onto our collage paper. We had many visuals of dogs and cats at our desks, to helps us visualize the facial order, features, texture and fur of our animals. We noted that with animals (and people), eyes are generally placed only as wide apart as the width of our noses. We glued these down and went over them with glossy acyclic gel medium, which gives our eyes and nose that glossy shimmer. Then it was time for adding definition, dimension and texture, and to make our eyes and nose harmonize with and look like they 'belong' to our collaged background. Using only black and white paint (and creating our own grays), we defined our eyes, created a snout shape and chin, considered dimension and facial structure. Again, we looked to visuals of cats and different dog breeds for inspiration. Cheeks, chins and snouts were pushed forward in that we used more white and light grays here, while eyes were pushed back in that we added more black around the edges. Using feather brushes and other fur-rendering paint brushes (fan brush, wisp brush), we added furry lines and texture around eyes, forehead, along the edges of our snouts, and anywhere we wanted that furry look. To make the eyes less 'startled' and to give our eyes more character, we painted over the upper edge of the iris. This softened the look a bit. We even abandoned brushes and used our fingers to finger paint some definition here and there. Fun! All my ages groups, from age 6-14, really enjoyed this multi-step process.... perhaps without even realizing just how much learning was happening! A real winner of a project! Thanks again to Natalie from Elementaryartfun.blogspot.com for the awesome inspiration! Ages 8-11 Ages 8-14 Ages 6-7

Free large double dog kennel DIY plans with material list and dimensions. Learn how to build a beautiful double dog kennel step by step.
