
![Wonderful DIY Wire Crochet Jewelry [Free Pattern]](https://i.pinimg.com/originals/29/62/b3/2962b372ad269adda27478beefed5fa0.jpg)
Those happy to spend many hours crocheting away are always looking for new designs and patterns to try out, which challenge their creativity and hone
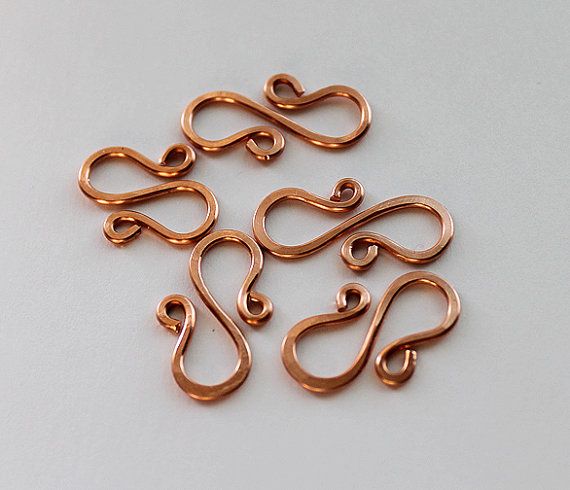
"S" clasp is a nice comfortable clasp. Handmade clasps and hooks will add a personal touch to your jewelry. Make sure you use a wire gauge that is heavy enough to produce a strong clasp for your necklace or bracelet. I generally use 14 gauge wire, but, for a delicate piece I may use 16 gauge.You can also use a jump ring with the clasp. To make this clasp you will need round nose pliers, chasing hammer, steel bench block. Watch my video tutorial how to make this "S"-hook clasp. PS. Excuse my web-camera for going out of focus in some episodes.

Finished two! Yay! Here are my first attempts. I actually really like the way these turned out! The hardest part about making these is find...

This post brought to you by the Beadalon crew!Welcome to day 3 of the party where we visit with Miss Kaaaatie Hacker!If you’ve been in the DIY jewelry world for any length of time, I’m positive you know Katie. She’s a good egg and one of my favorite people. She also hosts the popular television […]

This adjustable spiral ring is quite easy to make with just a little wire, a bit of muscle and a few standard tools. Supplies – Two 6 inch pieces of round, soft, 16 gauge wire One 14 (o…

Free jewelry tutorials, plus a friendly community sharing creative ideas for making and selling jewelry.

Stop choosing between wire jewelry tutorials and seed bead patterns, and combine them both into a fabulous DIY bracelet design. Create your own Wire and Seed Bead Bracelet. Colorful and fun, this homemade bracelet is a fun and quick way to make a handmade accessory. If you are someone who is always looking for new ways to learn how to make a bracelet, you will love this beaded wire jewelry tutorial because it is so versatile. Change the type of wire and the color of the beads and you can go from bold to sleek to elegant all with one jewelry making technique.

Free jewelry making tutorials, craft ideas, design inspirations, DIY, projects, tips and tricks and trends

Make your own I have seen a few beautiful, dainty, wire rings lately and I have fallen in love. Case in point. Kelly Fro...

Introducing my wire crochet workshop participants with other wire work techniques, that are different than my Invisible Spool Knitting wire crochet, made me want to write about it here on my blog , so my readers that can't attend my workshops in person can learn about them too. The list is long so probably not all the

Free jewelry making tutorials, craft ideas, design inspirations, DIY, projects, tips and tricks and trends

A must-have for musicians!

Learn how to make the viper chain. Free step-by-step instructions from thebeadman.com, offering jump rings to the public at wholesale prices.

The idea of using the ISK looms in other ways than simply starting a tube, has been cooking in my head for a long time, but I never got to dive in and start putting it together. The ISK looms are used to easily start any wire crochet design, tube, round, square or flat they all begin as a tube. But this is definitely n

Making a Wire Wrapped Ring: This instructable is going to take you through the steps of creating a lovely wire and crystal wrapped ring. Items needed for this project are: Ring Mandrel, Wire Cutters, 20 Gauge Wire (36"), Crystals or Stones, and Optional are Needle Nose Pliers.

When first learning kumihimo wirework, you'll notice right away that braiding with wire is different than other media you've used before. Wire is firmer and less forgiving than traditional kumihimo materials like silk or leather cording. With that comes a bit of a learning curve.

A bead spinner is not required tool, but if you string many seed bead strands you may find this simple spindle tool a reason to celebrate! And you do not have to spend $15-$65. You only need one wooden chopstick and small plastic jar(container). I used one from apple sauce, and it holds up to 100 grams of beads! Using an awl, make a hole in the center of jar. Push the stick down through the hole gently and slowly, allowing the pushing to widen the hole. Keeping about a couple centimeters (about 1 inch) of the stick sticking out from the bottom of the jar, use a couple drops of super glue to stick these two part Ideally, the bowl will be at least a third of the way filled with beads.... Hold the wire down in the beads, pointing to the left, while you hold the top portion of the dowel and spin anticlockwise. Turn the dowel quickly, spinning it as fast as possible. Based on a very simple scientific principle -centrifugal force - the beads are "forced" onto your wire/needle. My bead-spiner's base made from two glued spools from wire . So, your full of beads spinner can stay upright even if you do not use it. I hope you like this tutorial! Al your comments are highly appreciated.

Free tutorial to make a heart shaped jewelry clasp using copper craft wire and basic tools perfect for beginner wire jewelry maker

There are many ways to finish the end of your jewelry pieces, but coil ends are quite a trusty option. This tutorial from The Cerebral Dilattante shows just how you can make and use them in your o…

Fidget Pendant: One thing I notice when wearing necklaces is that I'm pretty much constantly fidgeting with it. With that thought in mind, what better to do than actually make a fidget pendant! I had initially planned to make this with three circles, but halfway th…

Free jewelry tutorials, plus a friendly community sharing creative ideas for making and selling jewelry.

Free jewelry making tutorials, craft ideas, design inspirations, DIY, projects, tips and tricks and trends

Rings are one of my favorite arm candy accessories. The simpleness of a wedding ring to a large statement ring are so versatile. But how do you make your own rings and all under 10 minutes? This DI…

Easy DIY wish bracelet that is perfect to make for friends, family or to sell at craft fairs. Make a wishing bracelet in 15 minutes or less!

Step by step instructions on how to make a wire loop and use it to make a simple infinity style wire ring.

One of the simplest and most inexpensive ways of starting out on your jewellery-making journey is to make stretch bracelets.

Forget diamonds! DIY jewels are a girl's best friend. Simple, stylish, and super fun to make on a crafty afternoon.

Christina Larsen’s Regal Bracelet design takes the cross kumihimo structure outlined in Kumihimo Wirework Made Easy to a whole new level.

This post brought to you by the Beadalon crew!Welcome to day 3 of the party where we visit with Miss Kaaaatie Hacker!If you’ve been in the DIY jewelry world for any length of time, I’m positive you know Katie. She’s a good egg and one of my favorite people. She also hosts the popular television […]

I’ve been trying to challenge myself with each new project and am always scouring the web for tutorials from experienced metalsmiths. I recently picked up a small handful of cheap stones I co…

You don’t know how miracle a stone is for a fashionable ring! Actually, stones can be used to create some stylish stone rings. Today, we

More time recently to get to know the dark annealed steel wire from the hardware store. It’s definitely not as easy to work with as sterling or copper, but the finished look is very much to …

Crochet is a very popular craft and is easy to get started with....you just need yarn and crochet hooks! This page contains links to the best beginner's tutorials and a large number of free patterns.

Reviewing some the crafts we did at girls camp this year - - for all them listed together, see my Tips and Tricks for Girls Camp Crafts Post...oops - - I posted this yesterday but

Tools and Supplies A 6″ piece of 16ga or 18ga round, soft wire for frame 12 or so inches of half round, half hard, 16ga wire Round nose pliers Square or Chain nose pliers Wire cutters Chasing…

I've gotten a couple people asking me "how did you make that?!" so today I wanted to show you and try to explain to you how I do it! so here we go! Materials: Hammer (doesn't have to be a pink one) side cutting pliers needle nose pliers anvil (or any hard metal surface) heavy gauge wire (I just grabbed the heaviest the craft store had, I think it's 16 or 18 gauge not sure) thin gauge wire (I used 28 gauge wire) measuring tape binder clip glass beads some more beads! first measure your wrist now take that measurement and cut two pieces of the heavy gauge wire now bend them into a "U" shape making sure they are both similar in shape now take the needle nose pliers and curl the ends in to make a loop, do that for both ends on both pieces of wire now lightly hammer the ends they are slightly flat, not pancake flat now put both of the pieces together with the loops facing away from each other this is where I used the binder clip to hold the two wires together in the position I wanted while I wrapped now while you have the binder clip giving you a hand, start wrapping the thinner gauge wire on the side that you have the binder clip on. I personally used about 10 inches of the thing wire to wrap the two heavier gauge wires together. now I lightly hammered the place where I wrapped the wire around just to give it a more flat look and feel. Do this for the other side. now you can take as long or as short of wire (thin gauge) and string your bead and just start wrapping it onto your bangle form that you have already made it should look something like this you can have fun with it and string two beads at once or use different sized beads, just have fun with it! and you're done! after you put all the bigger beads on there you can decide to "fill in the gaps" with smaller beads or just leave it how it is! the colors remind me of the sea and the ends how they curl outward remind me of a mermaids tail :) I hope this was somewhat easy to follow!

Learn how to fix fake jewelry in silver or gold tones that's discolored or tarnished to keep your earrings, bracelets and necklaces looking new!
