

This is a tote bag in which the inside of the bag is divided by a zip pocket. The outer and lining of the bag hold the zipper pocket together, giving the bag

How to Make a Tote Bag. DIY Tutorial & Patern.

You can sew a tote bag with flat bottom and lining and it is quicker and easier than you might think! Make a custom tote bag!

The everyday bag you’ve been looking for is just a quick make away. With our free pattern and a yard of Lightweight Cotton Twill, you can tote groceries, kids’ snacks and books in style.

Large Fabric Wild Flowers Tote Bag Free Sewing Pattern

Every wondered how to make a nice simple carry-all tote bag to cart all your junk around in? Here's an easy DIY tutorial to help you out!

Spring is finally here and we couldn’t be more excited; days spent enjoying the warm sunshine and the cool Spring breeze while listening to the...

This is the Best 1/2 Yard Tote Bag EVER sewing pattern. The designer, Gingercake, has made a fabulous pattern and given it to us all for free.

Use your favorite fabric scraps and a raw edge applique technique to create a fun Mickey Mouse-inspired DIY Disney canvas tote!

Do you love DIY projects? Here are 12 amazing homemade tote bags that you will absolutely love! They are easy to make and they make great gifts!

Learn how to make a tote bag in just five simple steps. This beginner sewing project can be completed in about an hour with our helpful guide and diagrams.

In this post, I'll guide you through the process of making a zipper closer tote bag for travel. Whether you're a beginner or an experienced sewer, you'll find
How to Make a Simple, Reusable Market Bag. DIY Tutorial

DIY Recessed Zipper Tote Bag Today I made a Recessed Zipper Tote Bag with curved top shape. Zipper closure makes the bag even more functiona...

Make your own tote bag in three different sizes with this easy tote bag pattern. With video tutorial, written instruction, and lots of photos, you'll be ....

Every wondered how to make a nice simple carry-all tote bag to cart all your junk around in? Here's an easy DIY tutorial to help you out!

Updated September 2011 We have remade these awesome, simple bags for fall! This time around,…

Today, I made a tote bag that I use in general in my daily life. There is a zip pocket on the front of the bag and two pockets on the inside of the bag. And

Learn how to make a DIY tote bag from a thrift store tea towel. This project is easy, cute, and budget friendly! Makes a great gift idea.

DIY Wire Frame Fabric Tote Bag Free Sewing Pattern + Video

I have made 3 of these totes, the first two were given away in swaps. With this last one I took progress photos and wrote down measurements, and I'm going to keep this one. Photo heavy post! And some photos were taken at night, sorry about that - but that is when I can sew and when the progress photos get taken. Here are the other two totes I made with the same process This is the front of one This is the back of another The front of the one above Here is the finished tote for the tutorial This tutorial is for the tote only - I will do a post later in the week on the thread painting. The finished tote measurements are approximately 17" h X 15" w X 5" d with a 14-15" handle drop. Start with a selection of fabrics cut 4 1/2" square. For this tote I used Wee Wander by Sarah Jane for Michael Miller fabrics. I loved the whimsical springtime feeling of these fabrics. I added some Botanics by Carolyn Friedlander for Robert Kaufman and a few solids. You will need 25 squares for the back and 25 for the front (if your front does not have a focal block in the center) Sew together squares for the back exterior of the tote 5 rows of 5 If your front is the same, you can sew together those squares also Back of tote before quilting Front of tote before quilting- if you want a focal block, this one is 12 1/2" unfinished, and it will fit perfectly in the center of the 4 1/2" squares to make the 20" x 20" sized front I lined my back and front exterior pieces with Pellon SF-101, I like this bit of lining for totes and bags. Layer the back and front exterior with batting (no need for a backing layer before quilting as there will be a lining in the finished tote) and quilt as desired. If you have a focal block for the front, you will need a 20"x 20" quilted front, make this as you desire, and cut to the same size as back. I matchstick quilted - which looks fabulous and helps hold the shape of the bag, but takes quite awhile so be prepared to spend some time at your machine doing this. Cut two lining pieces the same size as your exterior pieces, 20" X 20" You can add to this tote slip pockets, swivel hook for keys, closures. For this tote I added a slip pocket for my phone and a swivel hook for my keys. This is a deep tote, I don't want to dig for the little things. To add a slip pocket, cut a piece of fabric 7" x 8 1/2" ( you can change to any size your desire), line this piece with Pellon SF-101 for a finished look inside the slip pocket. Press each side under 1/4" and top stitch along the top only (long side) Attach to one side of lining approximately 3 1/2" down from the top edge and 6" from each side. Stitch along 3 sides (not the top), creating a slip pocket. Sew together the two lining pieces, right sides together, along two sides and bottom with a 1/2" seam allowance. Fold over the top edge 1/2" all the way around and press, toward the wrong side. Press your seams as you desire, I pressed open. You will box the bottom corners, I have photos of this with the exterior of the bag, it is the same process for the lining of the bag. For the exterior pieces, right sides together, sew together along 3 sides - the bottom and 2 sides with a 1/2" seam allowance. Press the seams open and now you will box the bottom. With right sides together, lay the exterior pieces so that the seams line up, going out from the corner, measure 3" along the seam and draw a stitch line across the exterior, all the way across. Stitch across drawn line, back stitching at beginning and end then cut off the corner 1/2" from the stitched line. Do this to both bottom corners of exterior and repeat for the lining. For handles you have several options, you can use cotton web and just attach, leather straps or lined cotton web. I chose the lined cotton web for this tote. This tote has an approximate 15" handle drop, so the cotton web pieces should be cut 30" each (not 15" as I did the first time!). My cotton web was 1 1/2" wide, I cut a piece of fabric 3" X 30" to line the web. Fold under each long edge of fabric 1/4" and press. Lay the cotton web centered down the fabric piece (wrong side of fabric), fold fabric over edge of cotton web, and glue baste each side, then top stitch. If you do not glue baste, you can clip with wonder clips. In this photo the green strap has been edge stitched and the peach one has been glue basted. Turn exterior right sides out, and attach the handles to the top edge of the exterior with a 1/4" from edge stitch. Line up the handles how you desire, make sure both sides are equal. When placing the handles, and before sewing down, roll the handle back up as if you are holding the tote to verify the handles will be facing the correct direction and won't be twisted when you have a finished bag. This is where I also attached my swivel hook, along the edge close to the corner. With the exterior of the tote turned right sides out, press under along the top edge 1/2". Place the lining inside the exterior with wrong sides facing, pull out the handles, and the swivel hook if you have it attached, and clip the lining to the exterior all the way around, lining up the side seams. I changed to my walking foot to edge stitch around the perimeter of the tote at 1/4". Make sure to catch the handles and the swivel piece. And now you should be able to take a deep breath and have a large tote to carry all your miscellaneous to your next meeting, play date, road trip or just walking around to show off our skills Keep Calm and Quilt On! Mary

Sometimes We go out with just wallet and cell phone.Then you don't need a big bag, a cute and small bag like this is great.Maybe this could be a kid's

This bag is a great size to hold sewing tools or knitting supplies, or to use as a lunch bag.The zipper opens wide so you can see everything easily and there

The finished measurements of this bag are approximately 14¾″(37㎝) W × 11½″(29㎝) H × 4″(10㎝) D.

If you're tired of making quilting pieces like blankets, sheets, and pillow cases, why not make a bag next time? Here are some quilted tote bag patterns you can try.

Lots of photos and clear instructions in this easy tote bag pattern to sew! Great beginner bag sewing project, with sizes for both kids & adults shared.

41 funny tote bag sayings! Perfect phrases to use to make your own DIY tote bags using vinyl or freezer paper stencils.

This no sew t-shirt tote bag made from old t-shirts can be whipped up in just ten minutes! It's perfect as a DIY tote or farmer's market bag...

Make this easy DIY pillowcase tote bag with a pillowcase and scarf fabric. No sewing machine needed! Just simple stitches and supplies you have at home.

How to make a simple tote bag. Easy to follow step by step instructions with pictures. Perfect for beginners. Tote bags make great gifts!

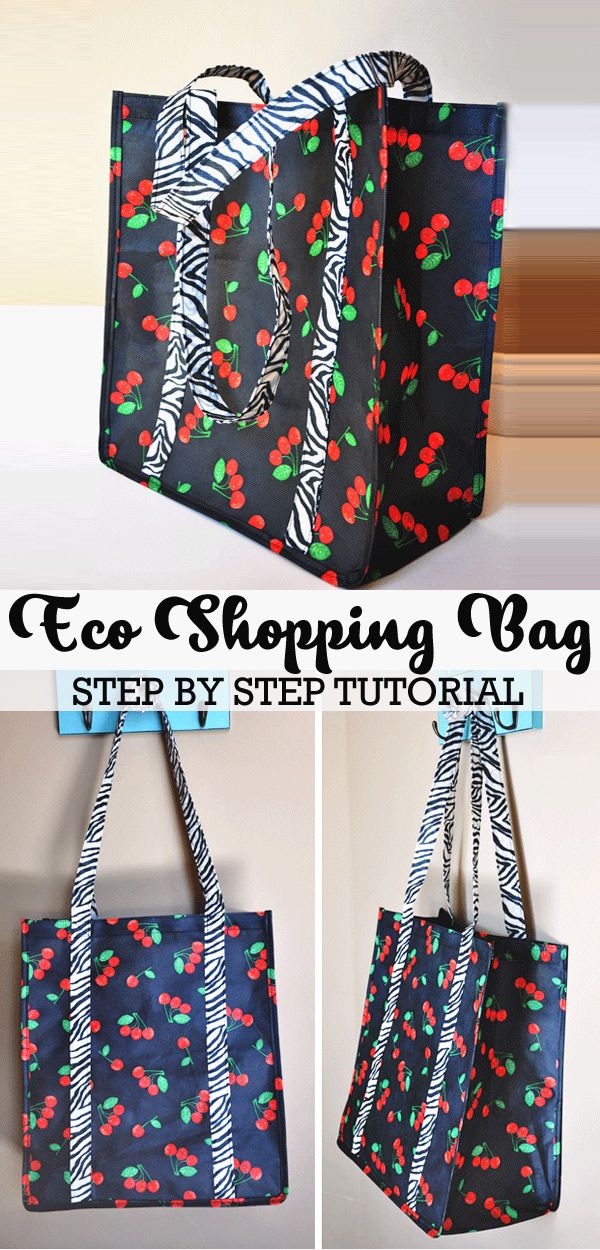
DIY REUSABLE GROCERY BAG // How to Make Shopping Bag // Step by Step Free Tutorial

Our Easy, Easier, and Easiest Totes are just that… easy! However, with French seams and…

DIY WINDMILL TOTE BAG Here's a nicely designed handmade bag. It was called a windmill bag because it looked like a windmill while making...

This designer receives really excellent feedback from her customers and it's always clear to see why. Her patterns are classic in style, always on-trend, easy

This handy tool is needed for all kinds of sewing projects. Get the easy to hold seam ripper that Amazon reviewers swear by! DIY Denim tote bagHere is…
