

Ya know that neat paint finish with the cracks and breaks in it? You can achieve the crackle paint finish with just white school glue and paint!

Learn How to Crackle Paint Easily, with this simple and inexpensive recipe! Such a fun crafting technique, by Rebecca E. Parsons, that any crafter can do!

Ya know that neat paint finish with the cracks and breaks in it? You can achieve the crackle paint finish with just white school glue and paint!

This tutorial shows how you can make paint crackle with glue. It's an easy cost effective way that gives amazing results for a rustic finish everytime.

Want to learn a super EASY way to crackle paint on wood to get a stunning antique effect? This tutorial will show you 4 easy steps with paint and glue!

Want to learn a super EASY way to crackle paint on wood to get a stunning antique effect? This tutorial will show you 4 easy steps with paint and glue!

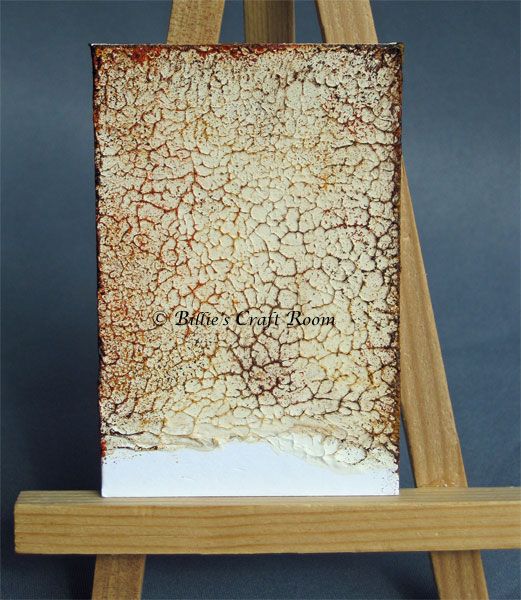
Thanks to Dollar Store Crafts for featuring this post! For years whenever I wanted a cool crackled effect on my painted projects I used the very expensive (to me) crackle medium and even bought some paints that were supposed to crack on their own. Because of the cost I did not do anything large and I was sparing in what I did do. Well, thanks to this cheap alternative, I can go a bit crazy and experiment because I found out how to get the crackle effect with Elmer's Glue! It's alot less expensive than any size bottle of crackle medium and just before school it's downright CHEAP. I've been doing this for awhile but if you go to the Elmer's faq site, you can see the instructions towards the bottom of the page. Four sentences of instructions. Four sentences! I had more than four sentences worth of questions when I first did this! http://www.elmers.com/diy/project/crackle-finish On their page Elmer's used wood glue. I used Elmer's school glue or multi purpose glue for ALL of my projects and have always had great results. Even the Dollar Store no name glue works in a pinch. I have never had a "failure to crackle" with these glues. UPDATE MARCH 30, 2012 - One reader has reported using the NEW Stronger Hold formula glue from Elmer's and that the crackle effect was not very good. She then found some Elmer's Glue All that did NOT say new formula on it and had great results. Loads of thanks to MichaLisa for her informative update! So this tutorial, as requested, will have lots of pictures and step by steps so you can see what to expect. If you have used crackle medium you know the basics, they are the same, but you will use Elmer's glue. I used multi purpose but I see online that others have used the school glue and even generic school glues. For this project I used Elmer's Glue All. I painted this piece of foam board with flat black acrylic. This is my base coat. Here is the piece of painted foam board and a piece of painted muslin I have smeared with a generous amount of glue. I used alot so it would show up in the pictures. Let the glue dry til it is tacky, just a few minutes, then paint your contrasting base coat on top. Do NOT wait for the glue to dry all the way or the top coat will not crack. This is one point that you desire tackiness, lol! Let's call it sticky. Alrighty then. For these pics I did NOT thin the top coat of paint. Try to use long strokes in one direction when painting your top coat. Do not go back and forth. Use long, steady strokes to cover your entire base coat with your top coat. Here is the foam board within a few minutes of painting the top coat of white paint. You can see the cracks forming pretty quickly, it is cool to watch! Here is the top coat on the painted muslin. And here is the painted muslin with the crackle effect. Since the muslin has a bit of give the cracks are smaller than the cracks on the wood board. Here are two more pieces of painted muslin. The piece on the left is painted using turquoise and black. The black on the top left piece has been thinned slightly. The turquoise on the bottom left has not been thinned so it's cracks are not as delicate as the black. The big piece of fabric on the right has been undercoated with burnt umber and chocolate brown, then top coated with THINNED glue and THINNED white paint. The cracks are very small and delicate and hard to see in the pic. They are what I prefer for a doll face or something with alot of fine detail. And here are some close ups of my sample boards. I tried to give you lots of pics so you can see what to expect when trying this technique. Foam board with black base coat and white top coat. Glue is not thinned and either is the white paint. Board is about 2" x 4". The wood boards in the following pics are about 1.5" tall x 5" wide. Base coated brown on the left and black on the right. Glue is not thinned. Top coat of black on the left is thinned alot, brown top coat on right is thinned just a little. Black base on the left, turquoise/teal base coat on the right. Glue is not thinned. Turquoise/teal top coat is not thinned. Black top coat on right is thinned alot, very watery. I used gold Patio Paint for this board and it reacts differently to the glue. Perhaps because Patio Paint stretches a bit? The base coat on the left is P P gold with a watery black top coat. The base coat on the right is black with a Patio Paint top coat. It cracked, but not much. The glue was not thinned for this board. I hope I've given you enough options that you can see what to expect with this technique. I would suggest experimenting a little til you find the combination that you like the best before using it on a final project. But have fun, it's easy to do and it's really really CHEAP! Check my sidebar for parties I'll be joining this week. See you there!

Ya know that neat paint finish with the cracks and breaks in it? You can achieve the crackle paint finish with just white school glue and paint!

Want to learn a super EASY way to crackle paint on wood to get a stunning antique effect? This tutorial will show you 4 easy steps with paint and glue!

Crackle paint is a fun decorative finish that does not require any expensive specialty paint, although there are many companies that will charge you a lot of money for their specialty crackle paint. Adding a crackle finish to an object will give it an aged look that is very popular in vintage interiors, especially the vintage, farmhouse, or shabby chic styles. You can crackle finish furniture, an old wooden box, kitchen or bathroom cabinets, a picture frame, ceiling fan blades, a door, Christmas ornaments, Easter eggs, flower pots, your ceiling, decorative wall letters, a wooden sign, a lamp, musical instruments, a vase, curtain rods, decorative sculptures, an old bucket, or whatever else you want. All you need to crackle paint is 2 contrasting colors of regular latex or acrylic paint and some school glue or wood glue (Elmers is a popular brand of school glue). Here are the steps for how to make crackle paint cheaper than expensive specialty crackle paint, using items you probably already have. Base CoatStart by painting your base coat. The color of your base coat will be the color shown in the cracks of your finished piece. In the photo to the right, the base coat is black. If the item you want to paint has a glossy finish, you will need to sand it well before applying the first layer of paint. Follow the paint manufacturer's instructions on how to use their paint and the appropriate drying time. Drying time may be 4 to 8 hours. Make sure the paint is completely dry before proceeding to the next step. Photo by ANNA DUVAL DESIGNS - More bedroom ideas GlueGenerously paint school glue or wood glue on top of the base coat of paint. The thicker the layer of school glue, the larger the crackles. Let the glue dry just a few minutes until it gets tacky but not totally dry. Photo by Historical Concepts - Look for hallway pictures Top CoatThe top coat is the color you want on top. In the first photo of the green crackle above, it is the bright teal green color. Paint your top coat going in only one direction, not back and forth. Do not paint an area for more than 5 seconds else the crackle effect will not work. Only do one coat and do not touch up spots that were not coated well the first time. For a more aged effect, thin your paint a bit by adding a little water and mixing well. Paint your entire piece and prepare to be amazed. The crackles should start to appear within a few minutes as the paint dries. Photo by Reynolds Custom Woodworks - Browse kitchen photos TipsExperiment crackle painting on a scrap piece of wood before painting your finished piece to make sure you get the results you desire. Use more and less glue to determine the size of crackle that you want. If you are painting a large object, follow all 3 steps on one section at a time so the glue does not fully dry before adding the top coat. For more information, see the video below.

DIY Weathered & Crackled Urns & Risers Create stunning weathered and crackled urns & risers for your fall decor. Learn how to DIY this versatile and seasonal home decoration project.

Want to learn a super EASY way to crackle paint on wood to get a stunning antique effect? This tutorial will show you 4 easy steps with paint and glue!

Do you love the crackled, chippy, vintage look? Not sure how to create this look without buying fancy crackle mediums, that can be a little pricey?! We have some great […]

16 fantastic and easy ways how to distress wood for an awesome aged and weathered look. Step by step guide to making your upcycling projects even more interesting.

There's no need to buy expensive crackle medium to create crackled paint effects. Make paint crackle by first brushing on a layer of Elmer's Glue-All.

Ya know that neat paint finish with the cracks and breaks in it? You can achieve the crackle paint finish with just white school glue and paint!

How to create a crackle finish with crackle medium. Easy step by step way to create texture and interest plus get a fun rustic finish.

I recently picked some miniature shutters, and knew I wanted an old white crackled painted look. I knew there were painting products to help achieve this look, but I didn’t have any at home…

The key to making newly painted wood look antique is to make it look as if it has normal wear from years of use. This is easily achieved with a crackle glaze that is applied directly over the base coat. A top coat of paint, which is applied over the crackle glaze, will reveal the base coat in the cracks that form.

This tutorial shows how you can make paint crackle with glue. It's an easy cost effective way that gives amazing results for a rustic finish everytime.

Crackle paint is a faux painting technique that creates a distressed looking finish with the appearance of old paint layers. You might have wood cabinetry, furniture or molding decorated with this paint technique but what happens when you get tired of the look?

A canvas makeover DIY project. Bring old and boring artwork to life again by using a little creativity! Crackle and paint in easy steps.

Crackle paint is a fun decorative finish that does not require any expensive specialty paint, although there are many companies that will charge you a lot of money for their specialty crackle paint. Adding a crackle finish to an object will give it an aged look that is very popular in vintage interiors, especially the vintage, farmhouse, or shabby chic styles. You can crackle finish furniture, an old wooden box, kitchen or bathroom cabinets, a picture frame, ceiling fan blades, a door, Christmas ornaments, Easter eggs, flower pots, your ceiling, decorative wall letters, a wooden sign, a lamp, musical instruments, a vase, curtain rods, decorative sculptures, an old bucket, or whatever else you want. All you need to crackle paint is 2 contrasting colors of regular latex or acrylic paint and some school glue or wood glue (Elmers is a popular brand of school glue). Here are the steps for how to make crackle paint cheaper than expensive specialty crackle paint, using items you probably already have. Base CoatStart by painting your base coat. The color of your base coat will be the color shown in the cracks of your finished piece. In the photo to the right, the base coat is black. If the item you want to paint has a glossy finish, you will need to sand it well before applying the first layer of paint. Follow the paint manufacturer's instructions on how to use their paint and the appropriate drying time. Drying time may be 4 to 8 hours. Make sure the paint is completely dry before proceeding to the next step. Photo by ANNA DUVAL DESIGNS - More bedroom ideas GlueGenerously paint school glue or wood glue on top of the base coat of paint. The thicker the layer of school glue, the larger the crackles. Let the glue dry just a few minutes until it gets tacky but not totally dry. Photo by Historical Concepts - Look for hallway pictures Top CoatThe top coat is the color you want on top. In the first photo of the green crackle above, it is the bright teal green color. Paint your top coat going in only one direction, not back and forth. Do not paint an area for more than 5 seconds else the crackle effect will not work. Only do one coat and do not touch up spots that were not coated well the first time. For a more aged effect, thin your paint a bit by adding a little water and mixing well. Paint your entire piece and prepare to be amazed. The crackles should start to appear within a few minutes as the paint dries. Photo by Reynolds Custom Woodworks - Browse kitchen photos TipsExperiment crackle painting on a scrap piece of wood before painting your finished piece to make sure you get the results you desire. Use more and less glue to determine the size of crackle that you want. If you are painting a large object, follow all 3 steps on one section at a time so the glue does not fully dry before adding the top coat. For more information, see the video below.

While you can purchase crackle glazes, a more affordable alternative is to make crackle paint with a bottle of glue. Here’s a quick guide on how to do that.

View our full range of effects based products and enhance your next furniture project! Including Crackle Tex, Leaf Foil Size, Scumble and Transfer Gel.

How to Create an Acrylic Crackle Painting. Creating an abstract painting for your home or office is easy. There is no need to be a professional artist to make a colorful and attractive painting.

Learn how to distress your wooden furniture using glue and paint to get that antique shabby chic look you are aiming for!

I needed to make a new door, look old. Really old. The only dilemma was the underlying "new" door surface. I couldn't simply paint and distress. The look had to…
Welcome Back If you love the texture of crackle but would like a fuss free way to create it, check out this video tutorial for creating texture with gesso. This is a dimensional paint effect so not…

If you're a DIY enthusiast, you may be familiar with the wide-range of special finishes that can turn a plain table or dresser into a conversation piece. Subtle webbed cracks in a painted or stained furniture piece create an antique look that stands out in a modern home. This look can be mimicked with a crackle finish. Base Coat To get a crackle finish, you will need to think backwards. The color peeking through the cracks in the finish is the base coat.

Cracks have been hitting the catwalk lately in Paris and New York. The Rag and Bone Spring collection 2013 used cracked leather and neon green. Alexander Wang’s Fall/Winter collection for B…

Antique furniture in good condition is getting harder and harder to come by since the natural wear and tear of time always takes its toll. Imagine the horror of going to a flea market or yard sale, and seeing a fresh, but out-of-place coat of paint over an item made almost 100 years ago.

This tutorial shows how you can make paint crackle with glue. It's an easy cost effective way that gives amazing results for a rustic finish everytime.

I recently picked some miniature shutters, and knew I wanted an old white crackled painted look. I knew there were painting products to help achieve this look, but I didn’t have any at home…

Make house painting a little bit easier and more successful with these clever painting tips and tricks

I hope you're not still buying expensive crackling medium at the craft store for all your crackle finish needs. You do know there's another ...
