

I love all the Bridge Card fancy fold layouts I am seeing, but wanted to change it a little. I moved the "bridge" piece up...

This surprise pop-out panel fun fold card certainly packs a WOW! It looks difficult but is really easy - don't we love that kind of card? I know I do!

Happy Sunday! I hope you have a fantastic day! Today, I have a Double Swing Fancy Fold Card. It is very easy to create and you can actually use one base to create 3 different Double Swing cards and you don't need any cutting dies to make it. To decorate my cards, I used 'Christmas Vintage Postcards' collection from Relatively Thoughtful. Have you ever created a swing card? Happy crafting!

A blog about paper crafting, scrapbooking and card making. Inspiration, instructions and tutorials for beginners and advanced paper crafters.

A must-see here! A beautiful partial die cut card you'll love to make! This project teaches you card making techniques, tips, & designs out of this world!

A quick fun fold card for you today, inspired by the lovely Sue, who sent me an awesome Christmas card. Its one of the easiest fun folds to do, a bit of scoring and cutting and you are done. Best of

Happy Thursday! I hope you have a wonderful day! Today, I have a Double Three Step Fancy Fold Card for you using 'Purple World' collection. ...

I've made this bridge fold card using the 6x6 Merry Little Christmas paper pad and some Christmas dies from Trimcraft. What you'll n...

Hi everyone, Todays's freebie is a Z fold card. This will be the last one for a couple of weeks as I am going on holiday later this afternoon. Hope you like it. You can also find more of my designs he

Yesterday I shared a Spring Card design and promised to be back with the cutting and scoring template, so here it is. The base card is 10″ x 5″. Mark (lightly in pencil) at 2.5″, 5″ and 7.5″ along each long edge and at 2.5″ along the top. Score and cut as shown. […]

Today I'm sharing a couple variations of a diagonal joy fold card. I love a simple fun fold. Folds that don't require any finicky ...

SPRINGY THINGY CARD TUTORIAL It's time for me to share my weekly Tuesday tip or technique. This tutorial fell out of my tips/techniques book as I moved it last night and so got chosen for today's effort. It makes a card front that the receiver pulls open and the card opens out like a spring to see an inner 20cm square area. Images of a completed card using this technique are below these instructions. Practice this on some scrap paper first. MATERIALS 20cm square piece of card stock or decorative paper of your choice. Pre colour the card if you wish. I'll use white card stock so you can clearly see what to do. Pencil, rubber, ruler, craft knife, craft mat and bone scorer. HOW TOO 1) On all sides measure and make a light pencil dot at the 5cm, 10cm and 15cm mark. On my sample I will use a black marker so you can see what I did easily. 2) From the 5cm mark at the left and right side measure and mark a dot at the 10cm mark 3) From the 10cm mark at the left and right side measure in and mark a dot in at the 5cm mark from each side 4) From the 15cm mark at the left and right side measure and mark a dot at the 10cm mark. These dots make a large diamond. 5) Score between all these dots. In my image I have drawn dashes to show you were to score 6) At the top 15cm mark score down to the right side of the diamond. At the 15cm mark at right edge, score across to the bottom of the diamond. At the 5cm mark on the bottom edge, score up to the left side of the diamond. Lastly at the 5cm mark at the left edge, score across to the top of the diamond. See dashed marks I have marked for you on my sample. All these score lines will be mountain folds. That is you bend the scored line back on itself to make a mountain. 7) At the 10cm mark on all sides score into the points on the diamond. See dashed areas on my sample. These scored lines and the scored lines for the diamond are all valley folds. That is you bend the scored line in on itself to make a little valley. Here is my sample with all the scored lines bent to their respective mountain and valley folds. 8) Now all you do is gently fold the card in on itself. Start on one side and then work your way around. If you have all the scored correct lines and folds it sort of winds in like a spring. It should look like this at the front and this at the back. Rub off all marked pencil dots. After I made my sample above for you I painted the card stock with white gesso, sprayed it with various sprays. Stamped and added embellishments to turn it into a steam punk card. I then layered and stuck it to a base card. As mine is fairly embellished it doesn't fold completely flat. This is m Springy Thingy Card open Some close ups of the folded card part. Hugs Annette In Oz

Current Classes December Stamp-of-the-Month Class—Snow Place. Register by Dec. 4. December Stamper Sampler Class—Quick & Cool Stocking Stuffers. Dec. 10. "Last Thursdays" Card Class—Rescheduled: Wednesday, December 30. Current Specials Weekly Deals—New specials announced every

Fold & Tuck cards look complicated but are actually very easy to make - once you've set them up to cut correctly using your Silhouette!

Hi Everyone, Hussena here to share with you a tutorial on how to make a flip-card using your dies and Big Shot..It's a really very easy way to make some fast and interactive cards to get the 'WOW' factor from your friends and family..So first let's gather our supplies and you all will need the following to make these cards below. Supplies needed for the tutorial :- Big Shot Machine Spellbinder's Nestabilities Label 4 Martha Stewart Scoring Board Fiskars Sure Cut paper Trimmer Cardstocks Pattern paper of your choice ( I have used the Prima Zephyr Paper Pad.) Distress inks(Totally optional) And now for the tutorial :- I have written the steps in the pictures itself..I hope this makes it easier for you all to understand it. Step 1- Take a piece of cardstock measuring 7 1/2 inches by 4 1/4 inches. Step 2 - Fold it in a zig-zag pattern. Step 3 - Your card should look like this now. Step 4 - Now measure,cut and glue your pattern paper on to the front of your card. Step 5 -Now place your die on the smaller side of the card with it's centre point aligning with the 2 3/4 inch scored line and stick it with either a Washi Tape or any repositionable glue. Step 6 -Now make your cutting sandwich for this you can refer our DT member Mallika's post on how to create a cutting sandwich for your dies...Place your acrylic plate only up to the 2 3/4 inch score line and run it through your Big Shot..This will allow you to only partially die-cut one end of your card which is required for the flipping mechanism. Step 7 -Now that you have cut one end ...Turn your card around and place your acrylic plate on the 3 3/4 inch score line and again partially die-cut it...Please take care to place your acrylic plates to the the required scored line...otherwise you will end up cutting up the entire piece. Step 8 -After you have die-cut both the ends,your card will look like this below....Now, peel off the pattern paper from the die-cut ends...Don't worry if you mess up a bit..This will later on get covered up. Step 9 -Now using the same label die, die-cut two pieces of cardstock....One plain and other colored....The plain one will be attached to the back side where as the colored one will be in the front of your card. Step 10 -Attach the white cardstock on the front side and when you flip your card this will go on the back. Step 11- Attach the colored cardstock on the back side as shown. Step 12 -Once both the die-cuts are attached, this is how your card will look. Step 13 -As you can see,when the card is opened, the white die-cut piece comes in the front where you can write your message. Step 14 -Once the card is closed, this is how it will look. Step 15 -Here are my sample cards before I have embellished them. Supplies used for embellishing :- Lawn Fawn Blissful Botanicals and Flutter By. Prima Zephyr paper Pad , Best of K & Company Papers. Distress ink : Tumbled Glass., Versafine Onyx Black Ink. Martha Stewart Doily Lace Punch Marianne Embossing Folder- Daisies. Hope you all like my tutorial..If you have any queries do leave me a comment below and I will try to get back to you as soon as possible!.. And don't forget to participate in our current challenge 'Summer Sundae' to win some lovely prizes www.crafterscorner.in(All Craft supplies under One roof) For further information please contact us at : [email protected]

Everyone loves a little bit of pizzazz on special occasions, and these swing cards are just the thing to spice up your gift-giving. They a...

Ok whom ever is stealing my time can you give it back LOL. Really though the weeks are flying past and my day to share an old tip or techni...

Check out this gorgeou Christmas Pinecones dies fun fold Christmas card I got to stamp with Shelli and Sara from Stampin' Up!
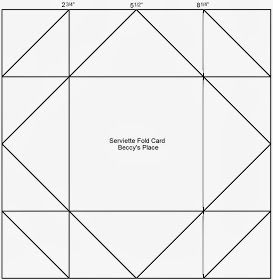
Napkin Fold cards definitely have the WOW factor! They are made from a single sheet of cardstock that folds inward to form a kind of pouch that would be perfect for hiding a gift card or some money. You can decorate the card with co-ordinating pieces of patterned paper and an embellished belly band to hold everything together. Fold Template 1. Start with a sheet of cardstock measuring 11" x 11". Score at 23/4" and again at 81/4". Turn the cardstock 90 degrees and score again at 23/4" and 81/4". 2. Fold and crease along each score line. Your cardstock should look like the photo below. 3. Find the centre point of the cardstock by measuring 51/2" from each edge toward the middle. Mark the centre with a small dot. 4. Fold each corner into the centre. Notice how my score lines line up as I fold. 5. Open the cardstock out again. It should look like the picture below. 6. Now it's time to fold it up. Start by pushing in on one side. Hold down the large triangle with your fingers, then bring the corners of the cardstock back into the centre. Do this on all four sides. (I practiced this step with printer paper a few times before I got the hang of it.) 7. Now take one corner and fold it backward, lining up all the edges and points. Crease well, and repeat for the remaining three points. 8. You've now finished creating the base card. All that's left is the decorating... the fun part! 9. To decorate, you'll need three sheets of co-ordinating patterned paper. One that measures 5" x 5" and two that measure 43/4" x 43/4". 10. Start with the paper measuring 5" x 5". Use your trimmer or a craft knife to cut from one corner to the other so you end up with two large triangles. 11. Cut both triangles in half again so you end up with four smaller triangles. Set them aside. 12. Cut the two 43/4" x 43/4" pieces of patterned paper in the same way so you end up with four triangles from each sheet of paper. Now cut each of these small triangles once more so you have eight tiny triangles from each sheet of paper. 13. You should now have four large triangles and sixteen small triangles. 14. These triangles will fit perfectly inside each of the creases you made on your card, with a little border around the edges. If desired, ink the edges of your patterned paper and cardstock before you adhere them together. 15. Cut a 51/4" x 51/4" piece of neutral cardstock for the centre of the card. This is where you will add your handwritten message so make sure the cardstock you use isn't too textured or dark in colour. Add a stamped image and sentiment then adhere to the centre panel of the card with double sided tape. 16. Create a belly band from 12" strips of cardstock and patterned paper. You can make the band as wide as you like. I cut a 2" strip of vanilla cardstock, a 1" strip of red cardstock and a 3/4" strip of patterned paper for my band. 17. Fold the band around your card to get the correct measurement. Overlap and secure the ends at the front of the card. 18. Embellish a little disc or tag to cover the join and add some extra strength to the band. 19. Fold your card and slip the band over to keep everything together. Done!

Hi everyone, last week I had a go at the Lattice/Plait fold technique. This has been a very popular video with so many of you re-creating your own beautiful versions. This paper fold style is a for…

Kate's back with another fun fold card design. She is calling this one the Buckle Fold card template.

We all love pretty papers right? You wouldn't be a papercrafter without it. Well take a look at this very pretty Flight & Airy Desig...

The asymmetric box fold creates a “shelf” or a few “shelves”, that are non-symmetric in height and depth. This technique is the base of many elaborated and impressive cards,…

These Flower Pot Cards have been around for quite a while. They're fairly easy to do & can be adjusted in size if need be. I've added a template at the bottom of the page with the measurements that I prefer. I made the blue one first then, had to make another one for a workshop using current products (& that would be so time consuming). I ended up doing the one in the middle for the workshop. Stamps: Mixed Bunch Colours: Blackberry Bliss, Hello Honey, Mossy Meadow, Cajun Craze & Whisper White. Punches: Blossom, Petite Petals, 1/2" Circle & Scallop Edge Border. Extras: Woodgrain Embossing Folder & Thick Baker's Twine. Insert sentiment stamped from Kinda Eclectic, in Blackberry Bliss. Stamps: Mixed Bunch Colours: Blackberry Bliss, Hello Honey, Mossy Meadow, Cajun Craze, Lost Lagoon & Whisper White. Punches: Blossom, Petite Petals, 1/2" Circle & Scallop Edge Border. Extras: Honeycomb Embossing Folder & Whisper White Stitched Ribbon. Insert sentiment stamped from Kinda Eclectic, In Mossy Meadow. Stamps: Peaceful Petals Colours: Pool Party Certainly Celery, Cajun Craze, Very Vanilla. Punches: Scallop Edge Border. Extras: Fancy Fan Embossing Folder, Pool Party Ribbon & Gold Embossing Powder.

Hello Fiends Oh! simple diagonal fold so easy and such a great fold. During the holidays I she the how to video if you miss it CLICK HERE to view the video. Trust me this diagonal fold is SIMPLE and

Here is a card that features a peek at some new products that will be available on January 5th: the You Are Amazing Stamp Set and the Flower & Field Designer Paper. It may look complicated, but

Sandiebella is back with a beautiful card plus the step by step on how to recreate it! Tea Light Card Supplies: Mason Jar of Flowers rubber stamp Card Rectangle Die Scoring board and bone folder Patterned paper Embellishments How to: Cut two pieces of card measuring 11″ x 4.25″ Score both pieces at 2.75″,… Continue reading Thursday with Sandiebella: Create a Tea Light Card

Who would have thought that a mistake could turn out to be a brilliant idea??? I designed this card – Triple Flag Swinging Z Fold Card – with the flags on the bottom half of the card. B…

Hello! Today I'm sharing a quick tutorial for drapery fun-fold cards. This card design is very easy and the end result is elegant and impressive. It is also a great way to use double-sided designer papers!

Hello, i thought id share monday's class with you all. I had fun designing this card and like i said in the post for the mens ties ...to sa...

Apologies for my absence over the past week, I've been battling a pretty solid case of the flu. It's been a long time since I've had a proper dose, usually I just whinge my way through head colds and I'm good to go, but this year I think I was one of the many who ended up with influenza. I still whinged, but I didn't get better any faster! Anyway, enough moaning, time to get down to some serious crafting with a tutorial on Kite Fold cards. TEMPLATE 1. Start with a piece of card stock measuring 11" long by 4" wide. 2. Place the card stock horizontally on your score board and score at the halfway point - 51/2". 3. Using a pencil and ruler, measure and mark 2" from either side of the centre line you just scored. Repeat on the other edge of the card. 4. Now measure and mark the centre of both ends of the card stock, which is 2" from either side. 5. Use a ruler to connect the marks you made. The four marks on either side of the centre line will form a cross. The lines should intersect in the middle of the score line. Now join each diagonal line to the mark you made at either end of the card stock. Refer to the template above and the photo below for correct placement. 6. Score along the two diagonal lines. 7. Use a craft knife or trimmer to cut along the other lines. 8. Fold back and forth along all the score lines. Now fold the triangular sections on either side of the middle line into the centre of the card. Press firmly to form the card base. 9. When folded, your card should be a kite shape. 10. Decorate with some patterned paper or stamps and whatever embellishments you like. Don't forget to add a little tail!

This style of fancy fold card has been "popping up" lately on Facebook, Pinterest and YouTube. I've enjoyed the many variations I've seen, b...

This month I am showing you how to make a Gatefold card. There are many variations, and this one is the simplest. Instructions: Cut a piece of A4 cardstock in half so that each piece is 21cm x 14.8…

Cascading Card Tutorial Cascading card Cascading cards look stunning and complicated but are not that difficult to make.These special accordion folded cards have 2 interlocking panels which can spring apart and also collapse to fold flat! Cascading card This is a special card for my mum who loves flowers so added punchcraft and quilled flowers to the layers of my cascading card. Cascading card The white daisies were a gift from my blogger pal Jovita.The roses are punchcraft roses made using a 6 petal punch.The pink buds are quilled coils and the tiny roses are ribbon roses. Cascading card I made a 3 D decoupage posy of pansies for the front of my cascading card. Cascading card How to make a Cascading Card. I made this cascading card using a Card template which was so generously shared by Penny .Penny's original template is a gem but looks scary and complicated until you break it down to little steps! So just to make things easier, sharing some step by step instructions on how I made Susie Prendergast's Cascading Card. Materials Required to make a cascading card Card stock : 2 pieces measuring 5.5 x 12 inches - use fairly thick sturdy card if you want to add lots of embellishments like I did. Scoring tool- if you dont have one use a blunt knife or dry pen. Scale Pencil Scissors Make the Panels of your Cascading Card Cascading card tutorial Mark 3 inches down one side of the card stock as shown. Cut off the white triangle you get as shown in the cascading card template.Do this for the other piece of 5.5 x 12 inch card too to get the panels of your cascading card. Mark the Panels The Cascading card is just 2 accordion folded cards interlocked together by slots.To help you know where to make your slots you can mark both your panels as shown. If you are using a scale mark the midpoint of 2 sides of your panel as shown. Measure 2 3/4 inch on the taller side and 1 1/4 inch on the shorter side.Join with a pencil line. Cascading card tutorial I used a score pal as shown below to help quickly find the midpoint. I marked the short side and turned it 180 degree clockwise to mark the longer side's midpoint. Cascading card tutorial Your Cascading card panels are mirror images and shown below is how the panels will look marked. Cascading card template Score your panels at 4 inch intervals[ black lines]. If using a score pal score at 4 and 8 inch mark. Make the slots:If you use a score pal it is super easy to make your slots.Drop down score lines to meet the pencil line marked earlier. The slots will be at 2 , 6 and 10 inch marks as shown. Cascading card tutorial Cut out 1-2mm wide slots.Accordion fold your panels as shown. The folds are Valley- Mountain in the 1st panel and Mountain- Valley for the 2nd panel of your cascading card. Cascading card template Interlock the slots of your cascading card starting from the taller end.The slots fit so nicely together that no glue is required and your card will expand and collapse at will! Cascading Card Tutorial To allow easy movement of the accordion mechanism, I attached the 3 D paper tole flowers only to one panel on the front of my cascading card. Cascading card Do try making this fun interactive card .Do tell me how you like this special card made for my mom! Click this link for more than 25 card making tutorials

Since my boyfriend’s birthday is just around the corner, I decided to make him an extra special card that I know will make him smile! I came up with this card myself, and I call call it……
