

If you're looking to transform your outdoor space into a vibrant haven that echoes the rich culture and warmth of Mexico, you've come to the right place. Mexican patios are celebrated for their colorful mosaics,

Learn how to get a smooth, beautiful edge, avoiding that stair-step look of the normal bind-off with the Sloped Bind-Off Method. A simple technique that changes your...

Are you dreaming of transforming your outdoor space into a boho-inspired haven where you can escape and unwind? Whether you're looking to create a cozy spot for morning coffees or an enchanting area for evening

Use this art discussion lesson for children, featuring work by Henri Matisse, to get children thinking and talking about art. If you haven’t tried art discussion activities before it’s easy to get started, and you’ll soon discover how they open up conversations and ideas, boosting children’s language, reasoning and confidence. Art discussion lesson for children […]
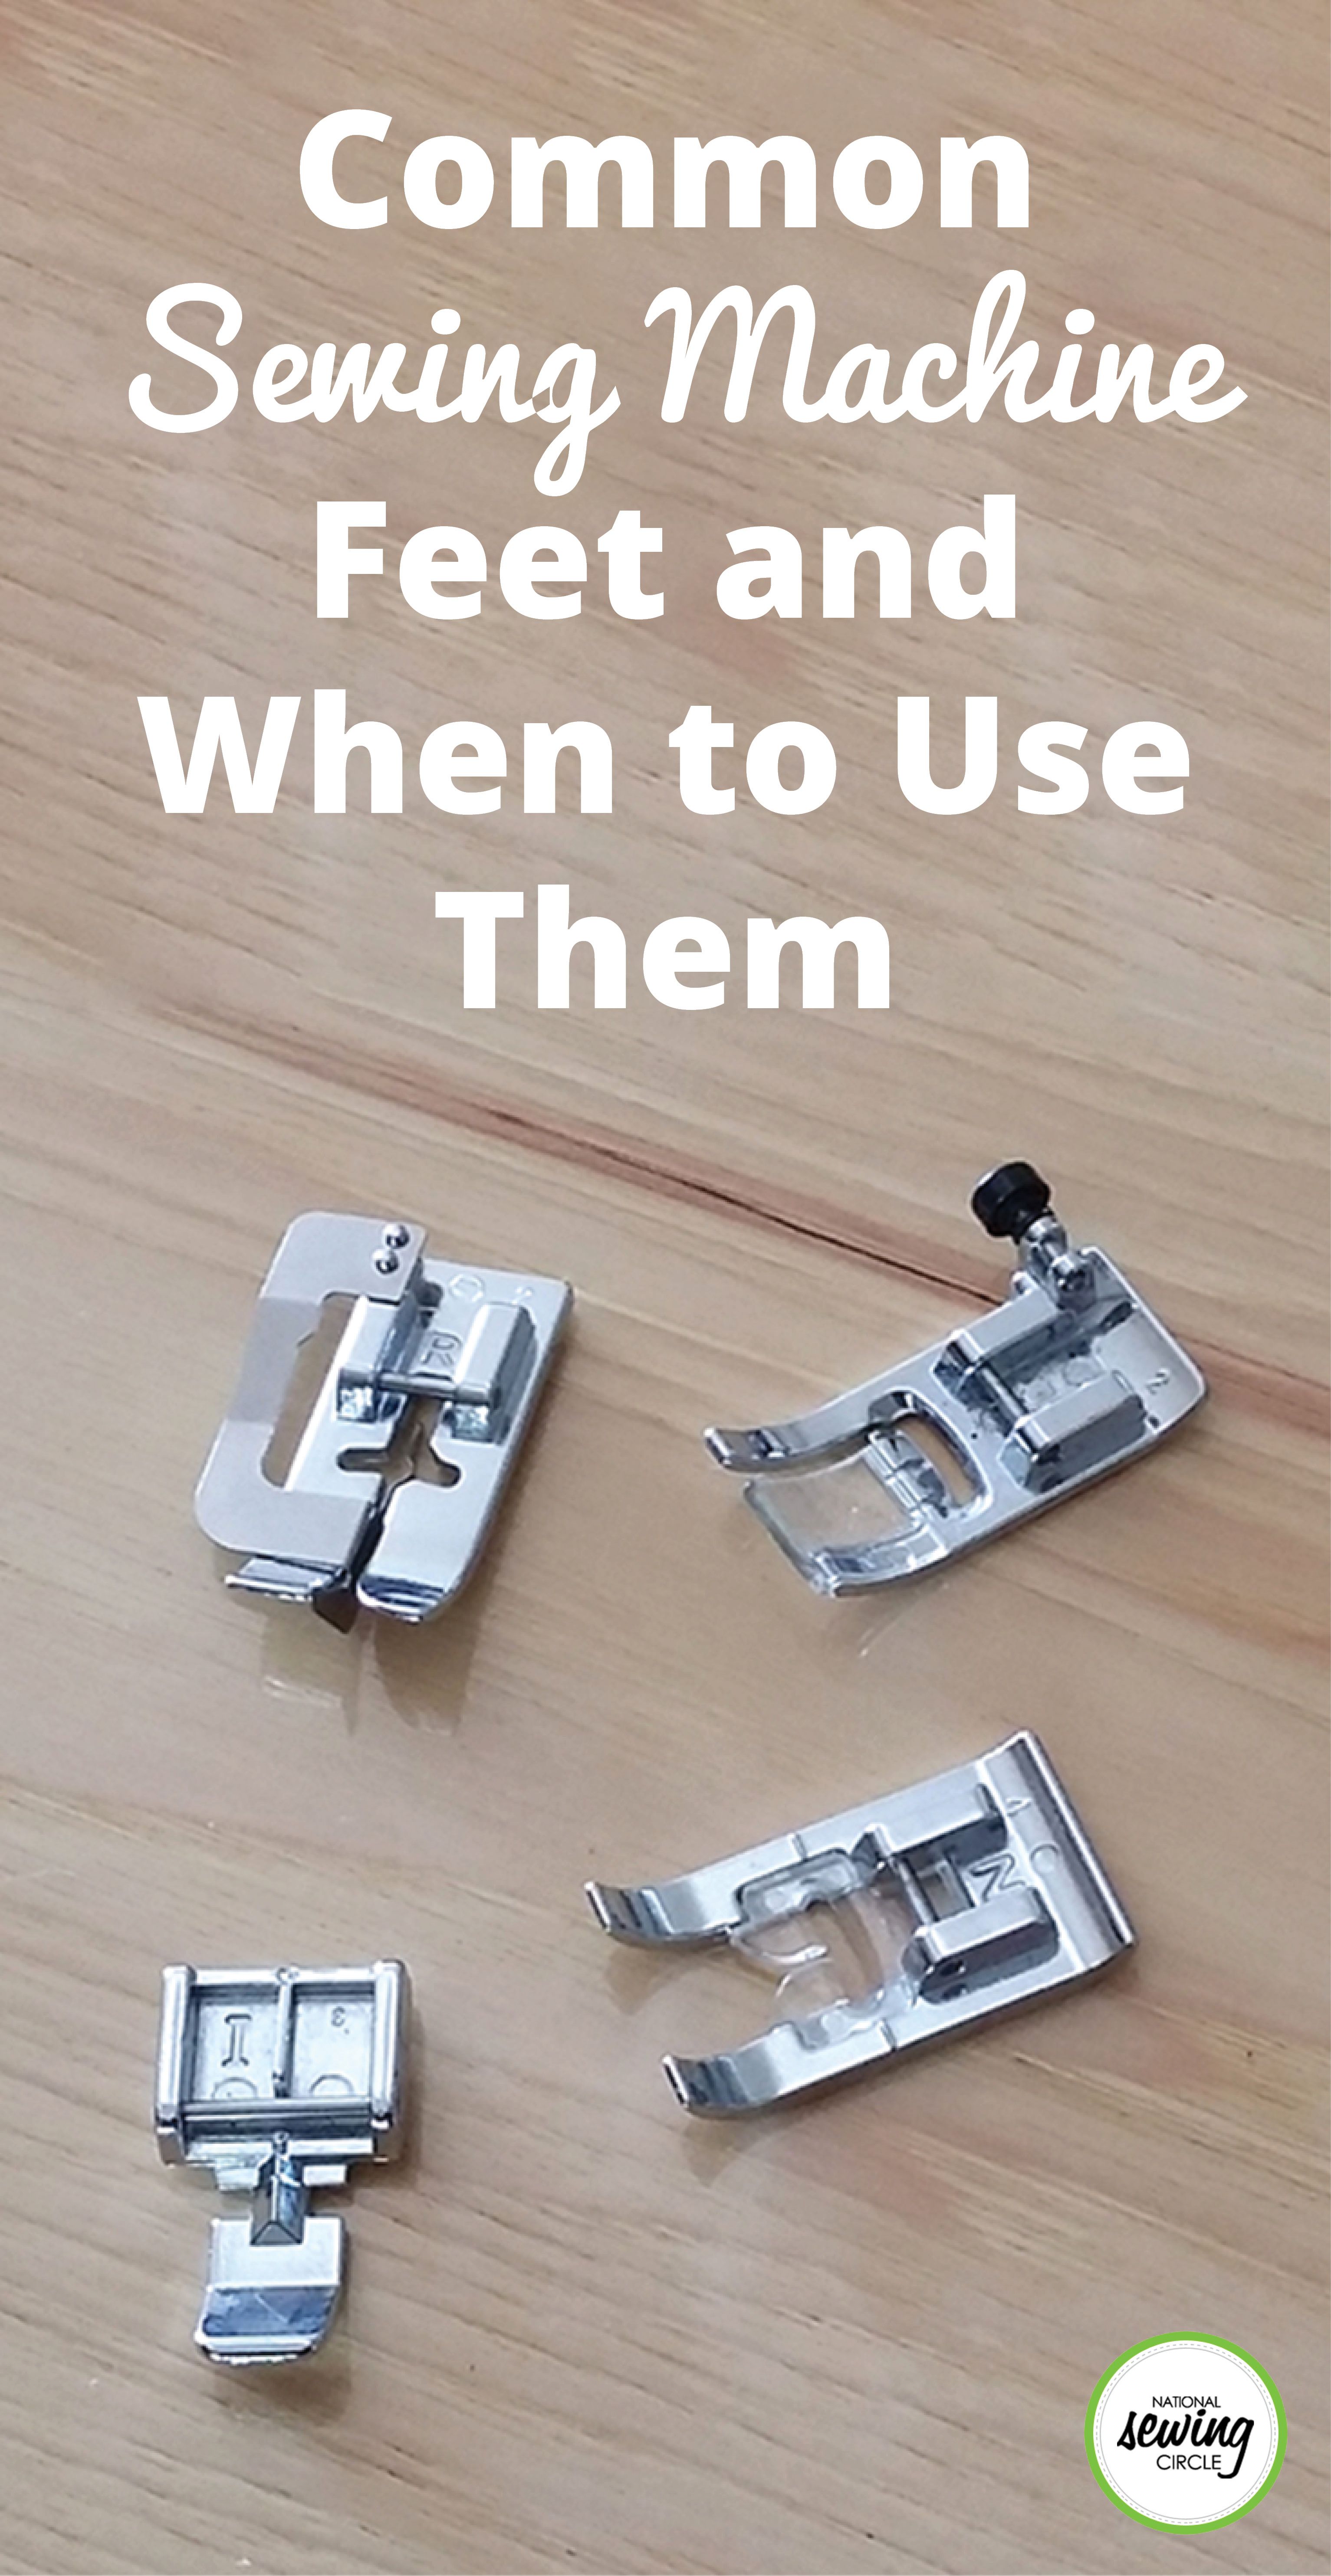
you’re new to sewing, you may have just started with the standard presser foot that comes on the machine and haven’t yet changed it out.

This is for the MAILED pattern ONLY, not for the finished piece. Sorry, I do not do E patterns. Fat Lab is a primitive style black lab ~ feel free to use your imagination and make him a reflection of your tastes and color preference. Fat Lab is a smidge smaller and a perfect tuck. When finished, he will be approximately 10 inches tall and 13 inches long. You will receive a full sized pattern with detailed instructions for making this and any techniques used. Basic sewing skills are needed along with the love of creating! You are welcome to make these for gifts, shows and online selling. Please give designer credit when selling online. A big thank you for buying direct from the designer and supporting American small business.

This was another requested plushie. I'm considering also making the evolved form of Drifloon - Drifblim, but haven't gotten around to that yet. I'm sorry I don't have a picture of the back of him, but there's really nothing to show and my camera memory was full. *sigh* The pattern is mostly an easy one, the one major difference is the sculpting part. It's not hard, it's just to add some 'puffs' to the cloud cap, but it IS a nice and easy introduction to soft sculpting other things, like faces in dolls, etc. If you have ever sewn on a plushie and accidently pulled the thread too tight and created a 'dent', you've already done some 'sculpting' LOL If you find any problems, please let me know I'll fix them ASAP. :) DRIFLOON Materials: WW yarn in purple and small amounts in white, gold and black G Hook Fiberfill Yarn needle Sewing thread in black, white and gold and sewing needle NOTES: Gauge isn't important, just ensure that your hook and yarn sizes result in a fairly tight stitch that won't allow the fiberfil to show thru. Numbers at the end of rounds/rows indicate the total number of stitches that should be in the round/row. This pattern includes a little bit of 'sculpting' of the pieces. This is done by using a sewing thread that matches the piece you're working on and sewing through the piece indicated to create shapes and forms. (see the cloud cap on the drifloon, the puffs of the cloud are sculpted using sewing thread). Use a single strand of sewing thread when sculpting, and try to keep your stitches buried in creases of the crochet to make them mostly invisible. By pulling your stitches gently tighter, it creates the shapes in the piece. It's not necessary to be precise in this particular sculpting application, because there are never any two clouds exactly alike. BODY: Using purple: Rnd 1: 8 sc in magic ring (8) Rnd 2: 2 sc in each sc around (16) Rnd 3: sc in next sc, 2 sc in next sc around (24) Rnd 4: sc in next 2 sc, 2 sc in next sc around (32) Rnd 5: sc in next 3 sc, 2 sc in next sc around (40) Rnd 6: sc in next 4 sc, 2 sc in next sc around (48) Rnd 7: sc in next 5 sc, 2 sc in next sc around (56) Rnd 8: sc in next 6 sc, 2 sc in next sc around (64) Rnd 9-15: sc in each sc around (64) Rnd 16: sc in next 6 sc, dec over next 2 sc around (56) Rnd 17: sc in next 5 sc, dec over next 2 sc around (48) Rnd 18: sc in next 4 sc, dec over next 2 sc around (40) Rnd 19: sc in next 3 sc, dec over next 2 sc around (32) Being stuffing at this point and continue as you go along. Rnd 20: sc in next 2 sc, dec over next 2 sc around (24) Rnd 21: sc in next sc, dec over next 2 sc around (16) Rnd 22: dec over next 2 sc around (8) F/O leaving a tail and then using chopstick or back of crochet hook, finish adding any stuffing you made need and shape to a ball. Weave in the tail and pull to close. NECK (flair at bottom of 'head/body'): Using purple: Rnd 1: Ch 16 sl st to form a ring, make sure not to twist the chain. Sc in each ch around (16) Rnd 2: sc in next sc, 2 sc in next sc around (24) Rnd 3: *Ch 4. Sl st in 2nd ch from hook, sc in next ch dc in next ch. Sk 2 of rnd 1 and sl st in next sc.* repeat from * to * to end of rnd. Sl st to base of first ch 4. F/O weave in the ends and sew the 'neck' to the center of the bottom of the head/body (center the closing 'circle' in the middle of the neck for best placement) CLOUD CAP: Using white: Rnd 1: 8 sc in MR (8) Rnd 2: 2 sc in each sc around (16) Rnd 3: sc in next 6 sc, 2 sc in next 2 sc, sc next 6 sc, 2 sc in last 2 sc (20) Rnd 4: sc in next 7 sc, 2 sc in next 3 sc, sc next 7 sc, 2 sc in last 3 sc (26) Rnd 5: sc in next 9 sc, 2 sc in next 4 sc, sc next 9 sc, 2 sc in last 4 sc (34) Rnd 6: sc in next 16 sc, 2 sc in next sc, sc next 16 sc, 2 sc in last sc (36) Rnd 7 sc in next 4 sc, dec over next 2 sc around (30) F/0 and stuff MODERATELY (you need some play in the firmness for the sculpting). Sew the 'cap' to the top of the head, using photo for placement help. TAIL OF CAP: Using white: Rnd 1: 4 sc in MR (4) Rnd 2: Sc in each sc around (4) Rnd 3: sc in next sc, 2 sc in next sc around (6) Rnd 4: sc in next sc, 2 sc in next sc around (9) Rnd 5: sc in each sc around (9) F/O stuff VERY lightly and sew tail to side of cloud cap at the base, to one side (see photo) Using sewing thread and needle, stitch random patterns in cloud cap using a running stitch, gently pull the stitch line to create 'random puffs' in the cloud. (make sure you like the puff before you fasten off the sewing the thread, if you don't like it, pull it out gently and redo it) NOSE: With gold: (make 2) Ch 11, sc in 2nd ch from hook and each chain across (10) Work one row even (10) F/O and weave in ends. Cross the two pieces and sew in the middle, then add to the 'face' of the drifloon. (see photo) EYES: Using black make 2: Rnd 1: 6 sc in MR (6) F/O and sew to face on either side of the 'nose' LEGS AND FEET: Feet (with gold make 2 ): Rnd 1: 6 sc in MR (6) Rnd 2: sc in next 2 sc, 2 sc in next sc around (8) Rnd 3: sc in next 3 sc, 2 sc in next sc around (10) Rnd 4: sc in each sc around (10) Row 5: Flatten the 'foot' and working through both 'sides' work 5 sc across . turn (5) Row 6: sc in first sc, in next sc work the following: dc, tr, dc, sl st next sc, in next sc work dc, tr, dc, sc in last sc. F/O String Legs: Using black ww yarn, ch 35, sl st in 'top' of foot (see photo) Ch 1 and sl st in each ch to end. Attach each leg to the side of the 'neck' (see photo for placement help) Finishing: I also added a hanger by attaching fishing line to the top of the cap and an old earring hook so that he would hang neatly. I kinda like how he gently moves and turns in the draft of the room, it gives him a little life. Drifloon and Pokemon are copyright Nintendo. This pattern is an original pattern by Linda Potts (June 2009). Please do not claim this pattern as your own. If you wish to share this pattern, you may link to this pattern but please do not reprint it on your site. You may keep a copy for your own personal use but you may not sell or distribute it, or sell items made from this pattern.

Are you dreaming of transforming your outdoor space into a boho-inspired haven where you can escape and unwind? Whether you're looking to create a cozy spot for morning coffees or an enchanting area for evening

A 7" tall amigurumi of a raven. The pattern is available as a PDF on Ravelry or you can find it written below. If you have any questions feel free to email me at [email protected]. Haven't had the time to make a new pattern recently, so here is an older one. Because he is so dark I have included outlines of the feathers to make them easier to see. Materials: ▪ Worsted weight yarn in black, dark grey ▪ F hook (3.75 mm) ▪ Stuffing ▪ 12 mm safety eyes ▪ Scissors ▪ Tapestry needle Difficulty: Easy You should know how to work in the round, increase, and decrease. Pattern: This is an icrochetthings original pattern © 2014-2016. Do not claim as your own. Do not copy, sell, or distribute this pattern. Do not sell any products made from this pattern. Key Head Starting with black 1. ch 2, 6 sc in 1st ch (6) 2. [inc] around (12) 3. [sc, inc] around (18) 4. [2 sc, inc] around (24) 5. [3 sc, inc] around (30) 6. [4 sc, inc] around (36) 7. [5 sc, inc] around (42) 8 – 14. [sc] around (42) 15. [5 sc, dec] around (36) 16. [4 sc, dec] around (30) 17. [3 sc, dec] around (24) 18. [2 sc, dec] around (18) Stuff and attach safety eyes (I placed mine between rounds 10 and 11 at about 8 sts apart) F/O Beak Starting with dark grey 1. ch 2, 6 sc in 1st ch (6) 2. [sc] around (6) 3. [sc, inc] around (9) 4. inc, 3 sc, dec, 3 sc (9) 5. sc, inc, 3 sc, dec, 2 sc (9) 6. 2 sc, inc, 3 sc, dec, sc (9) 7. 3 sc, inc, 3 sc, dec (9) 8. [2 sc, inc] around (12) F/O, leave long tail for sewing Body Starting with black 1. ch 2, 6 sc in 1st ch (6) 2. [inc] around (12) 3. [sc, inc] around (18) 4. [2 sc, inc] around (24) 5. [3 sc, inc] around (30) 6. [4 sc, inc] around (36) 7 – 10. [sc] around (36) 11. [4 sc, dec] around (30) 12 – 14. [sc] around (30) 15. [3 sc, dec] around (24) 16. [2 sc, dec] around (18) 17. [sc] around (18) Stuff F/O, leave long tail for sewing Left Wing Starting with black 1. ch 15, [sc] across (14) 2 – 3. Turn, [sc] across (14) 4. Turn, 11 sc (11) 5. Turn, [sc] across (11) 6. Turn, 8 sc (8) 7. Turn, [sc] across (8) F/O, leave long tail for sewing Right Wing Starting with black 1. ch 9, [sc] across (8) 2. Turn, [sc] across, ch 4 (12) 3. Turn, [sc] across (11) 4. Turn, [sc] across, ch 4 (15) 5 – 7. Turn, [sc] across (14) F/O, leave long tail for sewing 2 Haunches Starting with black 1. ch 2, 6 sc in 1st ch (6) 2. [inc] around (12) 3. [sc, inc] around (18) 4. [sc] around (18) F/O, leave long tail for sewing 2 Legs Starting with dark grey 1. ch 5, ss to 1st ch to form a ring (5) 2 – 5. [sc] around (5) F/O, leave long tail for sewing 2 Feet Starting with dark grey First Toe 1. ch 2, 4 sc in 1st ch (4) 2 – 5. [sc] around (4) F/O, leave long tail for sewing Second Toe Work the same as the first toe, DO NOT F/O 6. Attach to first toe with a sc, [sc] around the first toe, attach to second leg with a sc, [sc] around the second toe (8) 7. [2 sc, dec] around (6) Use the tail from the first toe to sew the hole between the toes shut 8. [sc, dec] around (4) 9 – 11. [sc] around (4) F/O, leave long tail for sewing 2 Small Feathers Starting with black 1. ch 5, [sc] across (4) 2 – 4. Turn, [sc] across (4) 5. Turn, 2 dec (2) 6. Turn, [sc] across (2) F/O, leave long tail for sewing Large Feather Starting with black 1. Turn, ch 7, [sc] across (6) 2 – 4. Turn, [sc] across (6) 5. Turn, dec, 2 sc, dec (4) 6. Turn, [sc] across (4) 7. Turn, 2 dec (2) 8. Turn, [sc] across (2) F/O, leave long tail for sewing Assembly See pictures above if you need help with placement Two diagrams have been included below if you are having trouble making out the placement of the feathers ▪ Sew the beak onto the head ▪ Sew the body onto the bottom of the head ▪ Sew the haunches onto either side of the body ▪ Sew the wings on either side of the body above the haunches ▪ Sew the feet onto the end of the legs ▪ Sew the legs onto the body in front of the haunches ▪ Sew the two small feathers next to each other onto the back of the body ▪ Sew the large feather just above the two small feathers

Do you hate purling? Perhaps you just haven't found the right method yet! In this blog post I explore what makes purling so annoying and the tension issues associated with it: rowing out, uneven ribbing, and unbalanced stitches. You'll also learn five methods for purling a stitch, each with its own advantages and disadvantages. Embrace the purl!

No Knots! I have a few pet peeves about sewing but my biggest one is tying knots. I have that little bitty sense of dread everytime I have to do it - partly because I can't see up close as well as I used to and partly that I like to make several knots and I hate the angst I have over trying to match them up so they're on top of each other. Anyway, here's a nice little technique for handsewing to do away with knots :) #1 double your length of thread/floss and thread the *tails* through the eye of the needle; this leaves a loop at the other end of your thread #2 starting from the back of your fabric, bring the needle up through the fabric to the front side but do not pull all the way through - leave the loop of your thread on the backside #3 push the needle through to the backside, leaving a small space between your original stitch and this new one #4 *this is a picture of the backside* after pulling the thread through from the front put your needle through the loop on the back #5 *this is a picture of the backside* now pull your thread firmly and you are ready to begin stitching! No Tails! One of my other pet peeves? Little thread tails poking up through your work ;) I use this technique on my softies/stuffies/stuffed toys. #1 okay, you've finished sewing up your seams and you've created a knot on the outside of your work #2 with the tail still attached, reinsert your needle as close as possible to your last stitch and then bring your needle up as far as possible from that stitch (basically the length of the needle but you can scrunch your fabric up on the needle so it will go further) #3 it should look something like this #4 now pulling the thread taut, scrunch the fabric up against your last stitch, then snip the thread close to the fabric and let go #5 voila! no peek-a-boo tails! I hope this helps some of you and my directions are clear enough. I'll permalink it in a side column for future reference.

I made a visual aid for claws! This will hopefully help those of you who are interested in selecting among some of the more common materials used for claws. I haven’t included everything possible of...

Whenever I get really anxious and nervous, I doodle and this is the result! I did this in 2021 and it is still my favorite piece I’ve made. I haven’t been able to capture the same creative drive since then, but hopefully I can find it again. Is it okay to post videos on Threads or is it more an Instagram thing?
