

Creative garden features you can DIY for free using twigs, sticks, and branches. Ideas include trellises and plant supports as well as garden artwork

Artist Chris Kenny uses bits of twig from tree branches to make these interesting found art pieces that exploit the human tenden

Even when the temperatures are blistering hot, there’s nothing that I enjoy more than working in my garden. That includes decorating. I just get so much joy out of landscaping and turning my outdoors beautiful.

This is such a simple idea but boy it looks so cool and modern. I bet this would be a great project to make when you are stuck indoors when it’s cold outside. Pop on over to the blog Homemade…

Creative garden features you can DIY for free using twigs, sticks, and branches. Ideas include trellises and plant supports as well as garden artwork

How to make magic nature wands.

How to make twig pencils | Making pencils out of branches and twigs | DIY Pencils | Back to school gifts, valentines gifts and DIY Gifts

Hair sticks are a great way to secure long hair in a bun and can be made for almost no cost in materials. Just use twigs you find lying around in the yard. Work out your stick length. You do this by measuring the width of your bun and...
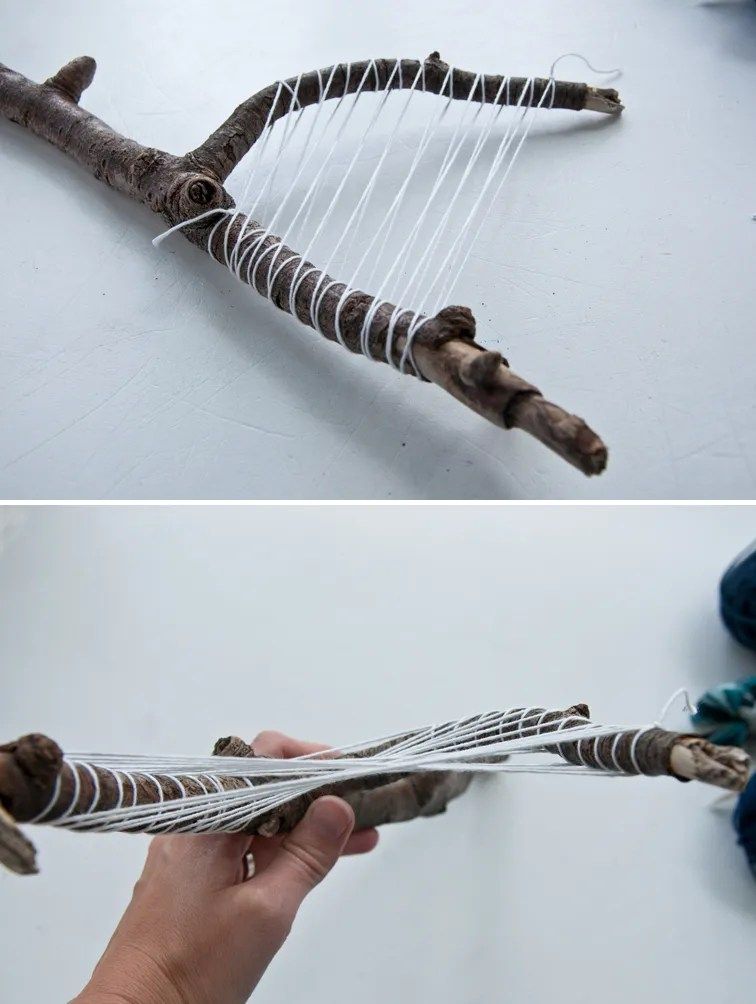
I have been admiring stick weaves for a while now and I finally decided to try it out. This is also really great for those who want to get into weaving, but don't own a loom just yet. It's a perfect free loom to play around on. I really like the rough texture of the

Explore Heath & the B.L.T. boys' 34690 photos on Flickr!

Twig pencils are fun, easy and cheap to make. And the expressions on your friends’ faces when you start scribbling with a stick will be writetious!

Our tree is finally up! And since I love me some Christmas crafts, my son and I recently whipped up these lovely (and easy) string art twig ornaments! Easy Twig String Art Ornaments This post contains affiliate links. Thank you for your support! These ornaments were super easy to make (and free to boot, since we had everything already on hand! First, we went to the park and picked up a bunch of sticks. Then, I tied our sticks together using Baker's Twine into cute triangles. Afterwards, we grabbed our collection of colorful yarn. I cut off bits of yarn and tied them to the ornaments. Then, we just wrapped the yarn around the ornament. (My preschooler struggled with longer pieces of yarn, so I made his strings shorter.) Overall, we wrapped around 3 pieces of yarn around each ornament, tying each one in place as we went along. Once we finished, I just tied on a shorter piece of yarn to hang the ornaments up in our tree. Love it when a craft is easy and beautiful too! More Natural Christmas Ornament Crafts for Preschoolers If you're looking for more preschool-friendly ways to incorporate natural items into ornament making, here are some more great ideas! Festive Pine cone Bird Christmas Ornaments | Artsy Momma Blogs Yarn Wrapped Christmas Tree Twig Ornaments | I Heart Crafty Things Snowflake Ornaments With Sticks | A Little Pinch of Perfect Easy Kid Made Shell Ornaments | Handmade Kids Art Painted Twig Icicle Ornaments | Schooltime Snippets Happy making, friends!

Engineering for Kids: Twirling Twig Mobile. Mobiles are a great demonstration of engineering/physics principles. Read on to find out how.

Learn how I made these DIY twig houses and used them as a cute addition to my home decor. All you need is sticks and some hot glue.

Hello! I have some decorative planter stakes for you today. Every time I see some painted branches around on the internet, they catch my eye. I just love how you can take something as simple as a branch (they don’t cost much!) and create a pretty cool craft out of them. I wanted to join in on the fun and create my own, but with a bit of a twist. I decided I would do some painted branches but add some extra crafty bits to them. Up leveling, if you will. You will need: some branches (ours were prunings from our own backyard. They are really nice and smooth.) My branches measure between 30 - 40cm (12" - 16"). acrylic paints extra decorative bits such as wool, beads, ribbon, fabric, ric rac or whatever else you would like to use from your craft stash. craft glue I started out painting the branches with acrylic paints. I used nice bright colours, painting bands of colour, some thin, and some wide. I added some spots here and there. Stripes also look good, in my opinion. I took some wool and started winding it around a section of the branch, after placing a bit of craft glue underneath to hold it in place. I tied off the end and trimmed the excess, then repeated with various other colours in random places on the other branches. I wanted to add some pom poms to the ends of my branches, so I used a really quick method for making them. I’d like to say that that was because I’m just super nifty, but it’s actually because I live in a house with two young girls who love to craft as much as I do and my pom pom maker was not locatable! But this is a quick and easy method all the same! You wrap the wool around two of your fingers. You need to leave a gap between your fingers to tie some wool around, so don’t do this first step too tight, or you wont be able to get the wool between your fingers. Tie a knot around the wool as in the photo, then slip off your fingers and trim through all of the loops. You’ll end up with a pretty scruffy looking ball; just give it a hair cut and it will be looking more like a pom pom in no time. I then glued my little pom poms to the ends of the branches with craft glue. I wrapped some beaded strands around by threading a beading needle onto some thread, and then tying the other end to a section of a branch. I then threaded on seed beads until I was happy with the length, and wound them around, with a bit of craft glue on the branch for extra hold. I finished by sewing into the above beaded strand and then tying the end off. Another fun idea is to sew in some little seed beads into some previously wound wool. I was pretty excited when I found these gold beads last time I went craft-supply shopping. I love them. I also tied some ribbon around in places with a knot. I liked the look of simply tying a knot and leaving bits of ribbon sticking out.I also tied around some small pom pom ric rac (one of my all time favorite craft supplies), and gluing some beads straight on. And there you have it. Some bright decorative branches that you can poke into some plant pots, or you can put them into a holder or vase as “flowers” that will never die, if you’re anything like me and you leave the flowers a little too long before taking them out to the compost! I hope you loved my painted branches tutorial. Jules :) You can find more of Jules here: Blog http://julesmadden.blogspot.com.au Instagram https://www.instagram.com/julesmadden/ Shop https://www.etsy.com/au/shop/artbyjulesmadden

Elkezdődött az ősz, az első heteket pedig akár otthonunk csinosítgatásával is eltölthetjük. Az új évszak beköszöntével érdemes egy picit másfajta hangulatot csempészni a lakásunkba, ehhez pedig a természetben is bőséggel találunk hozzávalókat. Válogatásunkban a virágokat, leveleket és terméseket helyezzük a középpontba.

Sticks are a wonderful medium to craft with - an such an inexpensive craft resource to get hold of. Let these 10 Stick Craft Ideas inspire you.

Engineering for Kids: Twirling Twig Mobile. Mobiles are a great demonstration of engineering/physics principles. Read on to find out how.

Further on we have prepared a collection of 46 Inventive DIY Wall Art Projects And Ideas which, we hope, will inspire you and make you want to start a DIY project right away.

Looking for beautiful, rustic nature crafts projects? Try these twig branch arts and crafts for kids and adults. These crafts made from twigs include wreaths, garlands, stars, a coat rack, reindeer, and more.

Rustic décor is so “in” right now. Whether you live in the country or your home is in the city, you can still have beautiful rustic décor and you can do it all yourself.

Source: diy-enthusiasts

This is a project I’ve wanted to do with the kids for the past few years, so when I foundread more Stick loom weaving on a grey morning

Whether you have a large yard and need space for your kids or pets to run free, or you live in a place where you need backyard privacy, installing a fence is a great way to define property boundaries, add safety, and create privacy around your home. The cost of a fence, however, can vary greatly depending on a variety of factors.

Maybe this year you aren’t quite into all the plastic Halloween stuff. I actually scored some real skulls from a sculptor that I am using as my Halloween decor. Maybe my costume this year wil…

Time to go out on a nature walk or to the closest craft store and pick up some twigs or craft sticks. We've been getting super crafty and created quite a selection of twig crafts

How To Make A Fairy House With Twigs and Moss Lately I'm obsessed with fairy gardens and houses and tiny little fairy furniture. These fun little structures make a great project to do with children or just for the child in you. I've made a few fairy structures and furniture pieces, and even a fairy door for a tree. But today, we'll focus on making a fairy house. Here is what you'll need: Twigs Moss Acorns Small Pine Cones Bark Glue (I used Gorilla glue) Air-Dry Clay Cardboard (like from a box) Large Masking Tape (optional) Pruning Shears (optional) If you're gathering items from nature, you might consider baking them before you use them to get the critters and critter eggs out. I did. I lined baking sheets with foil and baked at 225 F degrees for an hour. Use your judgement here. Baking twigs, acorns, pine cones, bark, etc. worked fine for me. I even baked a few fall leaves. Again, use your best judgement so as not to cause fires, etc. Step 1: Clay & Cardboard Cut a piece of cardboard into the size & shape you want for your house. I just used a piece of a box flap and cut into a rough circle shape. Next, use your air-dry clay to make a ring around the box, wrapping it underneath and making it thick on top (so you can push your twigs into it). It's easiest to work in small sections and just use your fingers to blend and work the clay as you go along. This makes a solid base for your structure. Step 2: Twigs Using your hands or a cutting tool, cut/snap the twigs until they are roughly the size you want for your fairy house. I recommend about 6-10 twigs for this, but you can decide what works for you. Place a drop of glue on the end of your twig, then press each twig into the clay around the edges of your cardboard and angle them so they meet in the middle like a tee-pee. If more clay is needed, you can add it around the base of each twig. Step 3: (Hardest Part) Let it dry overnight. Step 4: (Funnest Part) Start Decorating! Roof & Floor I added large masking tape to the tops of my branches to create a larger surface for attaching my bark "roof". I made sure the tape wrapped around and stuck to itself, not just to the branches as it might fall off. Cut pieces of bark using your hands to snap them or cutting tools (such as wire cutters or pruning shears). Attach the bark to the top of your structure. Don't worry if you have a few gaps. You can fill them in with moss. Also, add bark pieces to the floor using glue. Again, don't worry about gaps. Step 4: Moss Using super glue OR hot glue and some kind of craft stick or tweezers, begin tucking moss into all the cracks and crevices and gluing it into place. Also, cover all of the exposed clay at the base of your house with moss. Step 5: Steps Build twig "steps" for your fairy house by breaking a few twigs and gluing them to the house. Start with one twig on the doorstep, then glue another twig and another until you have the desired amount of steps. Step 6: Finishing Touches Time to use pine cones, acorns, dried flowers, etc., to create your own unique touches. Consider making an interesting embellishment above the door. Add some fancy dried flowers or twigs next to the steps. You could also make a candle stand. Pretty rocks, crystals, etc., also make fun additions. Use your imagination! And you're all done. You have a beautiful fairy house for your fairy friends. I've used mine in a terrarium in my home, but you could also place yours outside in a garden or in the woods. I'm not sure how long it would withstand the elements, but if it doesn't last long, that's just an excuse to make another one! :) Happy creating!

I have been admiring stick weaves for a while now and I finally decided to try it out. This is also really great for those who want to get into weaving, but don't own a loom just yet. It's a perfect free loom to play around on. I really like the rough texture of the

Creative interior decorating with natural materials is comfortable

Here’s a lemon squeezy little craft project for you to try out over the weekend. Spring is just around the corner so I’ll be adding a few green-fingered ideas over the coming months in …
