

At some point in their education nearly every student will make a cell model, it might as well be fun! Check out these 10 awesome ways to make a cell model!

Get to know the creator of the famous 'Blue Dog' with these Gorgeous George Rodrigue Art Projects for Kids, just in time for the artist's birthday!

Every year in my first year classes (12 year olds) I touch on the principles of perspective, at least in its one point form. We do a little art history, take a look at Masaccio and Mantegna. We mak…

Make sure your dart hits in the right place by adjusting the bust apex on your sewing pattern

This totally free Preschool Assessment Printable is exactly what you need to assess your preschooler's abilities. This set is a great starting point for kids starting at the age of three.

Have you ever wondered how to draw 3-dimensional letters that look like solid structures? Well…

1. Petits animaux brodés • 2. État d'amour • 3. Passer le contour • 4. Fleurs brodées • 5. Star sur un T-shirt • More ...

When you are renovating your home and changing any configuration, at some point you may need to build an interior wall. Learn how to build a wall!

Easy dress sewing patterns that are perfect for beginners looking to enhance their wardrobe without the hassle.

Learn how to draft pattern blocks with Pattern Making Basics! A text course with one lesson per day you can start making your own pattern blocks or slopers!

Learn the garment fit process including how to conduct a fit session. Identify common fit issues and how to correct them.

Let's do some simple practice exercises to improve our drawing and painting skills and learn one-point, two-point, three-point and atmospheric perspective!

I created this PDF worksheet to help students to think creatively, elaborate, and tell a story. I've used this when I taught in elementary (as young as kindergarten) and used it also in high school. There is no right or wrong answer and it is fun to see all the creative solutions that students come up with. My high school students taking the animation pathway especially liked this worksheet. We always share the results in class to see all the different solutions. I've included a blank sheet that you can have students create their own sheet and then switch with a partner and create a drawing from it. This adds a sense of challenge and game element to it. Further information: • Resources are ready to print and go Connect with me @ Messy Art Teacher Messy Art Teacher Blog Facebook Instagram Pinterest You can follow me by clicking at top of my store page if you would like to receive updates on new art resources and details of my forthcoming sales. Don’t forget to leave feedback on resources - you will earn points towards your next TPT purchases :-) Please contact me if you have any questions regarding this resource. Thanks! Nancy Miller - Messy Art Teacher

Download our free tree template that's perfect for making seasonal crafts for kids - or a whole four seasons craft!

Take a look at self portraits made by kids to get an idea of what they think of themselves, and their personality traits.

Grab your ruler and these step-by-step directions to create a one point perspective drawing project for kids in this fun art lesson.

Road-scapes Grant Haffner Style.... Elementary and Middle School ArtMixed Media Road Trip Landscape Art Lesson, Grant Haffner styleI have been preparing art lessons for the next school year. Recently, I gave this lesson a test run... I taught it online to my art club students in Vancouver, BC. They are elementary students (ages 6-12) They enjoyed the introduction to one point perspective and learning about contemporary artist, Grant Haffner. Here you can see what they created in one hour. This a

The metadata below describe the original scanning. Follow the All Files: HTTP link in the View the book box to the left to find XML files that contain more...

🌟 From baby loveys to king-sized bedspreads, this popular 12 point star baby blanket crochet pattern has been customized with pompoms, tassels, and even a solar system design. 🚀✨ Get inspired by these creative variations! 🧶💖

I can't believe this school year is almost over! I have only 5 days of school left, Friday is our last day. I will miss my kiddos dearly but am super excited to start my summer vacation. Next school year will bring so many changes for me~~new partner teacher (SUPER excited!!), best friend coming back to teach at my school (YAHOO!!), my baby girl is starting 8th grade at another school (BOO HOO!), and 3rd grade will switch classes next year (SCARED!!)!! I will need the summer to get ready for my 27+ new students next year. I love planning over the summer and will need this summer to prepare for switching classes. Switching won't be so bad, I will teach religion to 2 classes. I am really happy about not teaching science and social studies too!! I always have a hard time fitting these 2 subjects in on a daily basis. My students have been really busy these last 2 weeks doing my favorite all-time writing assignment~~~My Favorite Summer Vacation! I just love this writing and really LOVE how the finished essays turn out. Check them out below. You can click (HERE) to download the sunglasses template. You need to make 2 copies and tape them together. See below!! This year I decided to give out Candy Awards. I literally ran all over town looking for each type of candy. I even had my honey helping me (He was so cute going from store to store!)! I had the hardest time finding Lifesavers (Who would believe that?!). You can download your own set of Candy Awards from Tunstall's Teaching Tidbits. I found these awards during the summer and have been saving them all year. Check them out below! I can't wait to share them with my students tomorrow!!! Here is just a taste of what the awards look like! They are precious!!!! Here is a fun project I did with my class last week. I found this idea on Pinterest and just HAD to try it with my class! Look at the pictures below and try to see the shape! I am in LOVE with this!!

This method reduces the shoulder to match the back, but does not alter the width at the underarm. Draw a line parallel to the grain line down to the level of the front notch. Connect this to notch, ending at the stitching line. Mark the amount of reduction needed on the shoulder seam – point A.

I love the results of this dotted pumpkin project inspired by the dotted pumpkins of Yayoi Kusama. I did this art lesson with 3rd/4th grade. (Amazon Affiliate links have been used, at no extra cost to you.) I based our project after the lesson taught on the blog Plastiquem. First, I read the book Yayoi Kusama, From Here to Infinity, which is an inspirational book about her artwork and life. This is on my list of top 10 favorite books … Read more... →

Check out this list of embroidery stitches that work great for filling areas. From the obvious satin stitch or chain stitch to more unique stitches.
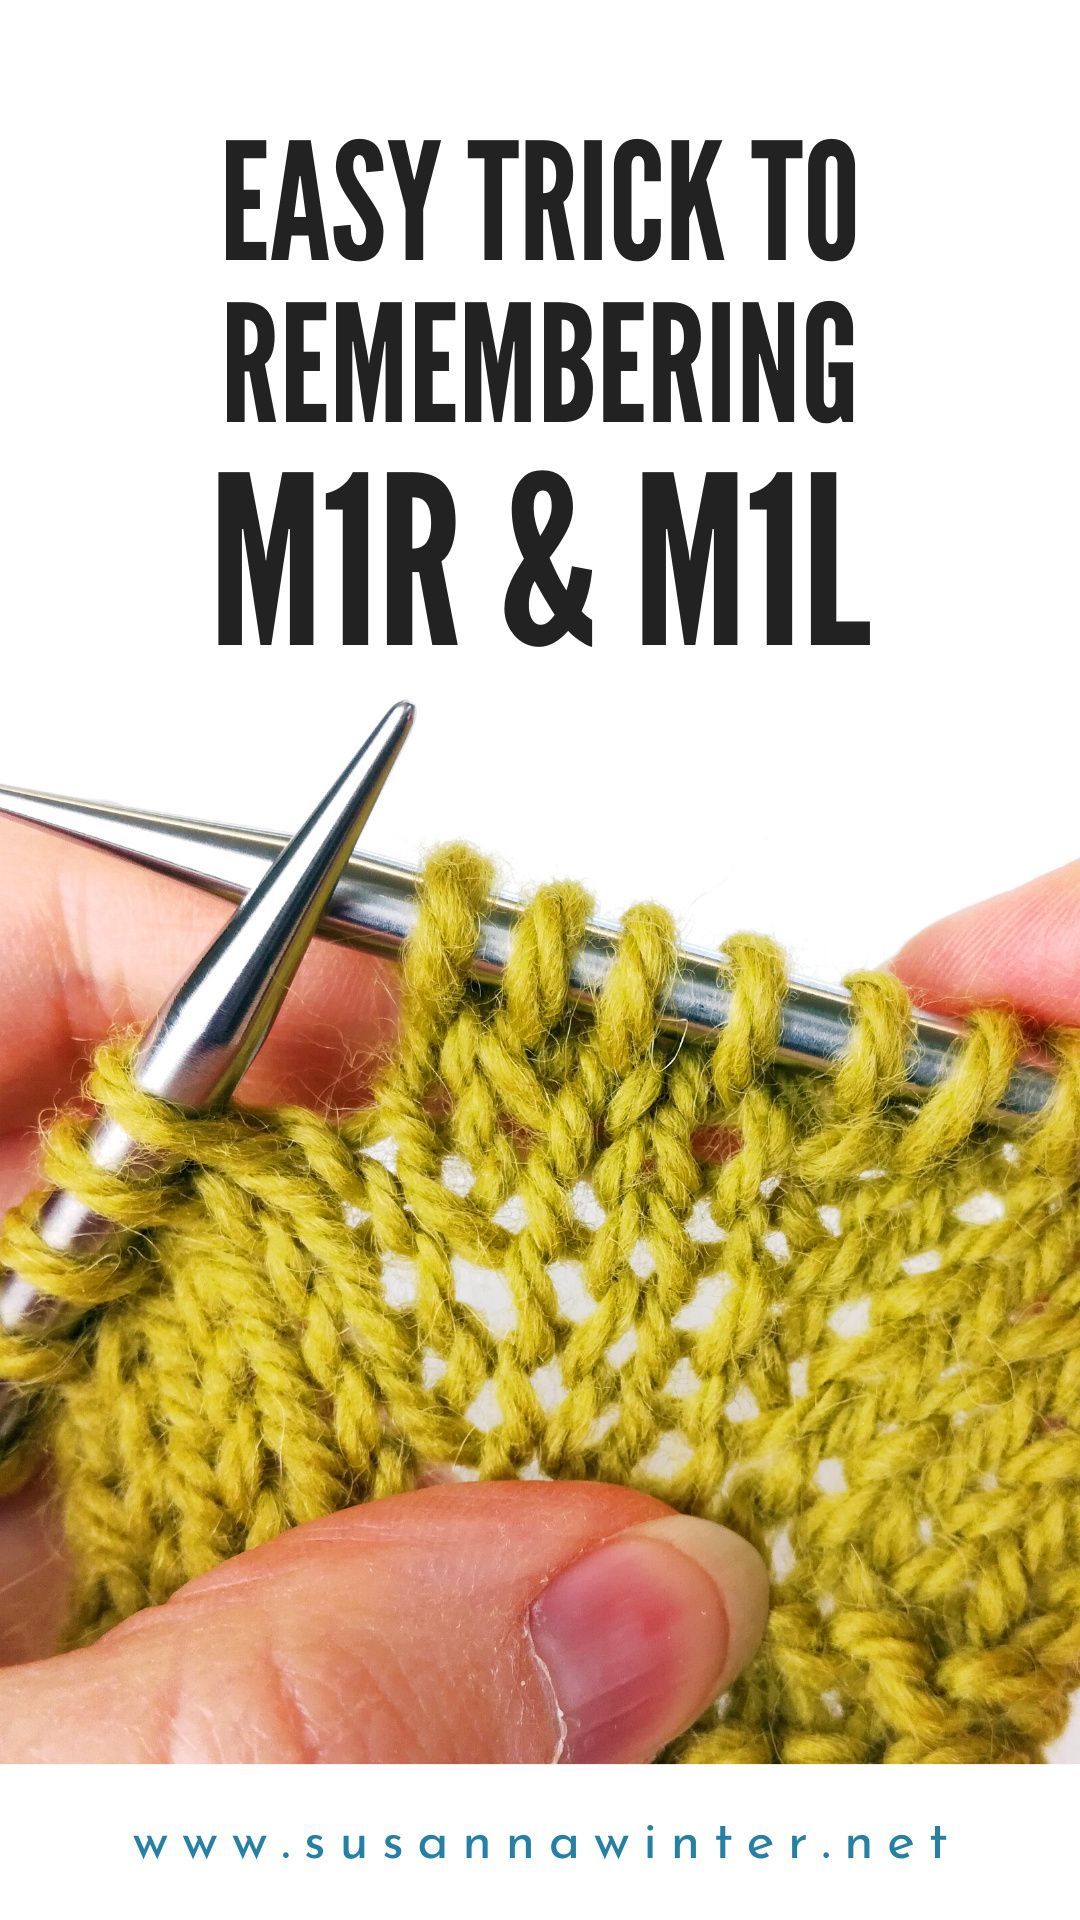
In this post I present an easy way to remembering M1R and M1L increases. The trick is to always pick up the strand from back to front with the needle that points in the direction you want the increase to lean into. I also propose handedness-neutral terms for M1 increases.

Le passé empiétant est un point très simple dans son principe, mais dont l’exécution n’est pas si aisée.. C’est un point de remplissage qui doit permettre un &laqu…

Petit article rapide pour vous partager des coloriages sur le thème de l'Automne. Ma fille est une grande fan de coloriages. Elle peut en faire plusieurs

Floral Alphabet PDF Pattern + Video Tutorial (available in English and Spanish) Important announcement! This is a digital file for instant download. Returns are not accepted and no physical item will be shipped once the purchase is made. Create your own floral alphabet with this pattern + video tutorial. Includes the full alphabet pattern plus &. Each letter is 10 cm tall (3.9 inches). The width varies between 9-11 cm (3.5-4.3 inches) depending on the letter. With this tutorial you will be able to embroider initials, names or complete words. It is ideal for creating a decorative frame, customizing clothes or making a personalized gift. PDF (13 pages) + Video-Tutorial (35 minutes) PDF Tutorial includes: + Pattern to print and transfer design adapted to a 15 cm (6´´) diameter embroidery hoop in A4 size. You can adapt the size of the pattern to your needs. + List of materials you will need + How to transfer the design to the fabric + Guide with the points used + Detailed guide to the points used with diagrams + How to finish your frame from the back + step by step instructions + Link to the video-tutorial on YouTube IMPORTANT: Thread color codes are not included. Just a few embroidered examples for inspiration. It is recommended to have basic knowledge of embroidery. The stitch guide includes and explains the stitches used to embroider this pattern as well as detailed instructions. So if any of the points used is new to you, it will help you learn and become familiar with it. Materials you will need: frame, needle, fabric, thread and scissors (in the tutorial you will find recommendations and advice on which materials to choose). How to access the digital files: once the payment has been confirmed you can download the files. If you need help downloading your PDF please visit https://www.etsy.com/help/article/3949 Intellectual Property: This pattern is for personal use only. Please do not sell the pattern or a product made from it. This pattern is licensed under a Creative Commons Attribution-NonCommercial-NoDerivatives 4.0 International license. Please read and review my shop policies before making a purchase. If you need help send me a message. Nature inspires my embroidery, you can follow my day to day on Instagram @missarorua Thank you for visiting my store ♥

Make an Origami 5 pointed star out of paper. Super easy to do and here are video and written instructions for however you like to learn.

En filigrane...

Learn how to work this simple knit stitch by watching this tutorial! Keep reading for tips on how you can use this pattern.

Aujourd'hui, je vous explique comment réaliser le point étoile. Vous connaissez peut-être déjà ce point, qui est assez connu au crochet. 1. On commence par une chaînette. Il faut 7 mailles pour la première étoile, puis 2 mailles pour par étoile supplémentaire. J'ai choisi de faire 5 étoiles, il me faut donc 7 + (4 x 2) = 15 mailles 2. On pique dans la deuxième maille après le crochet (pas la première), on fait un jeté, et on ramène le fil. On fait de même dans la 3ème, 4ème, 5ème et 6ème maille. 3. On se retrouve avec 6 boucles sur le crochet. 4. On fait un jeté, qu'on ramène à travers ces 6 boucles. 5. On fait une maille en l'air, ce qui va former notre première étoile. 6. On fait maintenant l'étoile suivante. On pique aux endroits indiqués sur le schéma, et on ramène un jeté à chaque fois. Dans les cas (1) et (3), il faut piquer dans des trous, pour (2) c'est un peu moins évident, il faut piquer sous la maille formant la dernière branche de l'étoile. Pour (4) et (5) ce sont les mailles suivantes de la chaînette. On se retrouve avec 6 boucles sur le crochet. 7. Comme pour la première étoile, on fait un jeté, qu'on ramène à travers les 6 boucles, puis une maille en l'air pour fermer l'étoile. 8. On continue jusqu'à la fin du rang, jusqu'à ce qu'il ne reste qu'une maille sur la chaînette. On fait une demi-bride dans cette maille. 9. Le rang 1 est maintenant terminé. On fait 2 mailles en l'air, puis on retourne l'ouvrage pour réaliser le rang 2. 10. Pour le rang 2, on réaliser deux demi-brides dans le centre de chaque étoile. 11. Pour terminer le rang, on fait une demi-bride dans la dernière maille. Ensuite on fait 3 mailles en l'air pour monter au rang suivant, on retourne l'ouvrage, puis on recommence à partir de l'étape 2. 12. Petite différence par rapport au 1er rang où on avait une chaînette comme base, pour ce 3ème rang, on pique le crochet dans la 2ème et la 3ème maille en l'air, puis sous les deux brins des 3 mailles suivantes. Et voici le résultat après 6 rangs !

Looking to grab students' attention during the first week of school with fun and easy science experiments? These super fun back to school science experiments are perfect for your first week of school science activities.

Spread the loveSo I’m going to make this short and sweet. If you collect house plants like I do, then you’ll propably get gnats at some point. Those annoying little creatures. Tiny little sneaky things. If you don’t get rid of them fast, they multiply SO FAST! They love the moist from your plants. Here i’m going to show you how to get rid of them with things you probably already have in your home. What you need water dish soap (any kind really) apple cider vinegar How to make your solution You’ll start by simply adding a drop (or 3) of dish soap into a bowl. plastic bowl or whatever you have handy. Next you’ll add some apple cider vinegar Last you’ll add the water I normally do about half water, half ACV. Then grab a plastic fork and mix it up a bit so it brings bubbles. Place the bowl or bowls in places where you see the gnats and where you keep plants. I’m not sure what attracts the gnats to this solution besides it being orange (they like orange) but it works like a charm. I didnt catch my gnats in time so I had so […]

Le punch needle fait fureur dans le monde du DIY. Découvrez cette technique de broderie avec Marie Suarez ! Matériel, conseils, tuto... Vous allez adorer !

Have you ever worked on a crochet project and was done and thought to yourself, "it needs a little something more, maybe a border"? At this crossroad, you decide to search for something fun, quick and nice looking that will complete your projects in a perfect way. Well, I may have just the border tutorial

La première fois que j'ai eu à changer de pelote j'ai cherché plusieurs façons de faire sur internet, mais je n'étais pas très satisfaite du résultat. Et j'ai enfin trouvé une technique où le resultat est beaucoup plus "net". - Sur la 1ère image, le...

Also known as: crewel stitch, stalk stitch, point de cable Through my research, I found out that stem stitch is crewel stitch. It is one of the easiest to be done and perhaps even one of the first stitches to be taught to any beginner. But, many...

The Suzette Stitch is one of my favorite stitches! I thought I would share a photo tutorial on How to Crochet the Suzette Stitch. This stitch creates such a beautiful and sturdy fabric. It's a really easy stitch to get the hang of because there's just a ONE ROW REPEAT! So easy!

Learn to crochet a solid square with no gaps at all! This solid afghan block is a great variation to the the classic granny for blankets, etc
