

Card Making Techniques Vol 14 is packed with 5 paper craft techniques you will find fun to use. Works great for other paper craft projects too

How to cut paper for the inside of your handmade cards. White inserts are great for dark color card bases.

How to sew knit neckband and knit binding - 3 options to finish your knit neckline, including photo tutorial and video tutorial

Loose, moody landscapes in watercolor was the perfect outlet! Lots of color play and simple composition is perfect for my tired little soul. In today's tutorial, I'm going to share with you my super easy watercolor landscape techniques. Perfect for beginner watercolor artists!

This Stadium Wave Pop-Up Card was an exclusive tutorial for my email newsletter subscribers in December 2023. This project has become popular

SPRINGY THINGY CARD TUTORIAL It's time for me to share my weekly Tuesday tip or technique. This tutorial fell out of my tips/techniques book as I moved it last night and so got chosen for today's effort. It makes a card front that the receiver pulls open and the card opens out like a spring to see an inner 20cm square area. Images of a completed card using this technique are below these instructions. Practice this on some scrap paper first. MATERIALS 20cm square piece of card stock or decorative paper of your choice. Pre colour the card if you wish. I'll use white card stock so you can clearly see what to do. Pencil, rubber, ruler, craft knife, craft mat and bone scorer. HOW TOO 1) On all sides measure and make a light pencil dot at the 5cm, 10cm and 15cm mark. On my sample I will use a black marker so you can see what I did easily. 2) From the 5cm mark at the left and right side measure and mark a dot at the 10cm mark 3) From the 10cm mark at the left and right side measure in and mark a dot in at the 5cm mark from each side 4) From the 15cm mark at the left and right side measure and mark a dot at the 10cm mark. These dots make a large diamond. 5) Score between all these dots. In my image I have drawn dashes to show you were to score 6) At the top 15cm mark score down to the right side of the diamond. At the 15cm mark at right edge, score across to the bottom of the diamond. At the 5cm mark on the bottom edge, score up to the left side of the diamond. Lastly at the 5cm mark at the left edge, score across to the top of the diamond. See dashed marks I have marked for you on my sample. All these score lines will be mountain folds. That is you bend the scored line back on itself to make a mountain. 7) At the 10cm mark on all sides score into the points on the diamond. See dashed areas on my sample. These scored lines and the scored lines for the diamond are all valley folds. That is you bend the scored line in on itself to make a little valley. Here is my sample with all the scored lines bent to their respective mountain and valley folds. 8) Now all you do is gently fold the card in on itself. Start on one side and then work your way around. If you have all the scored correct lines and folds it sort of winds in like a spring. It should look like this at the front and this at the back. Rub off all marked pencil dots. After I made my sample above for you I painted the card stock with white gesso, sprayed it with various sprays. Stamped and added embellishments to turn it into a steam punk card. I then layered and stuck it to a base card. As mine is fairly embellished it doesn't fold completely flat. This is m Springy Thingy Card open Some close ups of the folded card part. Hugs Annette In Oz

We all love pretty papers right? You wouldn't be a papercrafter without it. Well take a look at this very pretty Flight & Airy Desig...

Learn how to use watercolor pencils. These easy techniques are perfect for beginners who are new to using watercolor pencils.

Looking for step by step tutorials to guide you through watercolour techniques? This post will give you ideas, a video and a free worksheet.

How to Transfer Images onto Paper by Rebecca Parsons. Such a great Mixed Media technique, perfect to use in Art Journals or Junk Journals!

What are the dos and don'ts of gel printing? It's all here along with gel printing resources, a downloadable guide and free videos!

This Stadium Wave Pop-Up Card was an exclusive tutorial for my email newsletter subscribers in December 2023. This project has become popular

This Puppy Ears Card is an adorable card that is easy to make and a delight to open! Kids will love making and giving this fun card.

What makes gel printing so much fun? Is it the magical way the layers build up? Is it the excitement of seeing what patterns stuff from around the house can make? Is it that no two prints are exactly alike? Yes to all of those and so many many more reasons! I’ve put together a free […]

Gel Printing Cards for Valentines. Learn how easy it is to make your own unique, greeting cards with a Gel Plate. Printmaking made easy!

A Free Braided Card Template and a Video Tutorial Demonstration from Brandy Cox. She shows several example cards of this simple but so impressive technique

The ultimate guide to gel printing and the basics of gel printing you need to know - what materials you need and how to make gel prints

A Free Braided Card Template and a Video Tutorial Demonstration from Brandy Cox. She shows several example cards of this simple but so impressive technique

These fabric greeting cards are great for using up fabric scraps and letting your creativity run wild. Super easy to follow instructions.

Scrapbooking, card making, die cutting, stamping

Do you know how to tie a square knot or flat knot? Feeling frustrated with these craft ribbons? Let me show you the easy way to make these.

Embroidering greeting cards is a great craft for all ages and skill levels. Express your creativity easily and inexpensively.

Well I've been busy creating lately and thought I would share a tutorial with you. This one shows you how to use newspaper on your layouts i...

If you're just getting into watercolors or you've been painting for a while, sometimes it's fun to just experiment with techniques that you don't normally use when painting. I usually only paint using the basic watercolor techniques (see #1-#3) , but some of these are really fun to play around with,

In this tutorial video, I teach you my FAVORITE technique in watercolor—the wet-on-wet technique. It's great for loose-style painting.

A free tutorial for shirt card can be found here I'm getting organised earlier this year for Fathers Day in Australia (September 7th), with a shirt card. This card would also work great for a male birthday or even retirement...

Twist and Pop cards are fabulous, interactive cards with a central panel that twists and pops outward to reveal a message, image or combination of embellishments that is sure to impress the lucky receiver. TEMPLATE 1. Place the 11" x 41/4" piece of card stock horizontally on your score board and score at 51/2". Fold along the score line to form your card base. 2. Use some patterned paper and an assortment of embellishments to decorate the front of the card as desired. I used one of the images and sentiments from the new Make A Wish digital stamp set. 3. Place the 11" x 33/4" piece of card stock horizontally on your score board and score at 23/4", 51/2" and 81/4". Fold along each of the score lines starting with a valley fold, then a mountain fold and then another valley fold. 4. Decorate your image panel as desired. This is the section of the card that "twists and pops" as the card is open so you will probably want to display your main message or image here. 5. To create the mechanism, place the 8" x 3" piece of card stock horizontally on the desk in front of you. Use a pencil and ruler to measure and mark 21/2" from either end of the card stock, on both the top and bottom edge. See the template above for correct placement. 6. Place the 8" x 3" piece of card stock horizontally on your score board and score at 4". 7. Rotate the card stock so that it is now vertical on your score board. Score at 11/2" intersecting the first score line. 8. Now we're going to score between the pencil marks you made in step five. Start at the top, left hand mark and score down to the bottom, right hand mark. Now score from the bottom, left hand mark up to the top, right hand mark. The four score lines should intersect in the middle of the card stock. Refer to the template above. 9. Fold and burnish all score lines with a bone folder. 10. Use your index fingers to fold the long sections inward as shown in the photos below. 11. Use a bone folder to burnish all the folds. 12. Now we're ready to construct our twist and pop card. You should have an image panel, the inner mechanism and the card base. 13. Apply some glue to the triangle shaped area on the card mechanism. Lay a ruler along the centre of the card base to find the mid point and line up the mechanism, directly below the fold, making sure the card still closes easily. Apply the mechanism, glue side down, and allow to dry for a couple of minutes. 14. Apply more glue to the second triangle section, then close the card to adhere in place. Allow the card to dry for a few minutes to ensure the mechanism is securely attached. 15. Open the card. The mechanism should unfold and lay almost flat on top of the card. Place the image panel on top of the mechanism, matching the centre score lines and keeping the edges flush. 16. Fold the right hand panel over to reveal the mechanism. Use a pencil to mark the position of the image panel. 17. Repeat on the left hand side, so that you have two clear pencil lines on the mechanism. 18. Apply glue on the top, right hand section of the mechanism. Keep the glue between the pencil line and the edge of the card stock as seen in the photo below. 19. Move the image panel so that it's flush with the pencil line and centred over the mechanism (see below). Unfold the image panel and press against the glue. Allow to dry for a minute. 20. Apply glue on the bottom, left hand section of the mechanism, keeping the glue between the pencil line and the edge of the card stock as seen in the photo below. 21. Unfold the image panel and press against the glue. Allow to dry completely. Your card is now complete! (You may have to open and close the card a few times to limber up the mechanism) Stamps:

I am busily putting the finishing touches on Christmas presents, including one quilt that needs a label before it can be given away. I thought I would share how I make my quilt labels. This is not …

The chalkboard stamping style has been popular for awhile, it’s usual done with white embossing powder on black cardstock but here’s a clever twist on that idea, actually stamping with …

52 different mixed media techniques to alter cards! Explore and experimant with different materials and make your own altered playing cards

Join me for today's Folio Flip Album Tutorial where I share how I created this cute Folio with Recollections card stock and Colorbox paper.

J’ai devant moi un livre de tricot que j’ai depuis peu: The Opinionated knitter de Elizabeth Zimmerman. Ce livre est une mine d’or pour les tricoteuses. L’influence de madam…

If you’re not sure where to start when making a card, a card sketch is a great place to start! Learn how to use this simple card sketch!

New Stamp Tip: This is going to make you CRINGE!! (but it works!)

Make A Double Flap Fun Fold Card for Anniversary or Thank You Cards with Lisa Curcio of Lisa's Stamp Studio in this YouTube Card Making Class!
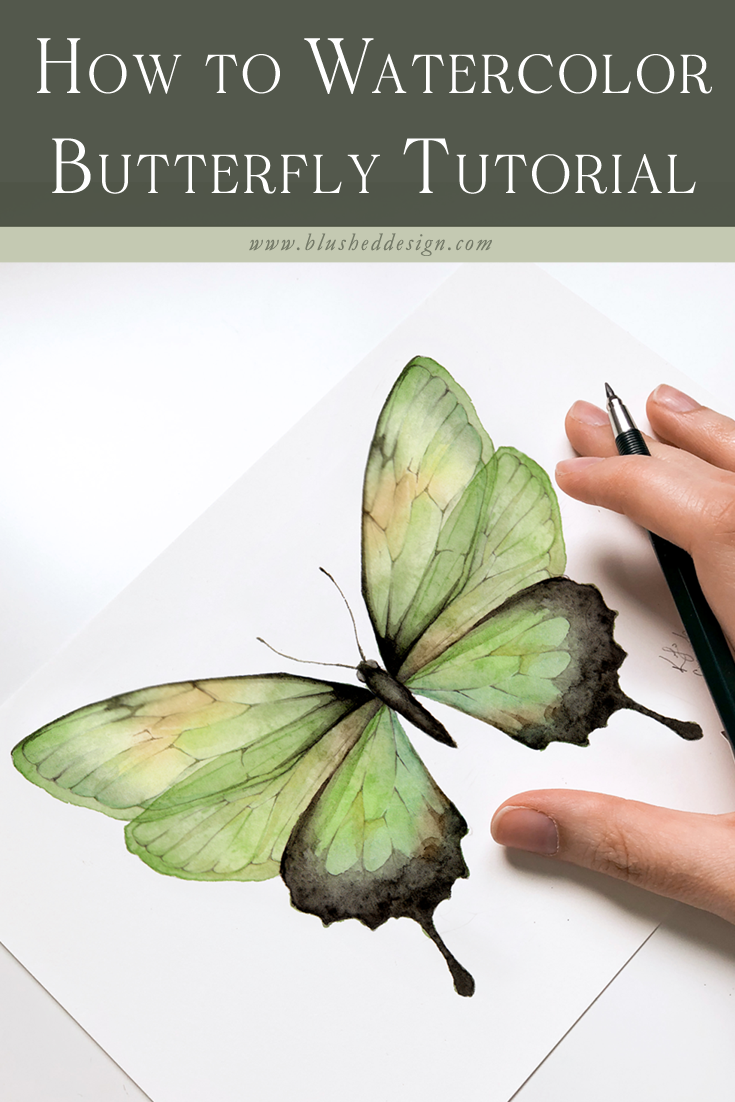
Remember that butterfly we drew together a few weeks ago? I’ve decided to share the watercolor process with you as well! I love the transparency in this butterfly—similar to the blue one that we did a few months ago—but one of my favorite aspects is the three-part wings! So so fun and pretty!

Today I am going to show 6 ways that I made easy background papers using supplies that you might already have around your craft room!

The Waterfall Technique is a clever and interactive way to add even more photos to your pages. Perfect for special trips or events.
