

TEMPLATE FOR LANTERNS

This was the second project I did with my Grade 7's during our "Art of Japan" unit. They designed their own kimono using a version of a bookmark template found here on the Crayola website. Kimonos are the beautiful traditional floor length robes worn mostly by Japanese women on special occasions. They are very expensive (often exceeding $10,000!) and beautifully patterned. I showed students examples of kimonos and then had them sketch ideas for a pattern in their sketchbooks. Image Source Image Source Each student got a blank template (which I modified from the one on the Crayoyla site) showing a very basic kimono with the robe, body and Obi (the sash). There were lots of Obi-Wan Kenobi jokes during this demo...lol I drew my own simple template and then photocopied it onto regular paper. When I do this project again, I would copy it onto cardstock, as the regular paper was too thin, really. I mean, it worked, but cardstock would be better (more sturdy). Draw your design/pattern in pencil then colour in with colored pencils or markers or watercolours. Students could do any type of pattern they wanted- not only traditional. Here's a camouflage pattern below, for example. Draw a little face. Colouring with markers..... Then cut all the pieces out... The Crayola sheet shows how to fold it all together- I also walked around and helped the kids individually fold it. It's quite simple. Here they are lined up and chilling out against the whiteboard. If you have a laminator, I would laminate them to make perfect bookmarks (and to make them sturdier). Ta da! On display with their 'Cherry Blossom' paintings.

While everyone just finished welcoming in the New Year, my family and I are awaiting another New Year’s celebration. January 28th is the Chinese Lunar New Year and for my Vietnamese family it is Tết . *This post contains affiliate links* I have been talking to my daughter about the upcoming holiday, so over the weekend, we made […]
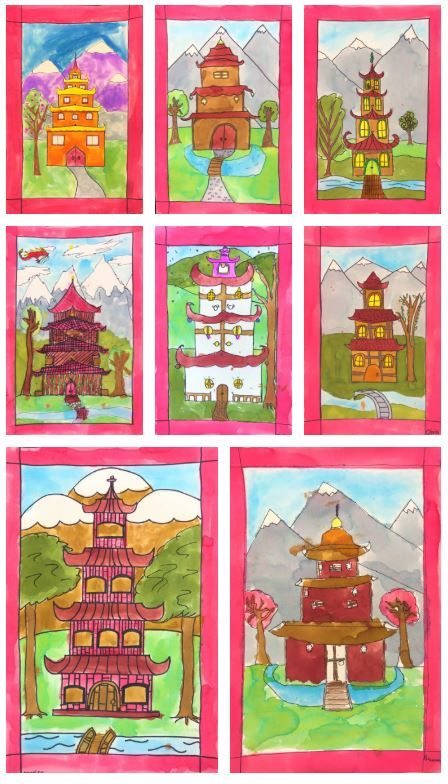
This dynamic pagoda art project for middle school students is a great curriculum connection to the ancient cultures of Asia!

This is a nature weaving lesson I found on the Crayola website (they have lesson plans!) called "Weaves of Gold". which I've modified a bit. You essentially paint some paper, then paint the underside of leaves to create leaf prints, then weave twigs or grasses through the painted paper. So we started off with a sheet of heavy/sturdy white paper. Fold it in half both ways so you have 4 equal sections. Paint the sections whatever colours you like. We used tempera cakes. Any paint will work. Gather some interesting leaves of various shapes and sizes; make sure they have strong veins on the backside, otherwise you won't get a decent print off of it. Paint the underside of the leaves with a thin, even coat of paint- we just used tempera and it worked fine. Just make sure the paint is not watery. You want it nice and opaque. Have students practice on scrap paper first until they get the hang of it. I like to use black for the dramatic contrast, but students chose whatever colours they liked. Make a leaf print in each section. I encourage the students to keep it fairly symmetrical or at least have the opposite sections match. Let this paper dry. Once it's dry, fold it in half and cut some thin strips through it. I draw a line across the top, about 3 cm thick, that I don't cut through. This keeps the paper all together. You can measure the strips with a ruler or not- it's up to you. It doesn't have to be perfect. The thinner the strips, the longer it takes to weave, FYI. For the nature weaving part, I gathered some long, dry grasses (I think they're decorative landscaping grasses) that were outside the school. You could have the students gather twigs or grasses outside as well, of course. We used about 15 'blades' of grass (weeds?) per artwork. You may need to cut them down to be just slightly longer than the width of your paper. Then weave the grass through the paper: over, under, over, under and alternate for the next row. After it's finished, we paint the back with white glue for extra strength and to keep the grasses all in place. You can trim off any ends that are too long or leave it au natural. Here are some Grade 7 results. Ta da! See my newest version of this lesson HERE.

Fun, easy paper plate crafts for children of all ages, including seasonal craft projects for Halloween, Thanksgiving, Christmas, and Easter.

In honor of Asian-Pacific American Heritage Month, Multicultural Kid Blogs is sponsoring a blog hop, and you are invited! We are celebrating the cultures and peoples of this diverse region by sharing our posts and asking other bloggers to do the same! Our hope is to create a wonderful resource for celebrating Asian-Pacific American Heritage Month with children. Be sure to visit the co-hosts of the blog hop (listed below) and share your own posts at the linky at the bottom! You can find even more resources on this region in our Asia and Australia and Oceania boards on Pinterest! Co-Hosts Multicultural Kid Blogs Crafty Moms Share Bicultural Mama Finding Dutchland Kid World Citizen Marie's Pastiche All Done Monkey Tiny Tapping Toes Creative World of Varya Miss Panda Chinese For the blog hop we decided to share some of the Asian-Pacific Island crafts we have been doing as well as a few books we have enjoyed! We have been having fun exploring games, puzzles, stories and crafts! For our crafts we used three books as our main resources: Asian-American Crafts Kids Can Do! by Sarah Hartman, Hands-On Asia: Art Activities for All Ages by Yvonne Y. Merrill, and Asian Crafts by Judith Hoffman Corwin. We started by looking at China with a Chinese Tanagram Puzzle. I made one from a square piece of memo paper. I copied the line placement from Asian Crafts. Then I showed Hazel the pictures of ways to arrange the shapes and she chose some of her favorites and made them. For more ideas on looking at China, check out the posts here. Next we looked at Japan with some origami. I made some shapes for Hazel and she and I made a few. To make these origami animals, we followed instructions from two books: Super Quick Origami Animals by Nick Robinson and Making Origami Animals Step by Step by Michael G. La Fosse. One of the things I really liked about making origami and about the tanagram is that you can review geometrical shapes. We talked about folding the paper into rectangles or triangles. For older children you can go into more detail and talk about right triangles, etc. We also made Japanese fans. Now Hazel has a thing for fans, so she loved this. We followed instructions using Asian-American Crafts Kids Can Do! except instead of cutting out circles we used paper plates. To make them you need a paper plate or a paper circle and three popsicle/craft sticks. Two of the sticks are glued in a v-shape next to the handle stick to support your circle. For more ideas on looking at Japan, check out here. We also had fun making a Nepal snow leopard mask. Hazel pointed out how we saw snow leopards at the zoo recently. Again I used a paper plate and cut the pattern we found in Hands-On Asia. Not reading the directions closely I cut out the eyes to make it a wearable mask instead of a piece of art. Then I let Hazel have fun. I cut out the mouth, tongue and ears for her as well as using the book's pattern for the nose. I also followed the instructions in Asian Crafts for a simplified version of Pachisi, a game from India. I decided to make it on the computer instead of hand drawing all the squares. As a result, you can download what I made by clicking the picture above or here. We decided to use glass beads and rocks as the playing pieces. Hazel could not wait to play and started to play with Ducky. To start you put the piece on its matching color in the corner of the board. The first person rolls the die (you have to make one either by cutting mine out and taping it together or getting a wooden cube and painting/coloring sides). If the person rolls his or her own color they get to move one square counterclockwise and then roll again. If the person rolls white, they just get to roll again. If they roll any other color the turn is over and the die goes to the person to the right. Once the piece makes its way around the board the player than has to go up the center spoke on their color. The person to make it to the middle first wins. For more ideas on learning about India, check out these posts. Hazel's and Ducky's Game In Play We have also been enjoying some stories from the different countries and about children adjusting to moving from the country to America and such. Here are some of our favorites. For more book choices, check out my Asian-Pacific Book Round-Up post. For all of our Asian-Pacific Island related posts check out here. And of course check out all the great ideas shared in this blog hop!! Feel free to share your Asian-Pacific crafts, books, and more as well!! An InLinkz Link-up

Explore Meet the Masters artists for engaging art lessons tailored for elementary students. Dive into artist study and unlock creativity with our curated resources. Discover art lessons based on renowned artists.

These scrolls start with a chalk pastel blended background and india ink branches blown out with a straw. Students then used Craypas to create their blossoms and used a small red foam square to create their signature seal. (I wanted to purchase a real signature seal but could not find one so instead I created a seal using an exacto blade and an old pink eraser!) Some classes ended up with extra time so we drew "Stillwater"the panda from the book "Zen Shorts" by Jon Muth. For displaying these lovely projects, I used hot glue to attach popsicle sticks together to ack like a dowel on the top, and glued a single popsicle stick to the bottom to give the scroll a bottom weight. A small red string to hang was the finishing touch.

After spending 6 or 7 classes on the Chinese Dragon Puppets, my fourth graders needed a quickie project to hold their attention and get another piece of finished work on the walls. These Asian Banners fit the bill quite nicely! Here's the skinny on these skinny projects (har har). Kiddos grabbed a long, narrow sheet of paper and folded it accordion-style. This year, I splurged on Dippity Dye paper.* At one building, we used liquid watercolor (slightly diluted with tap water), which gave us 6 color options; the other building used homemade liquid watercolors made from dried-out markers soaked in water. The homemade colors were far superior! The accordion, still folded, got double-dipped into a set of analogous colors. Papers were unfolded and laid out to dry till next time. On the second day, we watched the following video: Then, everyone fashioned a hanging thingamajig (quality vocab, check) for their banner. A slip knot wedged between some scrap black paper did the trick, as I didn't have enough wooden dowels, chopsticks, or some facsimile thereof and didn't care to mess with them anyway. Students chose several Chinese characters to paint onto their banners in a vertical arrangement. (You could use any Asian language, of course; I opted for Chinese, as I have several students of Chinese descent.) I had one of my buildings use true India Ink, while the other used black tempera. While the India ink soaked into the Dippity Dye paper very quickly and therefore wasn't as easy to work with as the paint, I reeeeally prefer the look of the ink. With black tempera With India ink Some of my kiddos opted to paint their names instead of a few random characters--I provided them with a website where they could look up their names to print out and bring along for the second day, if they so desired. These bright banners will look great hanging around the halls! * Personally, I have mixed feelings about the Dippity Dye paper. I found that thin, student-grade watercolor paper works just fine for this particular project. That being said, the Dippity Dye paper is nice and does a significantly better job of blending of colors and creating a tie-dye effect. It's extremely thin, though, and therefore easily ripped. I'm curious about the name-brand Dippity Dye--I wonder if it could possibly blend and be any more brilliant than our homemade liquid watercolors. P.S. I'm still looking for book recommendations to amp up the art room library! Please help!

Are ya'll familiar with the Japanese holiday called Children's Day? I think sometimes my students are convinced that everyday is Children's Day which is why nearly every night is Grape-Flavored Grown-Up Drink Day for this art teacher. But I digress. The real Children's Day is celebrated in Japan on the 5th day of May which, in case you didn't know, is the 5th month. It's a day set aside to respect children's personalities and to celebrate their happiness. Which, seriously, that part should be everyday in an art room, don't you think? On this day, all children fly a carp kite called a koinobori on a flag pole, along with the koinobori of those in their family. The father's koinobori is usually at the top, followed by the mother with the children's kites, from oldest to youngest, flown below. I had big visions of flying the kids' koinobori outside of our school for the occasion and for our upcoming art show (which is in 10 days, people! Not that I'm freaking out at all). However, we had some pretty Big, Bad and Ugly weather at the start of last week that lead me to believe that keeping these lovelies inside would be a better bet. The last time I hung something in these windows, it was a pretty big hit so I thought I'd do it again with our koinobori. Along with a sign, of course. Otherwise everyone just thought they were super cool fish kites. Which they are but there's also a super cool story behind them as well. So just how did my friends in First Grade Land create these awesome koinobori? Dude, it was so super easy and, like, the World's Fastest Art Project (which for me is a total rarity). Here's a list of the supplies we used: Roylco's Japanese Carp Wind Sock Kit For about $8, you can get your kitten mittens on a set of 24 die-cut fish with tag board strips that get glued into the mouths (if you look at the orange fish above, you'll see the tag board propping open the mouth.) Sharpies. This is optional. I had the kids use these to add details that they wanted to remain permanent. Watercolor Paint. Boy, talk about an End-of-the-School-Year-We-Are-Almost-Outta-Supplies Limited Palette, ya'll. But, we're artists, kids! We can make do! Or something like that. A Spray Bottle Full of Water. Yarn. Hole Punch. How the lesson went down: My kids have been learning about Asia, with an emphasis on Japan, all year. In fact, we'd just finished off this sushi lesson not long ago and had just completed making a ceramic koi fish. I needed a short and quick tie-in lesson while our clay projects dried and fired. These koinobori were just the perfect thing. After chatting about Children's Day, the kids were given a tray of warm and cold colored Sharpie markers. We chatted about the parts of a fish (fins, gills, scales, tail, etc.) and how we might emphasize those with either warm or cool colored Sharpies. That took up our first 30 minute session. For the next 30 minute session, we reviewed correct use of water color paint (which obviously doesn't include cleaning the tray, ew!). I also told the kids that they were again to use warm or cool colors but that they didn't have to stick with the same color family as they used last art class. Once the kids had collected their supplies (a paint brush and two ziplock bags -- the two things I forgot to mention in that above supply list, doh!), they were to raise their hand and I came over and squirted their fish with water. Because the paper is made from the same stuff as coffee filters, a wee spritz of water really helps the water color paint to spread out. The kids thought that was pretty rad. Once the kids had painted their entire fish, they were given the option of splatter painting. I don't think a single kid opted out of that one. To dry, the kids gingerly carried their zip locked fish to the floor. The reason I kept the bags on the bottom was that I found that the color will often run off the paper and on to the surface that it is sitting on. However, if the paper is allowed to "sit in it's own juices" so to speak, it dries much more vibrant. Now, normally, I woulda had the kids add the tag board and attempt to tie the string. But I was in a bit of a time crunch. So I set aside about 15 minutes every afternoon to hot glue the tag board at the top, hot glue it into a tube, hole punch the top and add the yarn. By the end of the week, I had all of my classes finished. To hang, I bent a paper clip so that it looked like some sort of scary prison shank and stuck it into the foamy ceiling tie. I added the top fish to that paper clip. Then I hole punched the bottom of that fish and added a bent paper clip to that hole where I attached the second fish. If I'm not making any sense it's because I'm deep into that aforementioned Grape-Flavored Grown-Up Drink Day and I simply cannot be held accountable for my incoherentness. I managed to get 'em all up and ready for Monday, May 5th on Friday. I can't wait for the kids (and the grown kids) to see them and celebrate all things children -- especially during our standardized testing week! Until next time, enjoy Children's Day! Or Grape-Flavored Grown-Up Drink Day. Your choice.

The Damarkurung is a traditional Indonesian craft. Learn how you can make these beautiful lanterns with your kids so the tradition continues!

Best website for documentary, people, travel, landscape, nature, portraits, black and white, Asian culture and art photography with free wallpapers and images.

Discover Hokusai's 36 views of Mount Fuji with this fun printmaking activity for kids! This Japanese wooblock prints lesson is for preschool and elementary.

Fourth graders are so enthusiastic about creating these Chinese dragons. We talked about the difference between the European dragon and the Chinese dragon. The Chinese dragon is a symbol of good luck and wisdom. It is a symbol of power for people who are worthy of it and a creature to be feared by fools and evildoers. The European dragon on the other hand is typically an unruly dreadful beast feared by all for its ruthlessness. We talked about how the appearance of the Chinese dragon has changed over time. It has become a creature that flies with a serpent's body, hawk claws, cow ears and the whiskers and scales of a carp (koi). We also learned the Chinese Waterfall Legend. It tells if the koi fish that swam up the Yellow river against the current and tried for 100 years to jump up the waterfall. When he finally made it, he became a dragon that chases pearls of wisdom. We talked about the life lessons that this story teaches us such as perseverance. The dragon is a huge part of Chinese culture and makes many appearances at celebrations. We also watched some dragon dance videos while we worked. Notice that it is chasing a pearl of wisdom! The main art concept that we talked about during this project was color blending. We talked about how to layer colors to blend, and we talked about using water to help colors to smoothly transition on our papers. Does it Blend Well? YES: 2 Primary Colors, 2 Analogous Colors (next door neighbors on the color wheel) NO: 3 Primary Colors, Complementary Colors (opposites on the color wheel), Secondary Colors When we talk about blending, I explain that our goal is to use vibrant rainbow colors on our artwork, so it's important to know how to avoid brown. Next, we do some color math. I explain that to make brown, you combine all 3 primary colors. I write out this basic equation on the board... Red+Yellow+Blue = Brown Then, we simplify the equation a variety of ways: If, R+Y=O, and Y+B=G, and R+B=P, and R+Y+B= Brown then... (R+Y)+B= O+B = Brown ...or... (Y+B)+R= G+R = Brown ...or... (R+B)+Y= P+Y = Brown As it turns out, when we simplify the equation we end up with complementary pairs: (notice that these are on the "NO" list). Orange and Blue Green and Red Purple and Yellow Why can't we blend secondary colors together Mrs. Seitz? To answer this question we expand the equations and discover that all 3 of the primary colors are present in the mixtures. Orange + Green = (R+Y)+(B+Y) Green + Purple = (Y+B)+(R+B) Purple + Orange = (B+R)+(R+Y) The color math really helps the kids understand the reasons behind what works and what doesn't. It also gives them a way to figure it out if they haven't memorized what works. When I teach it this way, it creates an ah-ha moment for many of the kids. At this point in the year, my 4th graders are really quite good with color concepts because we have already done our Kandinsky color mixing lesson with fractions! Learning Goals: I can... - Explain the difference between Chinese and European dragons - Tell about Chinese dragons - Blend using analogous colors (next door neighbors) - Give examples of colors that do and do not blend well

After spending 6 or 7 classes on the Chinese Dragon Puppets, my fourth graders needed a quickie project to hold their attention and get another piece of finished work on the walls. These Asian Banners fit the bill quite nicely! Here's the skinny on these skinny projects (har har). Kiddos grabbed a long, narrow sheet of paper and folded it accordion-style. This year, I splurged on Dippity Dye paper.* At one building, we used liquid watercolor (slightly diluted with tap water), which gave us 6 color options; the other building used homemade liquid watercolors made from dried-out markers soaked in water. The homemade colors were far superior! The accordion, still folded, got double-dipped into a set of analogous colors. Papers were unfolded and laid out to dry till next time. On the second day, we watched the following video: Then, everyone fashioned a hanging thingamajig (quality vocab, check) for their banner. A slip knot wedged between some scrap black paper did the trick, as I didn't have enough wooden dowels, chopsticks, or some facsimile thereof and didn't care to mess with them anyway. Students chose several Chinese characters to paint onto their banners in a vertical arrangement. (You could use any Asian language, of course; I opted for Chinese, as I have several students of Chinese descent.) I had one of my buildings use true India Ink, while the other used black tempera. While the India ink soaked into the Dippity Dye paper very quickly and therefore wasn't as easy to work with as the paint, I reeeeally prefer the look of the ink. With black tempera With India ink Some of my kiddos opted to paint their names instead of a few random characters--I provided them with a website where they could look up their names to print out and bring along for the second day, if they so desired. These bright banners will look great hanging around the halls! * Personally, I have mixed feelings about the Dippity Dye paper. I found that thin, student-grade watercolor paper works just fine for this particular project. That being said, the Dippity Dye paper is nice and does a significantly better job of blending of colors and creating a tie-dye effect. It's extremely thin, though, and therefore easily ripped. I'm curious about the name-brand Dippity Dye--I wonder if it could possibly blend and be any more brilliant than our homemade liquid watercolors. P.S. I'm still looking for book recommendations to amp up the art room library! Please help!

Are ya'll familiar with the Japanese holiday called Children's Day? I think sometimes my students are convinced that everyday is Children's Day which is why nearly every night is Grape-Flavored Grown-Up Drink Day for this art teacher. But I digress. The real Children's Day is celebrated in Japan on the 5th day of May which, in case you didn't know, is the 5th month. It's a day set aside to respect children's personalities and to celebrate their happiness. Which, seriously, that part should be everyday in an art room, don't you think? On this day, all children fly a carp kite called a koinobori on a flag pole, along with the koinobori of those in their family. The father's koinobori is usually at the top, followed by the mother with the children's kites, from oldest to youngest, flown below. I had big visions of flying the kids' koinobori outside of our school for the occasion and for our upcoming art show (which is in 10 days, people! Not that I'm freaking out at all). However, we had some pretty Big, Bad and Ugly weather at the start of last week that lead me to believe that keeping these lovelies inside would be a better bet. The last time I hung something in these windows, it was a pretty big hit so I thought I'd do it again with our koinobori. Along with a sign, of course. Otherwise everyone just thought they were super cool fish kites. Which they are but there's also a super cool story behind them as well. So just how did my friends in First Grade Land create these awesome koinobori? Dude, it was so super easy and, like, the World's Fastest Art Project (which for me is a total rarity). Here's a list of the supplies we used: Roylco's Japanese Carp Wind Sock Kit For about $8, you can get your kitten mittens on a set of 24 die-cut fish with tag board strips that get glued into the mouths (if you look at the orange fish above, you'll see the tag board propping open the mouth.) Sharpies. This is optional. I had the kids use these to add details that they wanted to remain permanent. Watercolor Paint. Boy, talk about an End-of-the-School-Year-We-Are-Almost-Outta-Supplies Limited Palette, ya'll. But, we're artists, kids! We can make do! Or something like that. A Spray Bottle Full of Water. Yarn. Hole Punch. How the lesson went down: My kids have been learning about Asia, with an emphasis on Japan, all year. In fact, we'd just finished off this sushi lesson not long ago and had just completed making a ceramic koi fish. I needed a short and quick tie-in lesson while our clay projects dried and fired. These koinobori were just the perfect thing. After chatting about Children's Day, the kids were given a tray of warm and cold colored Sharpie markers. We chatted about the parts of a fish (fins, gills, scales, tail, etc.) and how we might emphasize those with either warm or cool colored Sharpies. That took up our first 30 minute session. For the next 30 minute session, we reviewed correct use of water color paint (which obviously doesn't include cleaning the tray, ew!). I also told the kids that they were again to use warm or cool colors but that they didn't have to stick with the same color family as they used last art class. Once the kids had collected their supplies (a paint brush and two ziplock bags -- the two things I forgot to mention in that above supply list, doh!), they were to raise their hand and I came over and squirted their fish with water. Because the paper is made from the same stuff as coffee filters, a wee spritz of water really helps the water color paint to spread out. The kids thought that was pretty rad. Once the kids had painted their entire fish, they were given the option of splatter painting. I don't think a single kid opted out of that one. To dry, the kids gingerly carried their zip locked fish to the floor. The reason I kept the bags on the bottom was that I found that the color will often run off the paper and on to the surface that it is sitting on. However, if the paper is allowed to "sit in it's own juices" so to speak, it dries much more vibrant. Now, normally, I woulda had the kids add the tag board and attempt to tie the string. But I was in a bit of a time crunch. So I set aside about 15 minutes every afternoon to hot glue the tag board at the top, hot glue it into a tube, hole punch the top and add the yarn. By the end of the week, I had all of my classes finished. To hang, I bent a paper clip so that it looked like some sort of scary prison shank and stuck it into the foamy ceiling tie. I added the top fish to that paper clip. Then I hole punched the bottom of that fish and added a bent paper clip to that hole where I attached the second fish. If I'm not making any sense it's because I'm deep into that aforementioned Grape-Flavored Grown-Up Drink Day and I simply cannot be held accountable for my incoherentness. I managed to get 'em all up and ready for Monday, May 5th on Friday. I can't wait for the kids (and the grown kids) to see them and celebrate all things children -- especially during our standardized testing week! Until next time, enjoy Children's Day! Or Grape-Flavored Grown-Up Drink Day. Your choice.

TEMPLATE FOR LANTERNS

I’ve tried an effective technique to imitate the Ming Vases, the typical Chinese vases in white porcelain with blue decorations. We begin copying the characteristic shapes of the Chinese vases from…

In this Ming Vase Art Lesson, students will design their own Ming Vase while learning about this valuable art form, and it's place in history. Grades K-1.

Wayang puppets are from the culture of Indonesia. Print our template and craft it into puppets of your own.

Are ya'll familiar with the Japanese holiday called Children's Day? I think sometimes my students are convinced that everyday is Children's Day which is why nearly every night is Grape-Flavored Grown-Up Drink Day for this art teacher. But I digress. The real Children's Day is celebrated in Japan on the 5th day of May which, in case you didn't know, is the 5th month. It's a day set aside to respect children's personalities and to celebrate their happiness. Which, seriously, that part should be everyday in an art room, don't you think? On this day, all children fly a carp kite called a koinobori on a flag pole, along with the koinobori of those in their family. The father's koinobori is usually at the top, followed by the mother with the children's kites, from oldest to youngest, flown below. I had big visions of flying the kids' koinobori outside of our school for the occasion and for our upcoming art show (which is in 10 days, people! Not that I'm freaking out at all). However, we had some pretty Big, Bad and Ugly weather at the start of last week that lead me to believe that keeping these lovelies inside would be a better bet. The last time I hung something in these windows, it was a pretty big hit so I thought I'd do it again with our koinobori. Along with a sign, of course. Otherwise everyone just thought they were super cool fish kites. Which they are but there's also a super cool story behind them as well. So just how did my friends in First Grade Land create these awesome koinobori? Dude, it was so super easy and, like, the World's Fastest Art Project (which for me is a total rarity). Here's a list of the supplies we used: Roylco's Japanese Carp Wind Sock Kit For about $8, you can get your kitten mittens on a set of 24 die-cut fish with tag board strips that get glued into the mouths (if you look at the orange fish above, you'll see the tag board propping open the mouth.) Sharpies. This is optional. I had the kids use these to add details that they wanted to remain permanent. Watercolor Paint. Boy, talk about an End-of-the-School-Year-We-Are-Almost-Outta-Supplies Limited Palette, ya'll. But, we're artists, kids! We can make do! Or something like that. A Spray Bottle Full of Water. Yarn. Hole Punch. How the lesson went down: My kids have been learning about Asia, with an emphasis on Japan, all year. In fact, we'd just finished off this sushi lesson not long ago and had just completed making a ceramic koi fish. I needed a short and quick tie-in lesson while our clay projects dried and fired. These koinobori were just the perfect thing. After chatting about Children's Day, the kids were given a tray of warm and cold colored Sharpie markers. We chatted about the parts of a fish (fins, gills, scales, tail, etc.) and how we might emphasize those with either warm or cool colored Sharpies. That took up our first 30 minute session. For the next 30 minute session, we reviewed correct use of water color paint (which obviously doesn't include cleaning the tray, ew!). I also told the kids that they were again to use warm or cool colors but that they didn't have to stick with the same color family as they used last art class. Once the kids had collected their supplies (a paint brush and two ziplock bags -- the two things I forgot to mention in that above supply list, doh!), they were to raise their hand and I came over and squirted their fish with water. Because the paper is made from the same stuff as coffee filters, a wee spritz of water really helps the water color paint to spread out. The kids thought that was pretty rad. Once the kids had painted their entire fish, they were given the option of splatter painting. I don't think a single kid opted out of that one. To dry, the kids gingerly carried their zip locked fish to the floor. The reason I kept the bags on the bottom was that I found that the color will often run off the paper and on to the surface that it is sitting on. However, if the paper is allowed to "sit in it's own juices" so to speak, it dries much more vibrant. Now, normally, I woulda had the kids add the tag board and attempt to tie the string. But I was in a bit of a time crunch. So I set aside about 15 minutes every afternoon to hot glue the tag board at the top, hot glue it into a tube, hole punch the top and add the yarn. By the end of the week, I had all of my classes finished. To hang, I bent a paper clip so that it looked like some sort of scary prison shank and stuck it into the foamy ceiling tie. I added the top fish to that paper clip. Then I hole punched the bottom of that fish and added a bent paper clip to that hole where I attached the second fish. If I'm not making any sense it's because I'm deep into that aforementioned Grape-Flavored Grown-Up Drink Day and I simply cannot be held accountable for my incoherentness. I managed to get 'em all up and ready for Monday, May 5th on Friday. I can't wait for the kids (and the grown kids) to see them and celebrate all things children -- especially during our standardized testing week! Until next time, enjoy Children's Day! Or Grape-Flavored Grown-Up Drink Day. Your choice.

Tourism in Japan is growing, and fast. According to JNTO, the estimated number of international travelers to Japan in March 2018 was about 2.6 million (+18.2 percent from the previous year), making it the biggest March ever. In 2020 the Summer Olympics will be hosted in Tokyo, and the city and country will have to cope with the resulting huge influx of tourists. This growth

This Taj Mahal Art Project for Kids is STUNNING and only requires a few art materials that you might already have in your art closet. Pair this beauty with a unit study on India for a rounded out homeschool lesson.

Clare’s Primary School holds a show of student work every two years. I blogged about the 2010 show here. The 2012 Student’s Art Show was just as impressive. From the flyer that accomp…

Check out Sarah4980's artwork on Artsonia, the largest student art museum on the web. Don't forget to join the fan club and leave a comment on the website.

Since 1993, thousands of local, national and international collectors, designers and businesses have taken inspiration and resource from Material Culture’s vast and constantly changing inventory of one of a kind items for their home, garden, commercial, and special design projects. Material Culture offers the rarest of combinations: a 60,000 square foot emporium of art, antiques,

Learn to make tapa or siapo cloth

Lined pojagi is actually quite easy to do. In rough Korean, this stitch is called “gim chim zhiel”. Seam allowances are not finished since the finished product is lined with another p…

Feelin' Frida-ish Monday: I have a coupla after school art clubs, in those small groups, we have the most enlightening convos. One girl asked, "We learn about men artists a lot. Aren't there any girl artists?" I had already been thinking about how I'd like to introduce more contemporary artists next year (this guy does it all the time and has me inspired) but now I know that more female artists need to be thrown into the mix. So! What contemporary/female artists do you introduce in your art room? dress: thrift store; necklaces: Forever39, ahem, 21; belt: Anthropologie; tights: Target; boots: Seychelles I don't know what life is like on your end of the world but I'm sure it's crazy-busy. Especially if you are a teacher. End-of-the-school-year projects to wrap up, mountains of artwork to sort for our school-wide art show, let's-get-rid-of-this-stuff spring cleaning, the list grows by the day. So this week, I thought I'd share with you just some of the things we've been working on in the art room. Complete lessons on this here blog to come, but for now, you'll have to savor these sneak-peaks. AND, just so's ya know, Wednesday, April 30th is the LAST CALL FOR THE BEST DRESSED ART TEACHER CONTEST! Yes, I'm shouting at you, that's how excited I am! So many of you awesome art teachers have sent me snaps that left me rolling in laughter (which is a good thing, I swear! Ya'll are the best!). What's the Best Dressed Art Teacher Contest, you ask? Well, here's the details: Nominate yourself or an art teacher buddy! Simply send an email to me at [email protected] with a photo of your best artsy look. High resolution photos preferred, please. Please include a short bio about the art teacher and what inspired the look. Photos and bio will be shared on this blog on April 30th. Open voting on this blog will end on May 5th and the winner will be announced May 7th! The winner will receive a magical prize along with an interview on this blog. So! what are you waiting for? Shoot me an email, you crazy art teacher, you! So if I'm not found Buried Alive under the 400+ clay projects that the kids have created over the last coupla weeks, it'll be a miracle. These clay stars were created a couple months back. Our original intent was to glaze them and "sell" them back to our parents with the proceeds going to charity. However, due to some personal stuff, that had to get placed on the back burner. But now we're back! And I just knew I'd never be able to get 400+ stars glazed and fired along with all those projects. So I lurked the interwebs for a possible solution and saw something about coloring clay projects with crayons...(well, construction paper crayons were recommended but, in the state that my room is currently in, there was no finding mine)... We painted over them with watercolor paint (I asked that the kids pick just one color, por favor) and viola! Colorful and completed in a snap! More details about these stars and how they were created in an upcoming post. Bump-It Up Tuesday: So I had a hair appointment after school on Tuesday (not that you'd ever be able to tell I got my hair cut. I'm such a chicken, I always just get a couple inches taken off. So boring!). Once seated in the hair-cuttin-hot-seat, I proceeded to unravel the following from my 'do: 11 Bobby Pins, 2 Pink Bows and 1 Extra Large Bumpit. My hair dressers reaction, after regaining her thoughts, "Ohmigawd, IS THAT A BUMPIT?!" I live in the South, ya'll! It's Big Hair or Die! shoes, sweater and top: thrift store; skirt and belt: Pin Up Girl Clothing Speaking of clay projects...my 3rd graders created these Chinese-inspired clay dragons. Ya'll, this project was such a hit! I would easily do this again with all grade levels. The creativity was off the chain crazy! I can't wait for them to glaze them so I can share the easy-peasy lesson with you. Some of my 4th grade students created Panda's with Personality (oh boy, ya'll. Do they ever have personality!) while another group created Asian elephants inspired by the painted elephants in India. Many added jewelry, fabric and flowers to their elephants. I have a feeling these are going to be the most colorful elephants ever. So Stinkin' Tired Wednesday: Seriously. The end of the school year is near...and my work load only builds as I'm sure yours does as well. This photo was the only one I managed NOT to be yawning my head off in. dress: vintage, thrifted; tights: Target; shoes: Dolls by Nina After finishing off our clay projects, We Returned to Our Normally Scheduled Program, Already in Progress (said in that officially dorky voice). Which means my 4th graders added either bamboo, cherry blossom trees or pine trees to their large (12" X 18") watercolor painted backgrounds. Lesson to come, promise! What is Wrong with You, Thursday?!: Wow, this outfit was a let down to the folks, both big and small, in my school! The 4th grade decided that they had never seen me in "short shoes" (um, I'm guessing that means flats?!) and my librarian buddy dubbed this a "too normal" of an outfit. Humph! Time to get outta these Short Shoes and step up my Non-Normal game, I guess! top: Target; skirt: vintage, etsy; shoes: gift; headband: made by me; necklace: The Paper Source Meanwhile, in 3rd grade, we excitedly finished these Ming vase inspired still lives. We spent a long time on this project but learned so much...I'll be sharing this lesson later this week. Stay tuned, ya'll! Hittin' the Town, Friday: Almost everyday after school, there's something going on. Whether it's an art club or meeting up with buddies, I'm always running. I had decided that, with art show approaching, I should spend more after school time in my art room...but I just can't! Not with buddies that I need to chat and shop with. Tamara, thank you for snapping this photo at my happy place -- Anthropologie (where I walked out with a not-at-all-necessary $298 dress for $26, eeee!). dress: made by me (go here for the craziest food-processing-foot-cutting story everrr) My 1st grade friends made clay koi fish...and while those dry, they are creating these koinobori (Japanese for Carp Kite) for May 5th which is Children's Day in Japan. I actually picked up these die-cut paper fish years ago through Roylco and never got around to having the kids create them. This time it worked to be the perfect tie-in, as well as a super short project while our clay drys out. I'll share with you more about this project soon. Ah! So much to share with ya's!

Chinese Calligraphy Banners created by 3rd graders
