

Today I made two cards for two different challenges and they couldn't be more different ... The first one is for CAS-ual Friday's Challenge (CFC47 - "Let the Hunt Begin" - something you'd find in an Easter Basket). I used a digital stamp from Whimsie Doodles for the card below and had a lot of fun paper piecing the "peeps". Hope you like. "Hangin' with my peeps" Stamps: "Hangin with my peeps" (Whimsie Doodles Digital Stamps) Paper: Bashful Blue, Whisper White (SU!); assorted pastel patterned paper ($1 Store) Ink: Pink Pirouette Stampin' Write marker (SU!) Accessories & Tools: Tombow glue, 1/8" Certainly Celery Tafetta ribbon, 1/8" Baja Breeze Tafetta ribbon, glue dot, sticky strips, and adhesives I printed the digital stamp onto Whisper White cardstock. I ran it through again, printing four copies onto copy paper. I then taped pieces of different colored patterned paper over each image and ran it through the printer again. I cut out the chicks and glued them onto the Whisper White card front. I used the Pink Piroutte Stampin' Write marker to color in the hearts in the sentiment. I wrapped the two thin ribbons around the top of the card front and secured them at the back. I took a small piece of each ribbon and tied them together around the bands of ribbon that I had added to the card front; tying a half knot. I added a glue dot under the knot to hold it in place. I mounted the card front onto the card base of Bashful Blue cardstock. ____________________ For the second card, I made an asian-themed card for today's "Free For All" Challenge at SCS (F4A111 - Celebrate the Dragon). I used a retired stamp set from Stampin' Up! (sorry don't know the name), lent to me by my friend Frances. Hope you like. "Symbol of Love" Stamps: Name unknown (SU!) Paper: Basic Black, Gold, Soft Suede, Cherry Cobbler (SU!) Ink: Soft Suede, Basic Black (SU!) Accessories & Tools: Big Shot, Square Lattice embossing folder (Sizzix), Foral Screen embossing folder (Cuttlebug), Nestabilities Circles die-cuts, rubber brayer, adhesives, sticky strips, glue, and dimensionals I used the rubber brayer to add Soft Suede ink to the inside of the Floral Screen embossing folder, added a piece of Soft Suede cardstock and ran it through the Big Shot ... this is called faux letterpress technique. I cut out the embossed cardstock with my Nestabilities circle die-cut. I also cut out a circle frame from Basic Black cardstock. I ran the gold cardstock through my Big Shot with the Square Lattice embossing folder, then trimmed it to size. I cut two 1/8" strips of black cardstock and glued them on top of the gold embossed cardstock, trimming off any excess. I cut two more 1/8" strips of black cardstock and glued them to the front of the embossed circle, trimming off any excess. I mounted the black circle frame on top of the embossed circle. I mounted the gold embossed cardstock to the Basic Black card base. I mounted the framed circle to the card front, popping it up with dimensionals. I stamped the Japanese symbol for Love in Basic Black ink onto Cherry Cobbler cardstock and trimmed to small square. I mounted the symbol onto a thin frame of gold cardstock and then added to the card front, popping it up with dimensionals.

I am the most fortunate person to receive this beautiful card from my friend Gene L. who was visiting from Las Vegas. I can't tell you how b...

Here's a birthday card I put together for my bestest blogging pal, Patti of Creations By Patti blog. It's another box style card, but with windows on all four panels; I believe it's called a "Go Round Card". This is only the second time I've attempted this type of card (first one was for my daughter's birthday last year). And since I have yet to find a tutorial for this card, making this continues to be a "big experiment" for me. For Patti's card, I knew I had to go with her favorite Asian theme. I was inspired by shoji screen type table lamps like these... ...and decided I would use the delightful kokeshi dolls from the books by Annelore Parot to adorn her card. Here's a view of the first two panels: And the next two panels: The box panels with windows were created in MTC by joining and welding rectangles, ovals and fancy label shapes together. MTC also rendered the kokeshi and panda images into cutting files which were cut using a Silhouette Cameo. Here's Michiko and Emi.... ...Yumi and Aoki.... ...and of course little panda. I used a Quickutz die to cut the branches and sakura blossoms are cut from Punch Bunch and Carl punches. A 1/16-inch EK circle punch was used for the flower centers. Kokeshi faces were cut from white cardstock and colored with Copics; and kimonos were cut from digitized washi paper. Here's a peek at the bottom of the box which shows how the struts that hold each kokeshi doll in place are adhered to the inside of the box. As you can see, the construction is very similar to the struts inside the very popular "Card In A Box" type card except the struts on this card run parallel to the four sides and are adhered to each other as well as to the inside of the box. And finally, here's the card flattened, which needed a box type envelope about a half inch in depth to fit in. I have to admit it took me quite awhile to finish this card. Though it was quite challenging and fun, I don't think I'll have the time or patience to do this card too often. I guess you could say this was a one of a kind card for my one of a kind very, very special friend!

How to make origami envelopes from Newspaper. Then decorate with pens, paint, washi tape or stickers! So much fun. A great Newspaper DIY

This is a nature weaving lesson I found on the Crayola website (they have lesson plans!) called "Weaves of Gold". which I've modified a bit. You essentially paint some paper, then paint the underside of leaves to create leaf prints, then weave twigs or grasses through the painted paper. So we started off with a sheet of heavy/sturdy white paper. Fold it in half both ways so you have 4 equal sections. Paint the sections whatever colours you like. We used tempera cakes. Any paint will work. Gather some interesting leaves of various shapes and sizes; make sure they have strong veins on the backside, otherwise you won't get a decent print off of it. Paint the underside of the leaves with a thin, even coat of paint- we just used tempera and it worked fine. Just make sure the paint is not watery. You want it nice and opaque. Have students practice on scrap paper first until they get the hang of it. I like to use black for the dramatic contrast, but students chose whatever colours they liked. Make a leaf print in each section. I encourage the students to keep it fairly symmetrical or at least have the opposite sections match. Let this paper dry. Once it's dry, fold it in half and cut some thin strips through it. I draw a line across the top, about 3 cm thick, that I don't cut through. This keeps the paper all together. You can measure the strips with a ruler or not- it's up to you. It doesn't have to be perfect. The thinner the strips, the longer it takes to weave, FYI. For the nature weaving part, I gathered some long, dry grasses (I think they're decorative landscaping grasses) that were outside the school. You could have the students gather twigs or grasses outside as well, of course. We used about 15 'blades' of grass (weeds?) per artwork. You may need to cut them down to be just slightly longer than the width of your paper. Then weave the grass through the paper: over, under, over, under and alternate for the next row. After it's finished, we paint the back with white glue for extra strength and to keep the grasses all in place. You can trim off any ends that are too long or leave it au natural. Here are some Grade 7 results. Ta da! See my newest version of this lesson HERE.

I'm sharing with you today what I consider the most fabulous handmade birthday card I have ever received in my life. And without a doubt, this incredible cascade card was created by my very special and talented friend Patti, of Creations By Patti. I've had my eye on, and pinned what I thought were some really pretty cascade cards on my Pinterest board for quite awhile now, with the hope that I'd like to try one someday...but none of them even come close to being as clever and elaborate as this one. Woo Hoo! You can just imagine how excited I was to receive this stunningly beautiful card from Patti during our last visit to the Bay area. Here's a view from the top of the card at a different angle to show all the intricate attention to detail that went into putting this card together...each piece of the red traditional torii gate, the Japanese girl, her kimono and teapot... every bamboo stem, each leaf, painstakingly inked and pieced together to create this very special one of a kind card. You can find links to all the different svg cut files and learn about the techniques Patti used to create this little masterpiece by visiting her blog here. And while you're there, be sure to check out all the rest of her beautiful creations, guaranteed to amaze and inspire you to no end!

Print This CraftWatch the Olympics with your own easy to make Asian hat. Related posts:

Here are wonderful free patterns for Asian Inspired quilts! In the list below, you will see free patterns for quilts with kimonos, pagodas,...

Let yourself be inspired by my unique and lovely designs, that hopefully will unleash your unlimited creativity! These really beautiful clipart images are perfect for any crafting project that comes to your mind. You can easily use them for any Print-On-Demand products like mugs, posters and other wall art, clothing, … Maybe you are searching for a nice aesthetic addition for your digital planners, wedding- or birthday invitations, greeting cards, for scrapbooking and any other mixed media project, or you need them for some paper crafts for your kids! So don’t hesitate, add them to your digital craft stash today and start crafting! But please note that those are images with a white background. Further information below. _____________________________________ Each image showcases a pretty fancy looking asian vase filled with awesome alluring either white-violet or orange orchids. 5 of them even got some butterfly flying by :0. Every vase has a unique design and slightly different shape. In my personal opinion, these cliparts are particularly well suited for any craftings aiming on mothers day or a wedding! ;) WHAT YOU RECEIVE - 10 High Quality JPG’s - All file sizes are about 4096x4096 pixels (approximately 42x42 inches) - Each image comes with a resolution 300 DPI (high resolution) - Of course, you will get watermark free versions of the files! Because I haven’t found a promising way to remove the background of the images without losses in quality of the images, I decided to just upload them with their original white background. You are free to remove the background by yourself, or you can message me if you want to buy this set with a transparent background, but there may be slight loss in the quality since it is hard to remove the background since most of my designs are in a watercolor style, which leads to half transparent stains that may be unwanted for your prints. TERMS OF USE All the products I offer in may store can be used both for commercial and for personal purposes BUT you commercially only as finished physical products. You are NOT ALLOWED to… - Sell, share, or redistribute the graphics in their original format - Use the graphics to make clip art, digital paper, or any other digital design resource You CAN… - Use them, modified or without changes, to create own physical product or for Print-On-Demand like for T-Shirts, mugs, caps…) - Use them for any digital finished end product where you put your own creative effort into, so that it is your own design with unequivocally changes made Purchasing an item does not transfer copyright. If you’re not sure about your intended use, please send me a message! HOW TO DOWNLOAD YOUR FILES Normally you will be automatically redirected to the download immediately after the purchase. If this doesn’t happen you can either go to the “You” tab of your Etsy account and then go to “Purchases and Reviews” where you can select “Download Files” and be able to download the files. Or you can check your E-Mails where Etsy will send you a mail containing a link to the download. If you didn’t get a mail, check your spam inbox etc. If you are currently on the Etsy app, you won’t be able to download the file here, so you need to go to your E-Mails. You could also go to the item’s listing page, where there will be a “Instant Download” message on the images of the item. Notice that if the payment hasn’t fully processed yes, you can’t use the “Download Files” button yet and have to wait for it to be processed. RETURNS AND EXCHANGES Since this is a digital download item (you won’t receive a physical product) I can obviously not provide for any returns, refunds, exchanges and cancellations. Make sure to read the description profoundly so that you exactly know what to expect from your order. You will get what you can read in this description. If you have any questions about the product or difficulties with the download, please feel free to contact me. QUESTIONS/FAQ Please check out the FAQ section of my shop. I try to answer most of the questions that may occur directly in this description or via the FAQ section of this shop, so please feel free to check out the FAQ before messaging me. You can find a FAQ drop down tab under the description as well as at the very bottom of the main/listings page of my shop. But if there are any questions left, please don’t hesitate to get in touch with me and write a message here on Etsy. I’m always available and happy to help! _____________________________________ Nevertheless, I feel really honored, that you found my store beneath all the competition here on Etsy. I hope I can satisfy your wishes with this or any other listing in my shop. And you haven’t found one yet, maybe consider coming back later since I am constantly uploading new listings every day! So don’t be too shy to look for something unique and new you may like and need for your digital crafting projects. And if there are any requests and design ideas you would like to see in my shop, you can of course contact me! And really much thank you in advance for any purchase you made or will make! It means a lot to me and helps me to advance many of my projects and dreams in my life! So again, thank you. Here are some similar items you may also like: https://www.etsy.com/de/listing/1459875544 https://www.etsy.com/de/listing/1473205639

Crispy, crunchy, spicy and sweet, the Sticky Sesame Cauliflower is as Asian as it can get. And it leaves you smiling in deep satisfaction.

Here is the Asian Garden Gate - Serenity Version so far. Still has some pages to go and some details to complete but this gives you an idea of what it will look like. I will post more photo's when it is finished. The album slips down inside the Gate frame. The Mini album cover opens like a Shoji screen. The Kimono has small tags in the sleeves (which fold in when the book is closed) and inside the neckline. Each page has 4 matte size tags. I will also post photo's of the Flower Garden Version when I have it ready. The pattern (which should be ready and available to everyone by Saturday) will have both versions.

Hi! So I am telling myself not to be too lazy this summer because before you know it, it'll be Christmas! These days are going by so fast. I want to try to do something creative everyday. I hope I can keep up with that goal. The other day I finished up 9 more little Year of the Sheep calendars using Sister Stamps Sheep stamp. I think I shared one before so I didn't photograph the set I just made. Yesterday and today I stamped up Sister Stamps Miyako and just had fun coloring her up. Now that I have less DT commitments I have more time to just create whatever I feel like! I kind of missed that. So here are the 4 I colored up. I tried to use colors that I don't use too often for kimonos. I think mostly I pick pink! Miyako is such a cute stamp! And I have a plan for her to go on some calendars along with a cute saying I found on the internet. Yup, she's not just for Valentine's Day! I also started coloring up Yoichi because my middle guy is taking Taiko for the summer and I want to make a couple of thank you cards for his teachers. I hope you have a great 4th of July! We're gonna be different and bake a turkey tomorrow instead of grilling. Thanks so much for stopping by!

OK, here's my second attempt. I like this one better. The ribbons are coming out of the two little holes made by my die cutter which help ...

I needed a birthday card for a boy who is very much into LEGO Ninjagos. One of his favorite figures is SENSEI WU, so I decided that's what needs to be on the card. This was my inspiration: And here is what the card looks like:

These Thailand crafts for kids are perfect for celebrating Thailand Constitution Day and King Bhumibol's birthday - both of which are in December!

Buy Spiral Snake Mobiles at Baker Ross. Create ’sssssuper’ hanging decorations! Pre-printed card mobiles to colour in with our fibre pens or Deco pens, and then hang for ’sssstunning’ effects! 2 assorted. Size approx. 30cm when han

Hello everyone, Card using Tattered Lace and Carnation Crafts dies. I did`nt want to over decorate the stunning lace work in these panels, I thought these beautiful dies by Carnation Crafts perfect. Main Card shape..Hard to get hold of! like gold dust! Tattered Lace ..Screen Card Die.. I have cut with White Pearlescent A4 card. Carnation Crafts ..Beneath The Cherry Blossom.. Tree Peony..Coming Home..& Cherry Blossom. Birthday Wishes, by Phil Martin. Folds for posting. Beneath The Cherry Blossom collection. Here Tree Peony..Here Coming Home..Here Cherry Blossom..in the die set..Here Thank you for stopping by Pam xxx
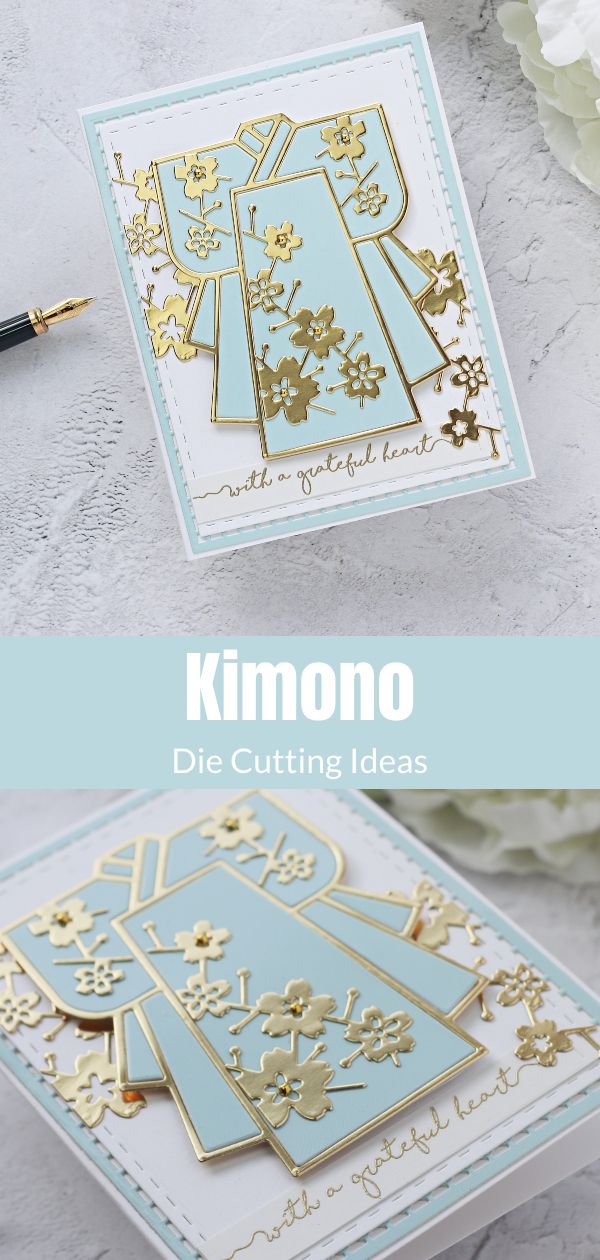
Hi everyone, Today I’m taking part in a new Spellbinders release!!! Spellbinders will be releasing new products on the 10th of every month and in addition to the new product, they are also selling a Project Kit to celebrate the launch. They have gathered some of the new products and created a fun crafting kit just ... Read More about New Cutting Edge Project Kit by Spellbinders | Kimono and Kaleidoscope Tile

Facebook Twitter LinkedIn Email Copy Link More Paper origami Japanese dolls represent the epitome of Japanese finesse and culture. The detail, ranging from the multi-step processes in which each doll is created and loving folded, to the wonderfully decorated special origami paper used for it’s kimono and the deep black crepe paper used for it’s […]

Now here is another fun card. I love cards that have movement. This waterfall card is a little different from the ones made with that strip ...

Here's a card I finally got to make. It was a surprise to me how much was involved. The original card is a "Secret Door" technique shown by...

Between Passover tonight and Easter on Sunday, I suspect a whole lot of people will be getting out the fancy china this weekend. So, if anyone out there needs a last minute way to gussy up the holiday table, magnolia napkin rings are a heckuva nifty option. I don’t even like napkin rings, but these...Read More

Color this easy pagoda drawing with water based markers, brush with water, and you have a lovely “watercolor looking” painting.
