

Colourful collage elephant inspired by the book Elmer by David Mckee.

An adorable crochet elephant pattern: meet Elsie the amigurumi Elephant! Elsie is a great stuffed animal for children.

This cute mini elephant by Supergurumi is easy and quick to crochet and is perfect as a little cuddle buddy, gift or key chain #amigurumi #crochet

Free amigurumi patterns... On our blog, you can find great ideas, tutorials and crochet step-by-step tutorials about amigurumi elephant. You will not have a hard time crocheting Amigurumi free crochet patterns.
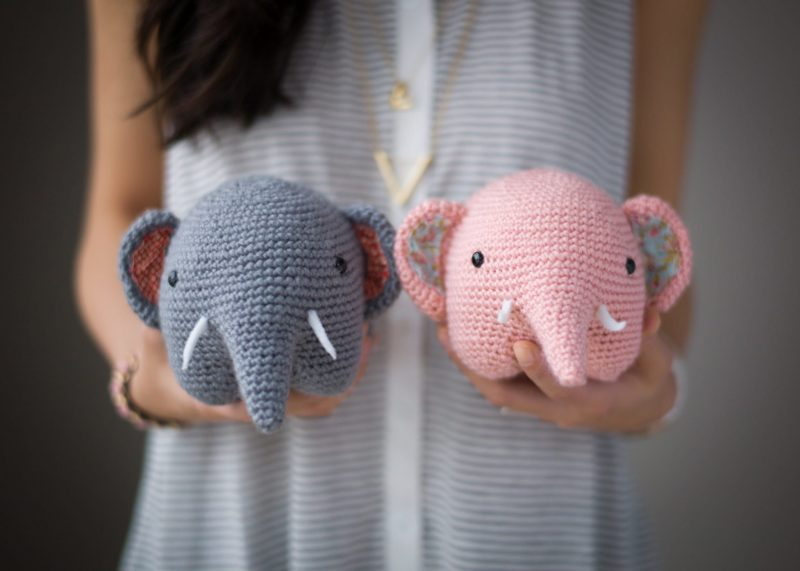
Crochet these absolutely adorable, whimsical elephants with a brilliant amigurumi technique that requires minimal attaching. Make them in a multitude of colours and add some fabric lining to the ears…

Amigurumi free patterns and step-by-step crochet tutorials... One of the free amigurumi sew designs we will share today is the amigurumi elephant. You can figure out how to sew these elephant utilizing the free amigurumi design.

Use one of free crochet elephant pattern to bring fortune to your home with this cute amigurumi. Admire the best elephant crochet patterns.

Crochet isn't just for making blankets and scarves anymore. People all over the world are taking the art of crochet to the next level by creating life-size animals from yarn. Yes, you heard that right - people are crocheting life-size animals! Giant life-size crochet crocodileImagine walking into a room and seeing a giant elephant made ...

A crochet free pattern to make this cute palm sized amigurumi elephant. The written pattern comes with a video and lots of pictures to help you along.

Note: Gustav measures 12 cm approximately. Of course should you use a different yarn calling, measures will vary. Materials - 3.00 mm crochet hook - 100 % cotton yarn for a 3.00 mm hook - Tapestry needle - A pair of safety eyes - Polyfiber fill Colors - One color for the body of your elephant - A bit of white for the tusks - A main color and a contrasting one for the hat and the ball. Abbreviations st = stitch ch = chain stitch slst = slip stitch sc = single crochet increase = 2 sc in one same st decrease = 1 sc joining 2 stitches Ready? Trunk (Using the color of the body...) 1. Start with a magic ring of 6 sc 2. to 4. Crochet 6 sc 5. Crochet *2 sc in each st*, repeat * (12) 6. to 8. Crochet 12 sc 9. Crochet 6 increases and then 6 sc (18) 10. to 12. Crochet 18 sc 13. Crochet *2 sc, 2 sc in the next st*, repeat * (24) 14. Crochet 24 sc 15. Crochet *3 sc, 2 sc in the next st*, repeat * (30) 16. Crochet 30 sc 17. Crochet *4 sc, 2 sc in the next st*, repeat * (36) 18. Crochet 36 sc Close and break the yarn Legs (Make 3, using the color of the body...) 1. Start with a magic ring of 6 sc 2. Crochet *2 sc in each st*, repeat * (12) 3. Crochet *1 sc, 2 sc in the next st*, repeat * (18) 4. Only through back loops, crochet 18 sc 5. to 7. Crochet 18 sc Close and break the yarn Now crochet a fourth leg (steps 1 to 7) but this time DO NOT BREAK THE YARN!!!!!!! 8. Join the leg you've just crocheted with one (2nd leg) of the three legs you did before, with a sc. Now crochet 14 sc along the second leg and then join the third one. Crochet 14 sc along the third leg and join the fourth one with a sc. Crochet 14 sc along the fourth leg and join the first one. Crochet 14 sc along the first leg. (In total you'll have 56 sc) STOP! Cut the yarn but do not close. We will take over from here soon. Now we'll work around the gap in the middle of the 4 legs. 1. We have 4 stitches on each leg. Join the yarn in one of them (preferably in one of the ends) and crochet 4 sc on that leg (these are the 4 stitches left of the 18 sts of each leg). Go to the next leg and crochet 4 sc on that one. Repeat with the 2 more legs left. Total: 16 sc. 2. Crochet another round of 16 sc 3. Crochet 8 decreases (8) 4. Crochet 4 decreases (4) Break the yarn and close. Now we will continue with the body where we left before. Join the gray yarn again... 9. Crochet *2 sc in the next st, 13 sc*, repeat * (60) 10. Crochet *9 sc, 2 sc in the next s*, repeat * (66) 11. to 13. Crochet 66 sc 14. Crochet *9 sc, one decrease,* repeat * (60) 15. to 19. Crochet 60 sc 20. Make sure to be in the middle of two front legs. If you are not there, crochet the necessary sc to reach that point. Place a stitch marker. This will be the beginning of the following rounds. Crochet 24 sc, then take the trunk and crochet together 12 stitches of the trunk with 12 stitches of the body with sc (12). Then crochet 24 sc in the remaining part of the body, till you reach the stitch marker. 21. Crochet 24 sc, then 24 sc on the trunk (these are the stitches you left untouched before) and then go one with 24 sc (72) 22. Crochet *10 sc, 1 decrease*, repeat * (66) 23. a 24. Crochet 66 sc 25. Crochet *9 sc, 1 decrease*, repeat * (60) 26. Crochet 60 sc 27. Crochet *8 sc, 1 decrease*, repeat * (54) 28. Crochet 54 sc 29. Crochet *7 sc, 1 decrease*, repeat * (48) 30. Crochet *6sc, 1 decrease*, repeat * (42) {Place safety eyes and stuff firmly...} 31. Crochet *5 sc, 1 decrease*, repeat * (36) 32. Crochet *4 sc, 1 decrease*, repeat * (30) 33. Crochet *3 sc, 1 decrease*, repeat * (24) 34. Crochet *2 sc, 1 decrease*, repeat * (18) {Stuff a bit more...} 35. Crochet *1 sc, 1 decrease*, repeat * (12) 36. Crochet 6 decreases Close and break the yarn. Weave in ends. Ears (Make 2, using the color of the body...) 1. Chain 2. In the 2nd chain from hook, crochet 4 sc. Ch 1 and turn. 2. Crochet *2 sc in each st*, repeat * (8). Ch 1 and turn. 3. Crochet *1 sc, 2 sc in the next st*, repeat * (12). Ch 1 and turn. 4. Crochet *2 sc, 2 sc in the next st*, repeat * (16). Ch 1 and turn. 5. Crochet *3 sc, 2 sc in the next st*, repeat * (20). Ch 1 and turn. 6. Crochet *4 sc, 2 sc in the next st*, repeat * (24). Ch 1 and turn. 7. Crochet 24 slst Close and break the yarn, leaving a long tail to sew to body. Tusks (Make 2, using white...) 1. Start with a magic ring of 5 sc 2. to 3. Crochet 5 sc Close and break the yarn, leaving a long tail to sew to body. Tail (Using the color of the body...) 1. Leaving a long tail, chain 9 2. In the second chain from hook, crochet 4 sc 3. Crochet *2 sc in each st*, repeat * (8) 4. Crochet 8 sc 5. Crochet 4 decreases (4) Close and break the yarn. Weave in ends. We will sew it to the body using the long tail we left at the beginning... Cone-cap (You can use two different colours or just one...) 1. Start with a magic ring of 6 sc 2. Crochet 6 sc 3. Crochet *2 sc in each st*, repeat * (12) 4. to 5. Crochet 12 sc 6. Crochet *1 sc, 2 sc in the next st*, repeat * (18) 7. to 8. Crochet 18 sc 9. If you'll want to make a white edge to the cap, now it's the time to do the color change. Crochet *2 sc, 2 sc in the next st*, repeat * (24) 10. Crochet *3 sc, 2 sc in the next st*, repeat * (30) Close and break the yarn, leaving a long tail to sew to body. Make a pompom and tie it to the tip... Ball (Use two colours and make two rounds with each one...) 1. Start with a magic ring of 6 sc 2. Crochet *2 sc in each st*, repeat * (12) 3. Crochet *1 sc, 2 sc in the next st*, repeat * (18) 4. Crochet *2 sc, 2 sc in the next st*, repeat * (24) 5. Crochet *3 sc, 2 sc in the next st*, repeat * (30) 6. Crochet *4 sc, 2 sc in the next st*, repeat * (36) 7. Crochet *5 sc, 2 sc in the next st*, repeat * (42) 8. to 16. Crochet 42 sc 17. Crochet *5 sc, 1 decrease*, repeat * (36) 18. Crochet *4 sc, 1 decrease*, repeat * (30) 19. Crochet *3 sc, 1 decrease*, repeat * (24) 20. Crochet *2 sc, 1 decrease*, repeat * (18) {Stuff firmly...} 21. Crochet *1 sc, 1 decrease*, repeat * (12) 22. Crochet 6 decreases (6) Close and break the yarn. Weave in ends. Assembly - Stuff the cap and sew it to Gustav's head, a bit to the side... - Sew the ears - Sew the tusks - Sew tail to body That's it!!! You are done!!!! Congratulations!! © 2016 - Gustav, the balancing elephant, is a design by Carla Mitrani for {Amour Fou} – All rights reserved. This pattern is for personal use ONLY. This pattern or parts of it must not be reproduced or published (printed or online), altered, resold or used for commercial purposes without authorization. You can neither reproduce, publish, alter, sell or use for commercial purposes FINISHED DOLLS made with this pattern without authorization. Thank you!

Free amigurumi patterns... You can find interesting ideas, tutorials and crochet tutorials about amigurumi elephant here. Lots of amigurumi free crochet patterns are waiting for you.

A crochet free pattern to make this cute palm sized amigurumi elephant. The written pattern comes with a video and lots of pictures to help you along.

A crochet free pattern to make this cute palm sized amigurumi elephant. The written pattern comes with a video and lots of pictures to help you along.

Learn how to create this elephant Amigurumi with this free elephant crochet pattern. This is an easy to crochet pattern, great for beginners.

Check out this adorable elephant pattern. I can't believe it's free!

This two week Cambodia itinerary aims to show you the very best of the , with a mix of temples, nature and islands!

Stunning Wall Hanging Free Crochet Patterns & Paid

I had originally intended to make a different kind of card today, but it required too many precise lines, so I looked around for som...

This great elephant pattern is a free PDF download on Deramores.com Check out the other Elephants in this directory.

We are so lucky here at Birch Fabrics, to be able to partner with some very talented ladies from the crafting community. Here we have an Elephant Plushie Pattern and Tutorial by Christina McKinney, a creative contributor to our Birch Fabrics blog, momma, photographer, and all around awesome person! Check out her adorable pattern and tute! .......................................................................................................................... I’m so excited to share this fun tutorial with you!! Growing up, my mom collected elephants - so I have always loved them. These make great little snuggle buddies for little ones or decorations for a nursery. And since they come together so quickly, they make great gifts. The pattern is available in two sizes, large and small - so you can make one, or a whole little family of them! Tips: Use a 1/4in seam allowance throughout. Read your pattern pieces BEFORE cutting, two of them require you to add a seam allowance along one edge. Pinning will really help keep seams matched up, but I DO NOT recommend sewing over pins! Press all your pieces well before and during sewing. Supplies needed: 1 fat quarter in main fabric print 1 fat quarter in contrast fabric scrap piece of iron on interfacing polyfil stuffing Printed pattern pieces PRINT PATTERN PIECES HERE! Fabric Shown: From Just For Fun Collection and Mod Basics 2 by Jay-Cyn Designs for Birch Fabrics Organic. You need to add a seam allowance to a couple pieces. I don’t measure them exactly, eyeballing it is just fine! This is how mine are pinned - about 1/2 in between - then I just cut up the middle. (My fabric here is folded wrong sides together, so I’m cutting both the left and right pieces at the same time. I recommend doing this to keep the pieces exact.) They should end up looking like this: So, once everything is cut, you’re ready to go! First, start with sewing each set of ears. Take two and put them right sides together. You’re going to sew just the curved edge, leaving the straight side open for turning. Repeat with second set of ear pieces. Turn your ears right side out and press. Using your pattern piece as a guide, place one ear on one of the main body pieces. The raw edge of the ear will lay against the raw edge of the body piece. Lay the corresponding face piece on top, sandwiching the ear in between. Pin in place and sew along the straight edge. Repeat this step with the second ear, face, & body pieces. Press your seam toward the elephants trunk. (It should naturally face that way when you flip the ear back.) Using your face pattern piece as a guide, line up where your eye will be, and iron on your interfacing piece. Just as a side note, there are a couple options for the eye. I use a stitch on my machine that just happens to look a little like an oval: You could also stitch an eye by hand, or leave it off entirely. I strongly recommend the interfacing if it’s machine or hand stitched - otherwise the fabric could tear. (Since these are meant for little ones, I would avoid button eyes.) Once I have the interfacing in place, I like to mark a small dot on the front where the top of my stitched eye will start. This helps keep things even! Once the eye is stitched, I pull the top and bottom threads from the front to the back and tie a small knot. Since reversing/securing the stitch isn’t an option with decorative stitches, I do this to make sure it doesn’t pull out over time. Then snip your threads The front should look something like this: Now, you need to stitch up your little tail piece. ***Quick note in regard to sewing this in the smaller size. I still cut the tail piece the same size and sew it the same way. I just shorten it when I’m finished.*** Fold over and press each long edge 1/4in. Fold in half and press Sew along the open side, staying close to the edge, but making sure you catch both sides. As close as you can to one end, tie a small knot for decoration. Using your pattern piece for placement, lay your tail piece in place and pin. Keep in mind that the tail will hang whatever direction you stitch it. So, decide if you want it angled up or down and place it accordingly. Leave about 1/4 inch out, just to make sure it gets caught in the seam correctly. Lay your second body piece on top, matching up all the edges and seams. Pin in place. You’ll need to decide what edge to leave open for turning and stitching. A straight edge is ideal for this - much easier to sew up once you’re done. Mark your start and stop points with double needles or different colored pins. Stitch around the edge taking care to follow all the curves. Take your time! Be sure to secure your start and stop stitches near the opening so it doesn’t unravel when you turn it right side out. Before turning, snip the inner and outer curves. BE CAREFUL and don’t snip through your stitches!! The inner and outer edges of the trunk and belly are the most important curves to cut. (Though I tend to just snip almost the whole way around. It goes a long way in helping things lay correctly when turned.) Turn right side out, poking out all the rounded edges and corners. I use a chopstick for this, it’s perfect!! (I don’t know about y’all, but I always have more than a few of those laying around! Take out anyone?) Once all your seams are pressed, you can start stuffing! I like to take small pieces of filling and push them into the trunk first. I then use the chopstick to poke filling into all the nooks and crannies. Fill to your desired firmness. (I recommend less filling if it’s meant for very little ones. Far easier for them to hold on to!) Once you’re happy with the filling amount, sew up the opening with a blind stitch. And you’re done! See? EASY! All Photography and Pattern-work by Christina McKinney, for personal use only. Not to be duplicated or sold. Please check out Christina McKinney's photography page on Facebook!

Easy Flat Knit Plush Elephant Free Knitting Pattern

DIY Fabric Elephant Toy Free Sewing Patterns & Tutorials

Create a cute elephant keychain with this easy crochet amigurumi Idea - perfect for gifts and quick crafts!

With their long trunks, big ears, and loping way of walking around, there's something fascinating about elephants. Whether you're looking for something to help you remember, or you have a stuffed mouse looking for something to frighten, here are my favourite stuffed elephant sewing patterns: Elephant toy

----------------------------------------------------------------------------------- How to attach legs to a soft toy for sitting --------...

After more than 11 years offering this pattern for free. The pattern is no longer available from my blog, it will soon be offered in my Etsy shop at xoxoGrandma for only $1.35. Chunky Little Elephant Toy is a fun project with complete tutorial. Happy elephant herd making! xoxo Grandma

Love elephants and pretty much anything with an elephant on it? If so, then this list of adorable Crochet Elephant Patterns will make you really happy!

I was commissioned by W A X partnership in Calgary to illustrate an elephant for the DIGINEG logotype. Here are some of the sketches: --------------------- And this is the final result:

Amigurumi free patterns and step-by-step crochet tutorials... One of the free amigurumi crochet patterns we will share today is the amigurumi Ballerina Elephant, whose photos and design belong to @fatoscaorguler. You can learn how to crochet these elephant using the free amigurumi pattern.

------------------------------------------------------------- PATTERN DEAL Buy 4 get 1 free !! You can order any 4 pattern and get 1 free ... Please advise your choise when purchasing. ------------------------------------------------------------- The Baby Elephant is crocheted as one piece.You just need to sew the ears. Video tutorial included. This listing is for an amigurumi pattern, not the finished toy. The finished elephant is approximately 2.7" (7 cm) tall. Crochet pattern in pdf format, written in English, and emailed to you within 24 hours of your payment! Please feel free to contact me for any questions! Thank you for looking. --------------------------------------------------------------------------------------------------------------------- Do not (re)sell, including translations to other languages; do not redistribute, including publishing on the internet. You may feel free to sell the finished products on your local bazaar,craft fairs,etc. You are not allowed to sell them on the internet. Thank you! --------------------------------------------------------------------------------------------------------------------

DIY 3D Fabric Elephant Toy Comforter Free Sewing Patterns

Check out this adorable elephant pattern. I can't believe it's free!

I'm excited to release my new plush elephant sewing pattern! This pattern and tutorial comes with options for making a cuddly elephant holding a heart or blanket, making it the perfect gift for all ages! The PDF pattern provides easy to follow, step-by-step instructions with photos and links to video tutorials for some of the steps requiring

Is in session! I'm so excited to invite you to join me for an afternoon (or an evening) of softie making! I will be teaching my Elephant Softies pattern twice this month at the fabulous fabric shop, Let's Sew, August 22nd (5:30-8:30pm) and 24th (1-4pm). Let's Sew is in Evansville (southwestern Indiana). Tommy & Tilly Elephant is one of my easiest (and possibly, most fun) patterns, so if you are new to sewing and want to make your first pattern project, or if you are more experienced and want to spend a few hours of sewing and socializing in a gorgeous fabric shop, sign up by calling the store at 812- 471-7945. If you have any questions, please leave a comment below or e-mail me! The cost of the class is $35, and materials are not included, but you will receive a discount on the supplies and pattern when you have paid for your spot. I am so looking forward to meeting a few of you in person, I hope to see you there! Happy Stitching,
